
Are you frustrated with a leaky Moen kitchen faucet? You’re not alone.
Many homeowners face this issue, but the good news is there’s a simple fix. Changing the faucet cartridge can save you time, money, and water. Imagine the satisfaction of handling this repair yourself, knowing you’ve avoided an expensive plumber’s bill.
This guide will walk you through the process step-by-step, ensuring you can tackle the task with confidence. Ready to transform your kitchen faucet from a drip machine into a smooth operator? Dive in and discover just how easy it is to change your Moen kitchen faucet cartridge.
Credit: www.accio.com
Tools And Materials Needed
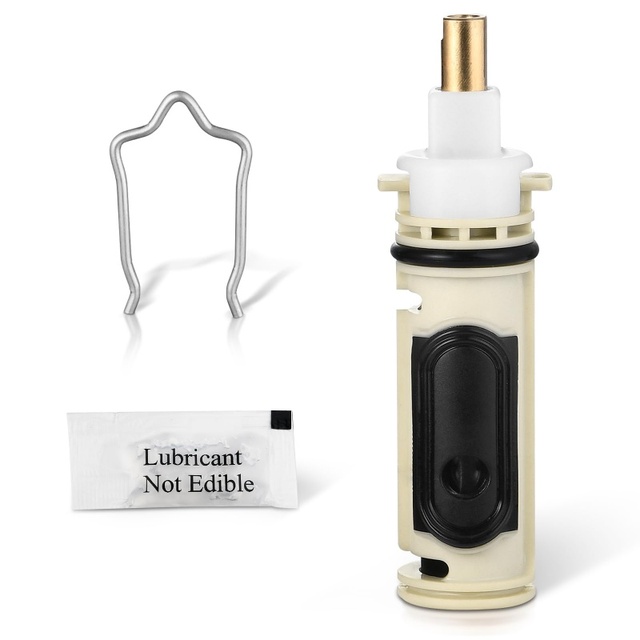
Gather essential tools and materials. You’ll need a screwdriver, adjustable wrench, and replacement Moen cartridge. Don’t forget pliers and a towel to catch drips.
Changing a Moen kitchen faucet cartridge might seem daunting at first. But with the right tools and materials, the process becomes much smoother. Before beginning this task, gather everything needed to ensure a seamless experience. Having all tools at hand prevents unnecessary delays.Tools Required
- Adjustable wrench: Essential for loosening and tightening nuts.
- Screwdriver: A Phillips or flat-head is useful for removing screws.
- Needle nose pliers: Helpful for gripping small parts.
- Allen wrench: Needed for hex screws on the faucet handle.
Materials Needed
- Replacement cartridge: Ensure it matches your Moen model.
- Plumber’s grease: Lubricates parts for easy assembly.
- Clean cloth: Keeps surfaces free from debris.
- Bowl or container: Collects any excess water during the process.
Preparing The Workspace
Preparing the workspace is crucial before changing a Moen kitchen faucet cartridge. Clear the area around the sink for easy access. Gather necessary tools like a wrench and screwdriver to ensure a smooth process.
Changing a Moen kitchen faucet cartridge might seem daunting at first, but preparing your workspace effectively can transform this task into a smooth operation. Before you dive into the nitty-gritty, it’s crucial to ensure your workspace is organized and safe. This preparation will not only streamline the process but also prevent any accidental mishaps.Clearing The Area
Begin by removing any clutter around your sink area. This includes dish soap, sponges, and any personal items that might obstruct your movement. Place them on a nearby countertop or shelf to keep them within reach but out of the way. Think about your space as a blank canvas; the fewer distractions, the more focus you’ll have on the task at hand. Have you ever tried fixing something only to knock over a bottle of detergent? Avoid these minor disasters by maintaining a clean and tidy area.Turning Off The Water Supply
Locate the water supply valves under your sink. You’ll typically find two valves, one for hot water and one for cold. Turn these valves clockwise until they’re completely shut off. This step is non-negotiable to avoid unwanted water spillage. Test your faucet by turning it on to ensure the water supply is indeed off. If you hear the water running, double-check the valves and tighten them further if necessary. Imagine the surprise of getting drenched mid-repair; a simple valve check can save you from a wet mess. By preparing your workspace efficiently, you set the stage for a hassle-free cartridge replacement. How do you usually get ready for home improvement tasks? Your insights could be the missing piece to someone else’s puzzle.Removing The Old Cartridge
Changing a Moen kitchen faucet cartridge might seem daunting, but with some guidance, it becomes a manageable task. Removing the old cartridge is the crucial first step. By following these steps, you’ll be on your way to a functional faucet in no time. Let’s delve into the process of detaching the handle, unscrewing the retaining nut, and extracting the cartridge.
Detaching The Handle
The handle is your gateway to accessing the cartridge. Begin by locating the screw that secures the handle. Often, it’s hidden under a decorative cap or behind the faucet. Use a screwdriver to gently remove the cap and unscrew the handle. If your faucet handle is particularly tight, a bit of elbow grease might be necessary. Remember, patience is your ally here.
Unscrewing The Retaining Nut
Once the handle is off, your next challenge is unscrewing the retaining nut. This nut keeps the cartridge securely in place. Use a wrench to turn the nut counterclockwise. If the nut feels stubborn, try spraying a bit of lubricant to ease the process. Are you feeling confident yet? This step is pivotal for freeing the cartridge.
Extracting The Cartridge
With the retaining nut removed, it’s time to extract the cartridge. Grasp the cartridge firmly and pull it straight out. If it resists, use a pair of pliers to give you a better grip. Sometimes, the cartridge can be stuck due to mineral build-up, but persistence pays off. Can you feel the satisfaction of progress? You’re one step closer to a fully functional faucet.
These steps are not only straightforward but also empowering. Next time your faucet needs fixing, you can confidently tackle the task and possibly save a few bucks in the process. Have you ever changed a cartridge before? Share your experience or tips in the comments below!

Credit: www.youtube.com
Installing The New Cartridge
Installing the New Cartridge Remove the old cartridge and clean the area. Insert the new Moen cartridge, aligning it correctly. Secure it by tightening the screws, ensuring a snug fit to prevent leaks. Reassemble the faucet, then turn on the water supply to test the installation.
Installing a new Moen kitchen faucet cartridge might seem daunting, but with a little guidance, you can have your faucet working like new in no time. Embrace the satisfaction of a DIY project as you follow these simple steps. A new cartridge can solve common faucet issues like leaks or inconsistent water flow.Aligning The Cartridge
Proper alignment is critical to ensure smooth operation. Make sure the cartridge’s tabs match the notches in the faucet body. This might require a bit of gentle rotation—don’t force it, as this could cause damage. Remember the old saying, “measure twice, cut once”? Here, it’s “align twice, fit once.” Taking the time to align correctly saves you from unnecessary hassle later.Securing The Retaining Nut
Once aligned, it’s time to secure everything in place. Use the retaining nut to lock the cartridge down. Hand-tighten it first to ensure it’s properly threaded, then use a wrench to snug it up. Be cautious not to overtighten. This could strip threads or crack the nut. How tight is tight enough? A good rule of thumb is to stop when you feel resistance.Reattaching The Handle
With the cartridge secured, reattach the handle. Line it up with the stem and push it into place. Fasten it with the screw you set aside earlier. Test the handle’s movement to ensure it rotates smoothly. Does it feel right? If not, you might need to adjust the handle position slightly. Completing this project not only fixes your faucet but also empowers you with newfound confidence in your DIY skills. Who knew a little cartridge could make such a difference?Testing The New Installation
Testing the new installation is crucial after replacing your Moen kitchen faucet cartridge. It ensures everything functions smoothly and there are no leaks. Let’s go through the steps to confirm your installation is successful.
Turning On The Water Supply
First, open the main water valves under the sink. Turn them counterclockwise to let water flow. Once the valves are open, turn on your faucet. Allow water to run for a few minutes. This clears any air pockets from the system.
Checking For Leaks
Inspect the area under the sink and around the faucet. Look for any signs of water leakage. Pay close attention to the cartridge area. Use a dry cloth to wipe around it. This helps spot any new drips or moisture easily. If leaks are present, re-tighten the connections. Make sure everything is properly sealed. If the issue persists, you may need to recheck the cartridge installation.
Troubleshooting Common Issues
Changing a Moen kitchen faucet cartridge can solve common issues like leaks or low water pressure. Begin by shutting off the water supply and removing the handle. Carefully extract the old cartridge, replace it with a new one, and reassemble the faucet to ensure proper function.
Changing a Moen kitchen faucet cartridge can sometimes be a straightforward task, but occasionally, you might encounter a few common issues. Understanding how to troubleshoot these problems can save you time and frustration. Let’s dive into some of the typical challenges you might face and how to resolve them effectively.Handle Tightness Problems
Is your faucet handle feeling unusually tight or difficult to move? This can often be due to debris or mineral build-up inside the cartridge. To fix this, remove the handle and check for any obstructions. Clean the area with a soft brush and ensure the cartridge is seated correctly. If the handle is still tight, consider lubricating the cartridge with a plumber’s grease. It’s a simple solution that can make a big difference.Water Pressure Fluctuations
Have you noticed changes in water pressure after replacing the cartridge? This issue might stem from improper installation or blockages within the cartridge itself. First, double-check that the cartridge is properly aligned and seated. Misalignment can cause inconsistent water flow. If alignment isn’t the issue, examine the cartridge for any debris or mineral deposits. Cleaning or replacing it might be necessary to restore optimal water pressure. — Remember, patience and attention to detail are key. By addressing these common issues, you’ll ensure your kitchen faucet functions smoothly, making your daily routines more convenient and efficient. Have you encountered any other issues with your faucet? Share your experiences and solutions with us!Maintenance Tips
Keeping your Moen kitchen faucet cartridge in top condition is essential. Regular maintenance helps prevent leaks and ensures smooth operation. Following these simple tips can extend the life of your faucet cartridge.
Regular Cleaning
Clean the faucet regularly to remove mineral deposits. Use a soft cloth and mild soap. Avoid abrasive cleaners that can damage the finish. Rinse thoroughly after cleaning. This prevents buildup and maintains functionality.
Checking For Wear And Tear
Inspect the cartridge periodically for signs of wear. Look for leaks or drips indicating damage. Replace the cartridge if you notice these issues. Proper checks ensure your faucet works efficiently. Early detection of problems saves time and money.

Credit: www.amazon.ca
Frequently Asked Questions
How To Stop Moen Kitchen Faucet From Dripping?
Fix a dripping Moen kitchen faucet by replacing the worn-out cartridge. Turn off water supply first. Remove the handle and unscrew the retaining nut. Replace the cartridge with a new one. Reassemble the faucet and turn on the water. Check for leaks to ensure the drip has stopped.
How To Replace A Single Handle Kitchen Faucet Cartridge?
Turn off water supply. Remove handle and retaining nut. Extract old cartridge. Install new cartridge. Reassemble faucet.
How Do I Identify My Moen Faucet Cartridge?
Identify your Moen faucet cartridge by checking the model number on the faucet. Find it on the spout, handle, or near the base. Refer to Moen’s website or manual for detailed identification. Also, consult Moen’s support for assistance.
What Is The First Step In Replacing A Cartridge In A Faucet?
Turn off the water supply to the faucet. This prevents any water flow during the replacement process.
Conclusion
Changing a Moen kitchen faucet cartridge is straightforward. Follow the steps carefully. Gather the necessary tools. Turn off the water supply first. Remove the old cartridge gently. Insert the new cartridge securely. Check for leaks after installation. Regular maintenance extends faucet life.
Save money by doing it yourself. Feel confident with your plumbing skills. Enjoy your smoothly functioning kitchen faucet. Happy fixing!