How to Fix Leaking Faucet in Kitchen: Quick Solutions
A leaking faucet in your kitchen can be more than just a minor annoyance. Those incessant drips not only waste water but can also hike up your utility bills, slowly driving up costs without you even realizing it.
You’re here because you’re ready to tackle this problem head-on and reclaim peace in your kitchen. Imagine the satisfaction of fixing it yourself, saving both money and resources. Ready to discover how you can stop the drip and restore tranquility to your home?
Let’s dive into the simple steps that will guide you to a leak-free kitchen faucet. Don’t miss out on these easy fixes that can make a big difference!
Identifying The Leak
Identifying the Leak Check where the water drips under the sink or around the faucet base. Listen for any dripping sounds. Look for moisture or water stains that indicate the source of the leak.
Identifying a leaking kitchen faucet is the first step toward resolving it. A leak can lead to wasted water and higher bills. Understanding the source of the leak helps you fix it efficiently. Often, leaks are due to worn-out parts or improper installation. By pinpointing the exact problem, you save time and avoid unnecessary repairs.Common Causes Of Faucet Leaks
– Worn-out washers can lead to constant dripping. – Damaged O-rings may cause leaks at the base. – Faulty seals often result in water puddles. – Loose parts can disrupt normal water flow. – Corrosion in valves often leads to leaks.Tools Needed For Inspection
– A flashlight helps locate hidden leaks. – Use adjustable wrenches for tight fittings. – Pliers assist in removing stubborn parts. – A screwdriver helps check screws and fittings. – Plumber’s tape ensures a tight seal after repairs.Turning Off Water Supply
Fixing a leaking faucet in your kitchen might seem daunting, but it’s a manageable task with the right guidance. The first step in the repair process is turning off your water supply. Doing this ensures you don’t end up with a flood in your kitchen while working on the faucet. Let’s dive into how you can effectively turn off the water supply, keeping your kitchen dry and safe.
Locating The Shut-off Valve
Your first challenge is finding the shut-off valve. It’s usually located under the sink, close to the wall. Look for a knob or lever attached to a pipe. If you’re unsure, trace the water line from the faucet back to where it connects to the wall. This should lead you right to the valve.
Consider how your home’s plumbing was set up. Older homes might have more intricate setups, making the valve harder to spot. Do you remember when you last checked your plumbing? If not, you might be in for a surprise. Take this opportunity to familiarize yourself with your kitchen’s plumbing system.
Ensuring Safe Water Shut-off
Once you’ve located the valve, it’s crucial to turn it off safely. Turn the valve clockwise until it’s snug, but avoid using excessive force. You don’t want to damage the valve or make it difficult to turn back on later.
Test your success by turning on the faucet. If no water flows, you’ve successfully shut off the supply. If water still trickles out, double-check the valve to ensure it’s tightly closed. Is your valve particularly stubborn? You might need to apply a bit of WD-40 to loosen it up.
Remember, handling the shut-off valve carefully is key. It’s the gatekeeper to your water supply, and damaging it could lead to more significant problems down the line.
Disassembling The Faucet
Disassembling the faucet is the first step to fix a leaking kitchen faucet. Turn off the water supply, then carefully remove the faucet handle and other components. This helps in identifying worn-out parts that might need replacement.
Disassembling the faucet is an essential step in fixing a leaking kitchen faucet. This process allows you to access the internal components that may be causing the leak. With a little patience and the right tools, you can easily disassemble your faucet and identify the problem areas. But before you dive in, remember that knowing how to properly remove the faucet handles and access the internal components is crucial.Removing Faucet Handles
To begin, ensure your water supply is shut off. It’s a simple precaution that can save you from unnecessary mess. Next, locate the screws holding the faucet handles. These are usually hidden under decorative caps. Use a flat-head screwdriver to gently pry off the cap, revealing the screws beneath. Once you have access, use an appropriate screwdriver to remove the screws. Keep them in a safe place, as losing them can be frustrating. With the screws removed, you should be able to lift the handles off easily. Do you know why this step is critical? Removing handles gives you access to the cartridge and other internal components, which are often the culprits behind leaks.Accessing Internal Components
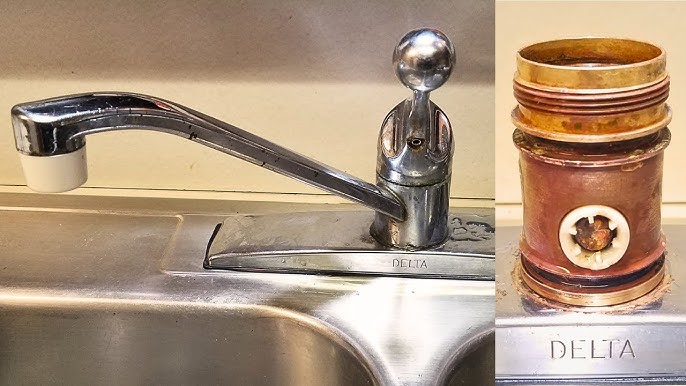
With the handles off, it’s time to access the heart of the faucet. You’ll likely see a metal retaining nut or clip holding the cartridge in place. Use a wrench or pliers to carefully remove these. As you pull out the cartridge, check for any visible signs of wear or damage. Sometimes a simple cleaning can do wonders, but often replacement is the best solution. Have you ever wondered why cartridges fail? Mineral buildup and wear over time are common reasons. Identifying these issues early can prevent bigger headaches down the line. Once you have the cartridge out, inspect the area for any debris or residue that might affect the new cartridge’s performance. Keep the area clean, and consider using a small brush or cloth to wipe it down. This ensures a snug fit when you reinstall the components. By understanding these steps, you empower yourself to take control of your kitchen repairs. Are you ready to tackle your faucet issues head-on?Replacing Damaged Parts
Replacing damaged parts in a kitchen faucet can stop leaks effectively. Identify the faulty components like washers or cartridges. Swap them with new ones to restore functionality and prevent further water damage.
Replacing damaged parts of a kitchen faucet can seem intimidating, but it’s often a straightforward process that can save you from a plumber’s bill. By focusing on the components most prone to wear and tear, you can tackle leaks with confidence. Let’s dive into identifying which parts need replacing and how to do it efficiently.Identifying Worn-out Washers
Start by turning off the water supply to your faucet to prevent any unexpected sprays. Remove the faucet handle using a screwdriver, then carefully take apart the valve assembly. You’ll likely find the washer at the bottom of the valve. Worn-out washers are a common culprit for leaks. Inspect the washer for cracks, tears, or signs of hardening. If the washer is damaged, replacing it is necessary. Simply remove the old washer and replace it with a new one of the same size and type.Changing O-rings And Seals
Leaky faucets can also result from worn-out O-rings and seals. These small, rubber components are crucial for preventing leaks around the faucet spout and handles. To change the O-rings, first, remove the faucet spout by unscrewing it from the base. You should see the O-ring seated at the base of the spout or handle. Replace the old O-ring with a new one, ensuring it fits snugly without being too tight. Seals are found in similar locations and can be changed in the same way. When replacing seals, ensure they are perfectly seated to prevent any water escape. Are you noticing any resistance when turning your faucet on and off? This could be a sign of worn seals. Replacing them might be just what you need for smooth operation. Taking these small but impactful steps not only fixes leaks but extends the life of your faucet. Have you ever fixed a faucet before? Share your story in the comments!Reassembling The Faucet
Tighten screws carefully while reassembling the faucet to stop leaks. Ensure each part fits snugly to prevent water drips. Test the faucet for smooth operation and leaks once reassembled.
Reassembling the faucet might feel like piecing together a puzzle, but with patience, you can restore its functionality. After dismantling and replacing faulty parts, this step brings everything back to its rightful place. Ensuring that each component is correctly reattached is key to stopping leaks and enjoying a drip-free kitchen.Reattaching Handles And Spouts
The handles and spout are the most visible parts of your faucet, and reattaching them correctly ensures smooth operation. Secure the handles by aligning them with the valve stem, ensuring the screw fits snugly. Tighten it using a screwdriver, but avoid over-tightening, which can cause wear. Next, position the spout over the faucet body. Slide it into place and secure it with any retaining nuts or clips. Remember, a secure fit prevents unwanted leaks and maintains water flow efficiency. Have you ever noticed how a slightly loose spout can cause irritating splashes? Avoid this by ensuring everything fits just right.Ensuring Proper Fit And Tightness
Once the major components are in place, it’s crucial to verify the fit and tightness of each part. Check the connections between the faucet body and the supply lines. Tighten these connections using a wrench, ensuring they’re secure but not excessively tight. A surprising trick is to run your fingers along the edges after assembly. This helps detect any irregularities or unevenness. A final test would be turning on the water to check for any leaks. How confident are you that everything is perfectly aligned? If the answer is less than certain, a quick recheck might save future headaches. Reassembling with care not only solves the current leak but also extends the life of your faucet. Every step counts towards building a robust and efficient kitchen fixture.
Credit: www.youtube.com
Testing For Leaks
Testing for leaks is vital in fixing a kitchen faucet. Identify the source by checking under the sink. Use a dry cloth to spot wet areas, ensuring no part is overlooked.
Testing for leaks is a crucial step after you’ve made adjustments to fix a leaking kitchen faucet. It’s the moment of truth where you find out if your hard work has paid off. This part of the process ensures everything is in working order and that no water is being wasted.Turning Water Supply Back On
Once you’ve tightened everything and replaced any faulty parts, it’s time to turn the water supply back on. Slowly twist the valve under the sink to let water flow back into the pipes. Doing this gradually helps to prevent any pressure surges that might cause further issues. Keep an eye out for any immediate signs of leakage. A steady flow is what you want, not a drip.Monitoring For Further Leakage
After turning the water supply back on, let the faucet run for a few minutes. Observe the area around the faucet and underneath the sink for any leaks. Use a dry cloth to wipe around the connections; this will help you spot even the smallest drips. Do you notice any persistent drips or dampness? If yes, you may need to revisit your repairs. Sometimes, a simple tightening or readjustment can do the trick. Remember, vigilance is key. Regularly check over the next few days to ensure the fix holds. This will save you from unexpected water bills and potential water damage.Preventative Measures
Regularly inspect faucet components to spot wear and tear. Clean aerators and replace worn washers promptly. Ensure proper installation and tighten loose parts to prevent leaks.
Preventative measures can save you from costly repairs and water damage. Keeping your kitchen faucet in top condition is essential. Regular maintenance and choosing quality parts are key. These steps help ensure your faucet remains leak-free.Regular Maintenance Tips
Regular upkeep prevents leaks and prolongs faucet life. Clean faucet aerators to remove debris. Debris causes reduced water flow and pressure. Inspect seals and washers for wear. Replace worn parts promptly to prevent leaks. Tighten loose nuts and bolts to avoid water seepage. Check for rust or mineral buildup. Use vinegar solution to clean stubborn deposits.Choosing Quality Faucet Parts
Quality parts ensure durability and prevent leaks. Opt for stainless steel or brass components. They resist corrosion better than plastic. Invest in high-grade washers and O-rings. These parts withstand wear and tear. Look for well-known brands with good reviews. Quality brands offer reliable products. Always consult product specifications. Ensure compatibility with your faucet model.
Credit: www.youtube.com

Credit: www.youtube.com
Frequently Asked Questions
How To Get A Kitchen Faucet To Stop Dripping?
Turn off the water supply and disassemble the faucet. Replace worn washers or seals. Reassemble the faucet carefully. Ensure all parts are tightened properly to prevent leaks. Regular maintenance can help avoid future drips.
Why Is The Inside Of My Kitchen Faucet Leaking?
Your kitchen faucet might leak due to worn-out washers, damaged O-rings, or loose connections. Mineral buildup can also cause leaks. Regular maintenance and timely replacement of parts can prevent such issues. Inspect the faucet to identify and resolve the specific problem, ensuring a drip-free kitchen experience.
What Is The Most Common Cause Of A Dripping Faucet?
The most common cause of a dripping faucet is a worn-out or damaged washer. Over time, washers can become stiff, torn, or dislodged, leading to leaks. Regular maintenance can prevent this issue and ensure a long-lasting faucet.
How Do I Fix A Leaky Faucet Myself?
Turn off the water supply. Remove the faucet handle using a wrench. Replace the faulty washer or O-ring. Reassemble the faucet and turn the water back on. Check for leaks.
Conclusion
Fixing a leaking kitchen faucet is easier than it seems. Follow the steps. Gather your tools. Identify the problem. Replace faulty parts. Test for leaks. Save water and money. Regular maintenance helps prevent future leaks. A little effort goes a long way.
Enjoy a drip-free kitchen. Share your success with friends. Encourage them to fix their faucets too. Feel proud of your DIY skills. Now, your kitchen is back to normal. Ready for cooking and cleaning. Keep your home in top shape.
Happy repairing!