
How to Install a Drop in Kitchen Sink: Easy Steps
Are you considering a kitchen upgrade and thinking about installing a new sink? A drop-in kitchen sink can be a great choice.
It’s a straightforward project that can transform the look and functionality of your kitchen. Whether you’re a seasoned DIY enthusiast or a beginner, installing a drop-in sink is a task you can handle with the right guidance. Imagine the satisfaction of enhancing your kitchen space with your own hands! In this guide, you’ll discover simple steps and tips that make the installation process smooth and hassle-free.
Ready to dive in and give your kitchen a fresh new look? Let’s get started!
Tools And Materials Needed
Gather essential tools like a wrench, plumber’s putty, and a screwdriver. Materials needed include a drop-in sink, silicone sealant, and mounting clips.
Installing a drop-in kitchen sink can transform your space. Before starting, gather essential tools and materials. Having everything ready makes the job smoother and more efficient.Tools Required
A few basic tools are needed for this task. You might already have most of them in your toolbox.- Adjustable wrench
- Plumber’s putty or silicone sealant
- Phillips screwdriver
- Utility knife
- Measuring tape
- Hacksaw or pipe cutter
Materials Needed
Besides tools, specific materials are necessary. These ensure the sink is properly installed and secure.- Drop-in kitchen sink
- Faucet kit
- Water supply lines
- Drain pipes
- Mounting clips
- Rubber gaskets
Preparation And Safety Tips
Ensure the sink fits the countertop opening. Gather necessary tools like a wrench and silicone sealant. Wear gloves and safety glasses during installation. Disconnect water supply before starting to avoid leaks. Follow manufacturer instructions for proper alignment and secure attachment.
Preparing to install a drop-in kitchen sink demands careful planning and attention to safety. Ensuring the area is ready and understanding safety measures can prevent mishaps. This section offers practical tips for preparation and safety.Gather Necessary Tools And Materials
Ensure all tools and materials are within reach. You will need a tape measure, screwdriver, silicone sealant, and plumber’s putty. Having everything ready will streamline the process.Clear The Workspace
Remove all items from the countertop. Clear space under the sink for easy access. This prevents damage and provides ample room to work.Check Plumbing Connections
Examine pipes and connections for leaks. Verify that shut-off valves work. This ensures no water flow during installation.Ensure Proper Lighting
Good lighting is essential. Use a portable lamp if necessary. This reduces the chance of errors.Wear Appropriate Safety Gear
Put on safety goggles and gloves. They protect against sharp edges and chemicals. Safety gear is crucial for your protection.Read Installation Instructions Carefully
Each sink may have specific requirements. Thoroughly read the manufacturer’s instructions. This guides you through the installation process.Measure Cutout Dimensions Accurately
Measure the sink and countertop opening. Double-check measurements to ensure fit. Accurate dimensions prevent installation issues.Plan For Waste Disposal
Consider how to dispose of old materials. Arrange for proper waste disposal. This keeps your space clean and organized.Turn Off Water Supply
Shut off the water supply to the sink. This avoids leaks and flooding. It’s a necessary step before starting installation.Verify Electrical Safety
Ensure no electrical appliances are near water. Check for exposed wires. This minimizes electrical hazards.Removing The Old Sink
Begin by disconnecting the water supply and removing all plumbing connections. Carefully unscrew and lift the old sink from the countertop.
Removing the old sink is a crucial step in installing a new drop-in kitchen sink. It might seem daunting at first, but with the right tools and approach, you’ll find it’s quite manageable. Carefully removing the old sink ensures a smooth installation process for the new one.Disconnecting Water Supply
Begin by turning off the water supply to your sink. Look for the shut-off valves under the sink and twist them clockwise to stop the water flow. If your valves are stubborn, use a pair of pliers for extra leverage. Open the faucet to let out any remaining water in the pipes. This prevents any unexpected water spills when you start dismantling the plumbing connections. Remember to keep a towel or small bucket handy for any drips.Detaching Plumbing Fixtures
Next, you need to detach the plumbing fixtures. Use a wrench to unscrew the nuts connecting the water lines to the faucet. Keep all the nuts and washers in a safe place—you might need them later. Remove the drain pipe by loosening the slip nuts with your wrench. Gently pull apart the pipes and set them aside. At this stage, you might encounter some stubborn parts; a little patience and gentle wiggling can go a long way.Lifting Out The Old Sink
With the plumbing detached, the sink is ready to be lifted out. If your sink is secured with clips underneath, use a screwdriver to remove them. Gently break the seal between the sink and the countertop using a putty knife. Once the sink is free, lift it straight up with a firm grip. If the sink is heavy, don’t hesitate to ask for help. It’s better to be safe than to risk damaging your countertops or injuring yourself. Removing the old sink may seem like a chore, but once it’s done, you’re one step closer to a fresh, new kitchen look. Have you encountered any unexpected challenges during this process? Share your experiences below!
Credit: www.sinkple.com
Preparing The Countertop
Preparing the countertop involves cleaning and ensuring a smooth surface. Measure and mark the sink’s position carefully. Use a jigsaw to cut the opening, following the template.
Preparing the countertop is a crucial step in installing a drop-in kitchen sink. It ensures the sink fits snugly and functions efficiently. A well-prepared countertop prevents leaks and supports the sink’s weight. Follow these simple steps to get the countertop ready.Cleaning The Surface
Start by clearing the countertop area. Remove all items and debris. Use a gentle cleaner to wipe the surface thoroughly. This removes dirt, grease, and residues that could interfere with the sink installation. A clean surface ensures a strong bond between the sink and countertop. Dry the countertop completely to prevent mold and mildew.Checking The Fit
Place the sink in its designated spot. Check if it fits well within the cutout. There should be no gaps around the edges. Make sure the sink is level with the countertop surface. An uneven fit can cause water to pool around the sink. This could lead to damage over time. Measure twice to ensure a perfect fit.Making Necessary Adjustments
If the sink doesn’t fit properly, adjustments are needed. Use a jigsaw or a similar tool to modify the cutout size. Carefully trim the edges to match the sink dimensions. Double-check the measurements before cutting. Smooth any rough edges with sandpaper. This prevents scratches and ensures a tight fit.Installing The New Sink
Installing a drop-in kitchen sink is a straightforward process. Begin by measuring the sink opening to ensure a perfect fit. Secure the sink with clips, then connect plumbing and seal edges for a watertight finish.
Installing a new sink can transform your kitchen, making it more functional and aesthetically pleasing. Whether you’re updating an old model or customizing a brand-new kitchen, the process can be straightforward with the right guidance. Let’s dive into the practical steps that ensure your new drop-in kitchen sink fits perfectly and securely.Applying Sealant
Before you position your sink, ensure the surface is clean and dry. A good sealant is crucial to prevent water from seeping underneath the sink, which could lead to water damage over time. Use a silicone sealant, which is flexible and water-resistant. Apply a continuous bead of sealant around the edge of the sink opening on the countertop. This creates a watertight barrier. Be generous but neat to avoid excess sealant squeezing out when you place the sink.Positioning The Sink
Carefully lower the sink into the opening. Ensure it’s centered and all corners sit flush with the countertop. This is a moment where an extra pair of hands can be helpful. Check that the sink aligns with the plumbing beneath. A small misalignment might seem trivial now but can create a headache later. Take your time to get it right.Securing The Sink
With the sink in position, it’s time to secure it in place. Most drop-in sinks come with mounting clips or brackets. These help hold the sink firmly against the countertop. Tighten the clips evenly, moving from one side to the other. This ensures even pressure and a tight fit. Double-check each clip to ensure they’re all secure. Consider the satisfaction of a job well done. By following these steps, you’ve not only installed a functional piece but also added value to your kitchen. What other home improvements could benefit from your newfound skills?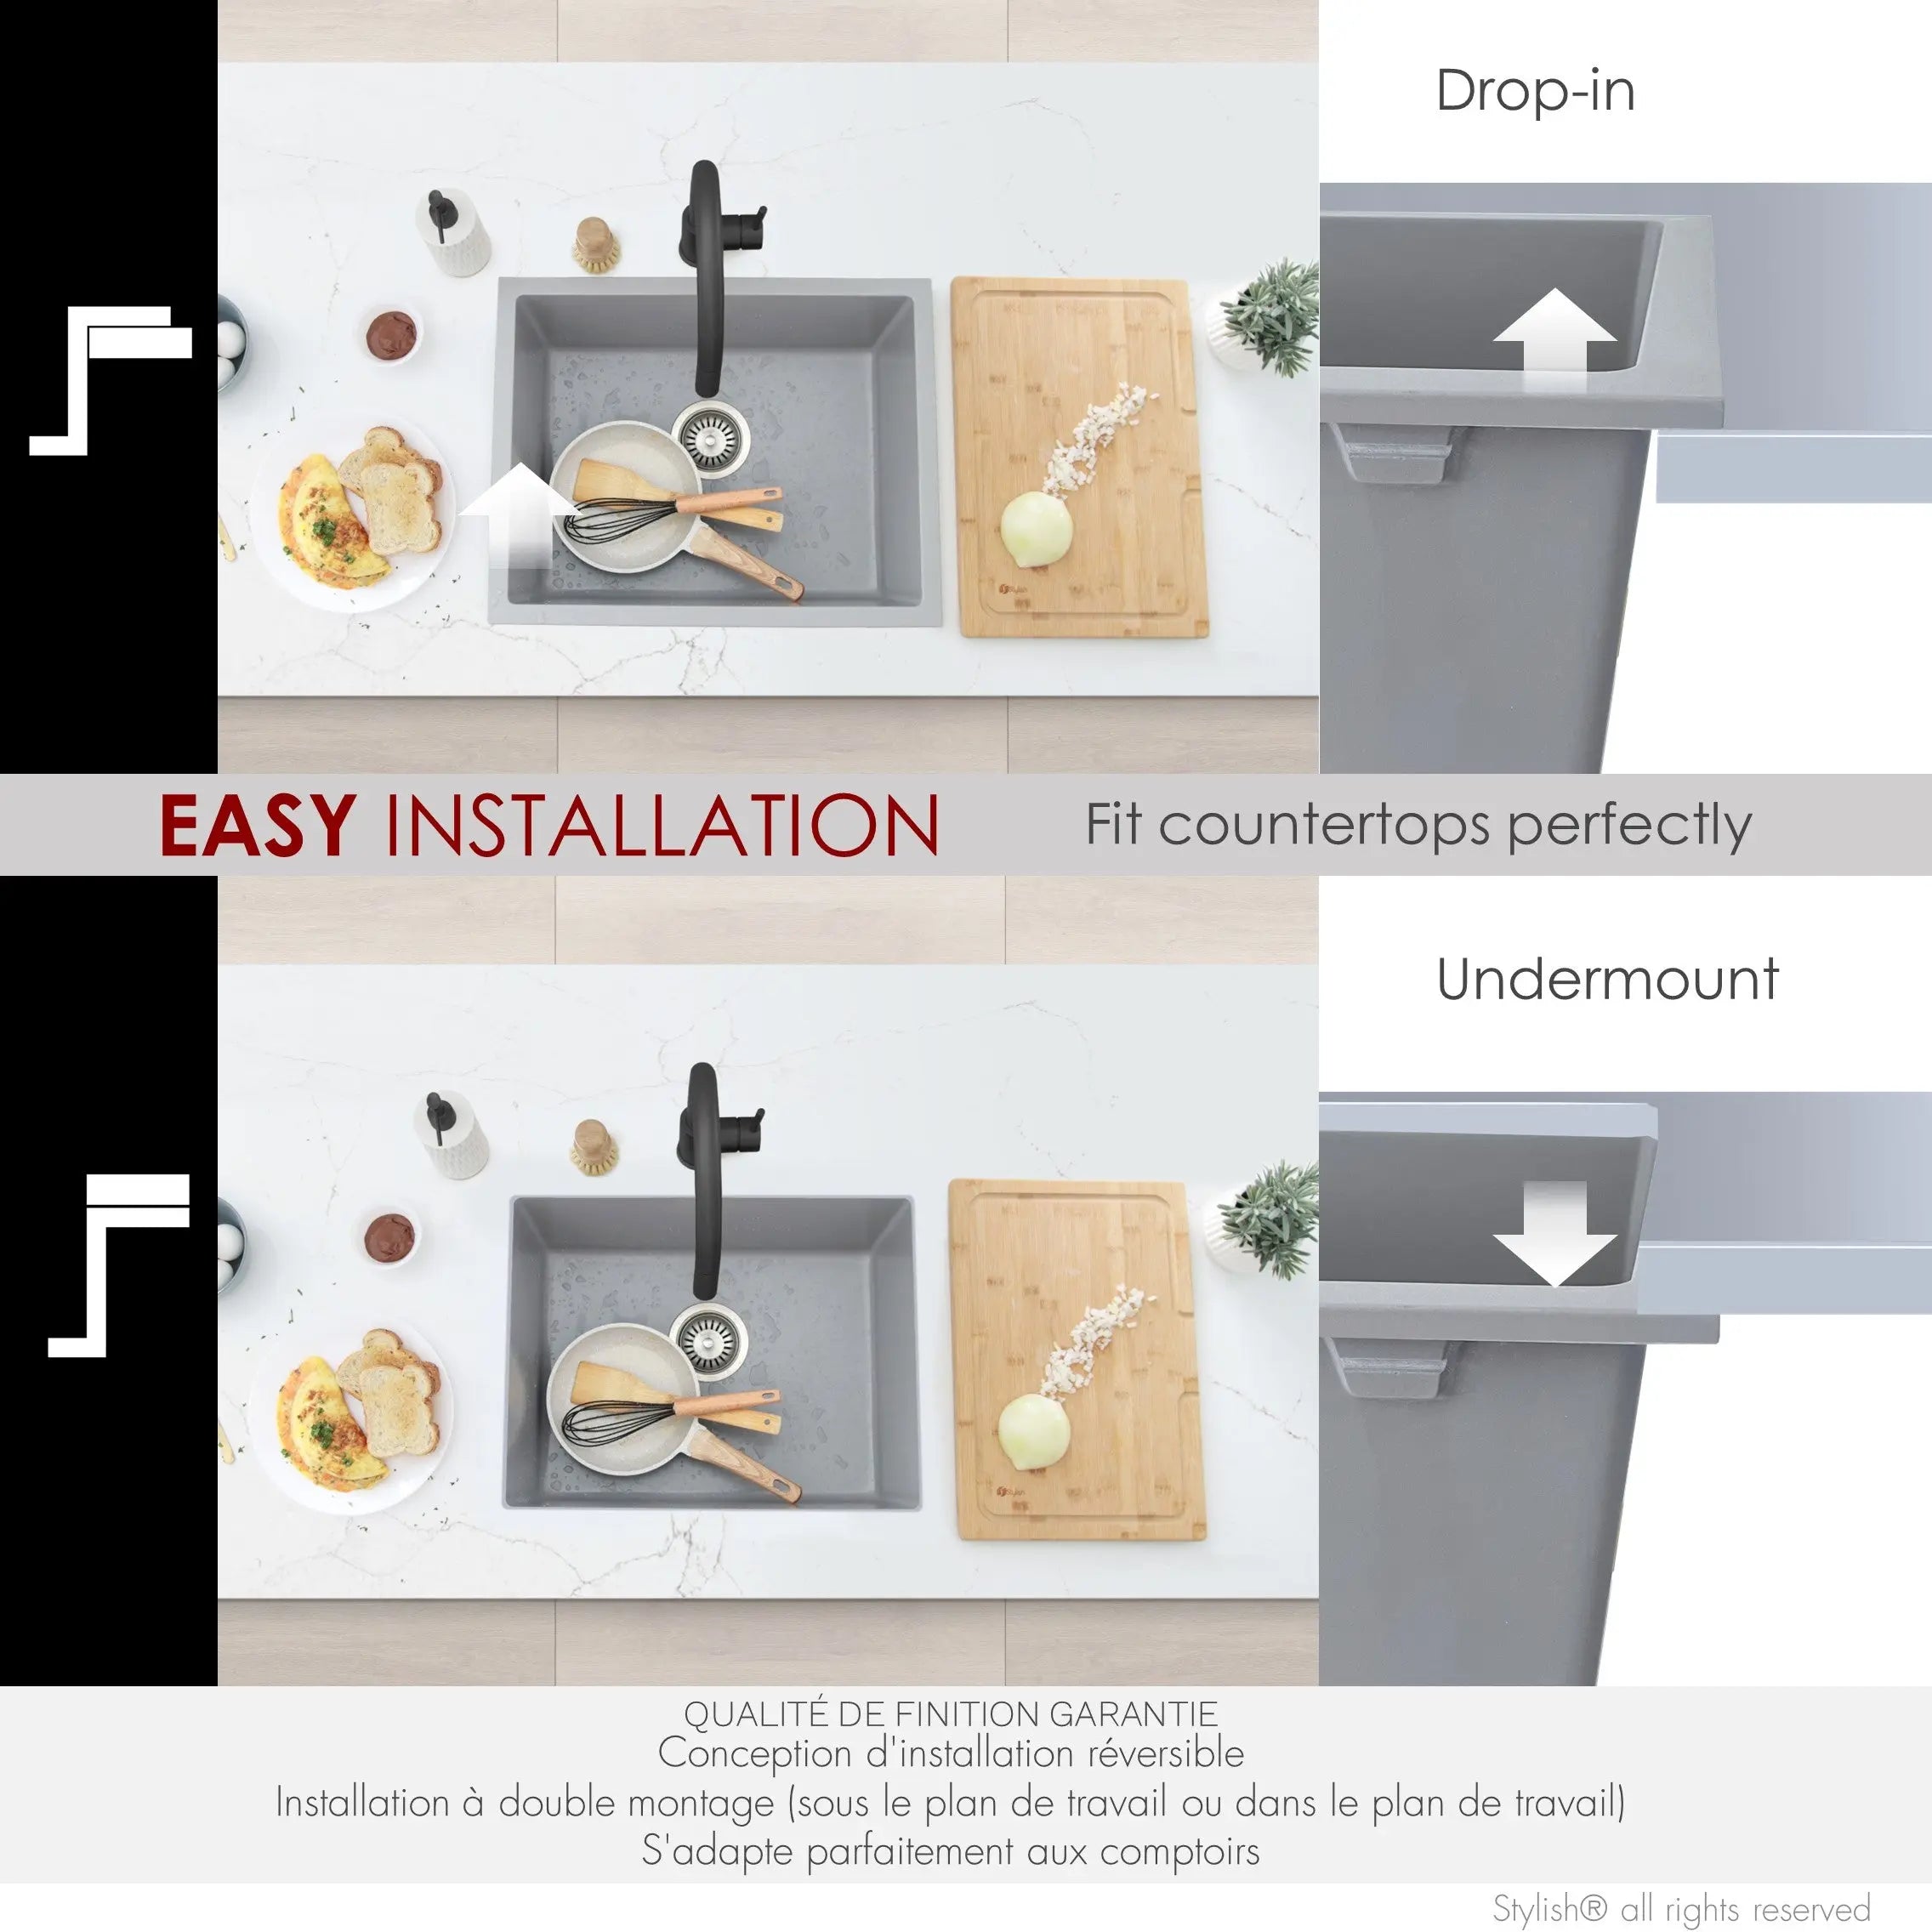
Credit: www.plumbingmarket.ca
Reconnecting Plumbing
Installing a drop-in kitchen sink enhances functionality and aesthetics. Start by measuring the cutout in the countertop to ensure a precise fit. Secure the sink in place, reconnect plumbing, and check for leaks to finish the installation.
Reconnecting the plumbing after installing a drop-in kitchen sink is crucial. It ensures your sink functions efficiently. This section guides you through the process step by step, helping avoid common mistakes and leaks.Reattaching Water Lines
Reattaching water lines is the first task. Begin by connecting the water supply lines to the faucet. Ensure each line is aligned correctly with hot and cold connections. Use a wrench to tighten the fittings securely. Avoid overtightening to prevent damage. Check if the lines are kink-free for smooth water flow.Installing Drain Pipes
Installing drain pipes is the next step. Attach the drain pipes to the sink’s tailpiece. Make sure the rubber gasket is in place to prevent leaks. Use plumber’s putty to seal connections properly. Connect the drain trap to the pipes. Ensure all connections are snug and aligned with the existing plumbing system.Testing For Leaks
Testing for leaks is essential before finishing. Turn on the water supply and run it through the faucet. Check all connections for any drips or leaks. Inspect the drain pipes and water lines carefully. If leaks are found, tighten the connections slightly. Repeat the process until there are no leaks.Final Touches And Cleanup
Once you’ve securely placed your drop-in kitchen sink, focus on the final touches. This stage ensures your sink looks great and functions well. Proper sealing, cleaning, and inspection are essential. These steps will enhance your sink’s durability and appearance.
Sealing The Edges
Begin by sealing the edges with a quality silicone sealant. This prevents water from seeping under the sink, which can cause damage. Apply the sealant evenly along the edges using a caulking gun. Smooth the silicone with your finger or a caulk finishing tool. Ensure a neat finish for the best results.
Cleaning The Area
After sealing, clean the surrounding area thoroughly. Use a damp cloth to wipe off any excess sealant. Remove any debris or dust from the countertop and sink. This step helps maintain a clean, polished look. It also ensures the sealant sets properly without interference.
Inspecting The Installation
Finally, inspect the installation for any issues. Check for gaps in the sealant and leaks around the sink. Ensure the sink sits flush with the countertop. Test the faucet and drain for proper function. Address any problems promptly to avoid future complications.
Credit: www.wayfair.com
Frequently Asked Questions
Are Drop-in Sinks Easy To Install?
Drop-in sinks are easy to install. They fit directly into a pre-cut hole on the countertop. You need basic tools and skills for installation. Secure the sink with clips and seal it with caulk. Follow manufacturer instructions for best results.
Enjoy hassle-free kitchen updates with minimal effort.
What To Use To Secure A Drop-in Sink?
Use silicone caulk to secure a drop-in sink. It provides a watertight seal and prevents movement. Apply it around the sink’s edge before setting it in place. Clean any excess for a neat finish. Silicone is durable and flexible, ensuring long-lasting sink security.
How To Install A Drop-in A Sink?
Turn off the water supply. Remove the old sink. Clean the countertop. Apply sealant around the opening. Lower the new drop-in sink into place. Connect the plumbing. Check for leaks and ensure the sink is secure.
What Type Of Adhesive For Drop-in Sink?
Use silicone adhesive or sealant for drop-in sinks. Ensure it’s waterproof and mold-resistant for durability and a secure fit.
Conclusion
Installing a drop-in kitchen sink is simple with the right steps. Follow the guide to ensure a perfect fit. Tools and materials should be ready before starting. Measure carefully to avoid mistakes. Secure the sink firmly and check for leaks.
Proper installation ensures a lasting kitchen upgrade. Take your time and enjoy the process. A new sink can transform your space. It adds style and function. With patience, you’ll succeed. Enjoy your refreshed kitchen!


