How to Install New Faucet in Kitchen: Easy DIY Guide
Executive Chef & Lead Commercial Kitchen Specialist at Daily Kitchup Test Lab
Are you tired of that old, leaky faucet in your kitchen? Imagine the relief of turning on a new, stylish faucet that works perfectly and adds a fresh look to your kitchen space.
Whether you’re aiming for a quick home improvement or looking to save some money by doing it yourself, installing a new kitchen faucet can be simpler than you think. Don’t let worries about complicated plumbing hold you back. With just a few tools and some straightforward steps, you can transform your kitchen in no time.
In this guide, we’ll walk you through each step of the process, ensuring you feel confident and capable. Ready to dive in? Let’s get started on giving your kitchen that much-needed upgrade!
Choosing The Right Faucet
Choosing the Right Faucet Pick a faucet that fits your kitchen’s style and sink size. Before installation, gather necessary tools like a wrench and plumber’s tape. Turn off the water supply to prevent leaks, then remove the old faucet. Secure the new one in place, ensuring all connections are tight.
Choosing a new faucet for your kitchen can be exciting. It’s not just about looks. The right choice balances style and function. It should fit your needs and your kitchen’s design. You might feel overwhelmed by options. But knowing what to look for makes it easier.Types Of Kitchen Faucets
Kitchen faucets come in many types. Single-handle faucets are simple and popular. They use one lever to control both hot and cold water. Double-handle faucets have separate handles for hot and cold. They offer precise control over water temperature. Pull-out and pull-down faucets have spray heads. They’re great for washing large pots. Touchless faucets work with a motion sensor. They add convenience and reduce the spread of germs.Considerations For Style And Functionality
Think about your kitchen’s style. Does it have a modern look? Or is it more traditional? Choose a faucet that matches. Stainless steel and chrome are sleek. Bronze and brass add warmth. Function is also key. Do you need a high-arc spout for filling tall pots? Is a pull-out sprayer useful for you? Consider how you use your sink daily. Make sure your choice meets those needs.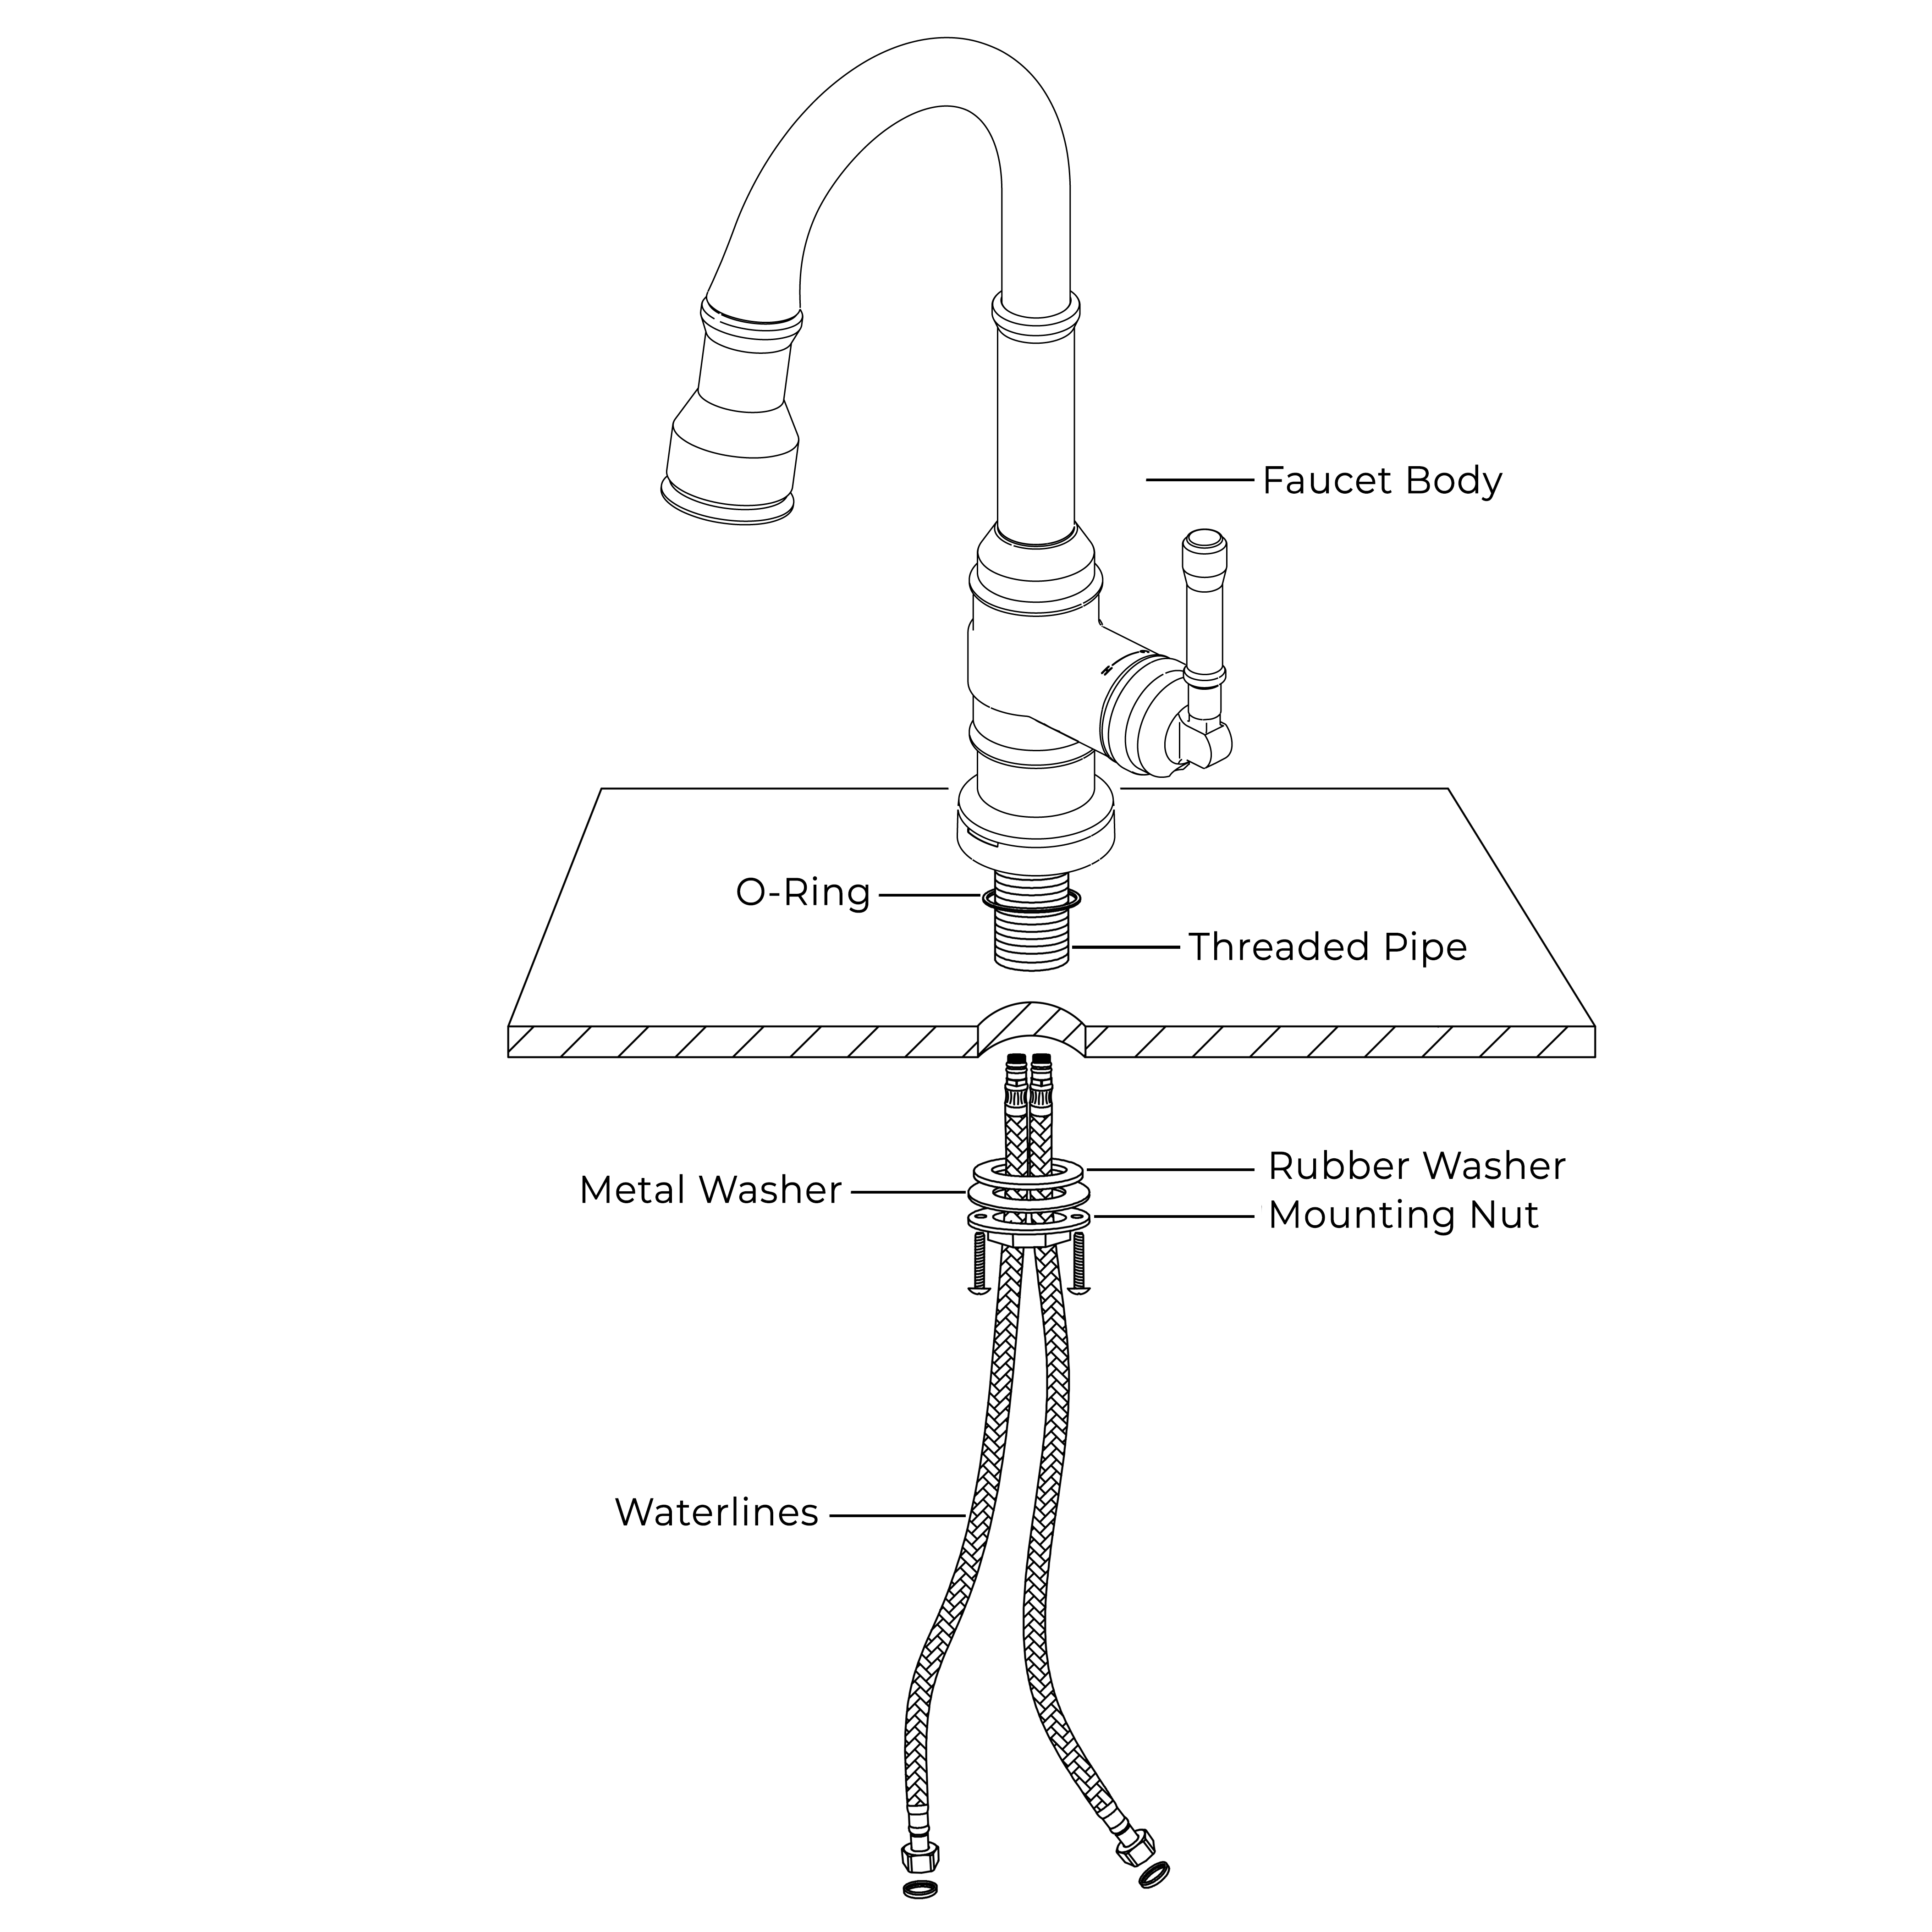
Credit: www.fontanashowers.com
Gathering Necessary Tools
Installing a new faucet in your kitchen can be a rewarding task. Before you start, gather all necessary tools. This ensures a smooth installation process. A little preparation goes a long way.
Essential Tools And Materials
Having the right tools is crucial. Here’s what you’ll need:
- Adjustable wrench
- Phillips screwdriver
- Plumber’s tape
- Basin wrench
- Bucket
- New faucet with instructions
Each tool serves a purpose. The adjustable wrench loosens and tightens nuts. The Phillips screwdriver handles screws efficiently. Plumber’s tape prevents leaks. The basin wrench reaches tight spaces. A bucket catches water spills. Ensure your new faucet includes instructions.
Safety Equipment And Precautions
Safety is important. Wear protective gear:
- Safety goggles
- Work gloves
Safety goggles shield your eyes. Work gloves protect your hands. Be careful with tools. Follow instructions carefully. Ensure the water supply is turned off. This prevents leaks and accidents. A safe workspace is a productive one.
Preparing The Workspace
Clear the area under the sink to ensure easy access. Gather all necessary tools and materials nearby. Disconnect the water supply to prevent leaks during installation.
Preparing the workspace is crucial for a successful faucet installation. A well-organized area ensures efficiency and safety. It reduces the risk of damage and makes the job smoother. Before diving into the installation, take time to prepare the space properly. It sets the foundation for the entire process.Clearing The Under-sink Area
Begin by removing items from under the sink. This includes cleaning supplies and storage bins. Clear the area to have room to work. It also prevents accidental damage to items. Use a flashlight to check for any leaks or damage. A clean space allows for easy access to plumbing connections.Turning Off Water Supply
Locate the shut-off valves under the sink. Turn them clockwise to stop the water flow. This prevents spills during installation. If the valves are hard to turn, use a wrench for assistance. Test the faucet to ensure water is off. Double-check this step to avoid any mess.Removing The Old Faucet
Removing the old faucet is the first step in installing a new one in your kitchen. Turn off the water supply, then use a wrench to disconnect the water lines and mounting nuts. Carefully lift out the old faucet, making space for your new fixture.
Removing the old faucet can seem like a daunting task, but with a little patience and the right tools, it’s entirely manageable. This step is crucial as it clears the way for your shiny new fixture, and doing it right ensures a smooth installation process. Let’s dive into the key actions you need to take to bid farewell to the outdated faucet.Disconnecting Water Lines
Before you start, locate the water shut-off valves under your sink and turn them off. This prevents any unwanted water flow, keeping your workspace dry and manageable. Use an adjustable wrench to carefully disconnect the water lines from the faucet, ensuring you have a bucket or towel nearby to catch any residual water that might escape.Detaching The Faucet Assembly
Once the water lines are disconnected, it’s time to remove the faucet assembly. Unscrew the mounting nuts beneath the sink using a basin wrench—this tool is your best friend in the cramped space under the sink. Gently pull the faucet up and out from the top, making sure not to scratch your sink surface. Have you ever noticed how liberating it feels to remove something old and make way for the new? By meticulously following these steps, you ensure a hassle-free transition to your new kitchen centerpiece. Ready to tackle the next phase?Installing The New Faucet
Installing a new kitchen faucet involves removing the old one, securing the new fixture, and connecting water supply lines. Ensure all seals are tight to prevent leaks. This DIY task enhances the kitchen’s functionality and appearance, providing a fresh look and improved water flow.
Installing a new faucet in your kitchen can feel like a daunting task, but it’s a practical skill that can save you both time and money. With the right tools and a bit of patience, you can easily upgrade your kitchen’s look and functionality. Let’s dive into the details of how to install your new faucet efficiently and with confidence.Positioning The New Faucet
Start by ensuring the faucet aligns perfectly with the sink’s mounting holes. This might sound obvious, but a slight misalignment can lead to leaks or an uneven appearance. Use a flashlight to check if the base of the faucet sits flush with the sink surface. Secure the faucet base by tightening the mounting nuts underneath the sink. Hand-tighten them first to avoid cross-threading, then use a basin wrench for a snug fit. Remember, a loose faucet can lead to frustrating drips and leaks.Connecting Water Supply Lines
Attach the water supply lines to the corresponding hot and cold inlets on the faucet. Make sure to connect the hot water line to the left inlet and the cold water line to the right. A simple mix-up here can lead to unwanted surprises when you wash your hands. Use adjustable pliers to tighten the connections, but be cautious not to overtighten as this can damage the fittings. A gentle nudge is usually enough to ensure a secure connection. Before turning the water back on, check if all the connections are tight and properly sealed. Once everything is connected, slowly turn on the water supply and check for leaks. If you spot any drips, gently tighten the connections until they stop. Testing your installation thoroughly at this stage can save you from unexpected waterworks later. Installing a new faucet can be a rewarding DIY project. Are you ready to tackle this home improvement task and enjoy a refreshed kitchen space?
Credit: www.youtube.com
Testing The New Installation
You’ve successfully installed your new kitchen faucet, but before you celebrate, it’s crucial to test the installation. This step ensures everything is working as it should and prevents future headaches. Testing not only confirms the functionality but also gives you peace of mind knowing you won’t have any surprise leaks or issues. Let’s dive into the key aspects of testing your new faucet installation.
Checking For Leaks
Start by turning on the water supply and carefully inspecting the area around the faucet. Look for any signs of moisture or dripping. Pay special attention to the connections where the faucet meets the water lines.
If you spot a leak, it might be due to loose connections or improperly seated washers. Tighten any loose nuts or bolts and ensure washers are correctly aligned. Don’t rush this step; a small leak can lead to bigger problems over time.
Ensuring Proper Water Flow
Once you’re confident there are no leaks, test the water flow. Turn on the faucet and check both hot and cold settings. The water should flow smoothly and consistently without sputtering.
If you notice any irregularities, it could be due to debris in the pipes or an issue with the faucet itself. You might need to clean the aerator or check for blockages. Proper water flow ensures efficient usage and keeps your kitchen running smoothly.
Have you ever installed something only to find a surprise issue later? Testing thoroughly now will save you from such scenarios. Ensure everything works perfectly, so you can enjoy your kitchen without any hiccups. Remember, a successful installation is not just about completing the task; it’s about ensuring it works seamlessly. What’s your next home project going to be?
Finishing Touches
After installing your new kitchen faucet, it’s time for the finishing touches. This ensures everything is secure and clean. Completing these steps will give your kitchen a polished look. Let’s dive into securing the components and tidying up the workspace.
Securing Faucet Components
Make sure all faucet parts are tightly connected. Check the nuts and bolts under the sink. Use a wrench to tighten them. Ensure the faucet is stable on the countertop. Avoid over-tightening, as this can damage the faucet. Confirm the hoses are secure and leak-free. Run the water to check for leaks. Adjust if necessary for smooth water flow.
Cleaning Up The Workspace
Remove any tools and leftover materials. Check for debris or old sealant. Wipe down the area with a damp cloth. Dry the countertop to prevent water stains. Dispose of packaging and old parts responsibly. Organize your tools for future use. Clean any spills with suitable cleaning solutions. Ensure the sink and surrounding areas are spotless.

Credit: www.familyhandyman.com
Troubleshooting Common Issues
Installing a new kitchen faucet might seem tricky at first. Check the water supply lines and ensure they are off before starting. Use the right tools to remove the old faucet and follow the manufacturer’s instructions for the new one.
This approach helps avoid leaks and ensures a secure fit.
Installing a new kitchen faucet can be a satisfying DIY project. Sometimes, unexpected issues arise during or after installation. Addressing these common problems can save time and frustration. Below, we’ll explore solutions to some frequent troubles.Addressing Water Pressure Problems
Low water pressure can be irritating. Begin by checking the faucet aerator. It can get clogged with debris. Unscrew it carefully and clean it under running water. If the problem persists, inspect the supply valves. Ensure they are fully open. Sometimes, the issue lies with the water supply lines. Examine these for any kinks or blockages. Replace any damaged parts to restore proper pressure.Fixing Leaks And Drips
Leaks can waste water and cause damage. First, check the faucet connections. Tighten any loose nuts or fittings. If the faucet still leaks, inspect the O-rings and washers. Worn-out seals are a common cause of drips. Replace these parts if necessary. Ensure all components are correctly aligned and seated. If leaks persist, the cartridge inside the faucet may need replacement. Always turn off the water supply before making repairs.Frequently Asked Questions
Can I Install A Kitchen Faucet Myself?
Yes, you can install a kitchen faucet yourself. Follow the manufacturer’s instructions closely. Gather necessary tools like wrenches and plumber’s tape. Ensure you turn off the water supply before starting. If unsure, consulting a professional is advisable to prevent leaks or damage.
Do I Need A Plumber To Install A New Faucet?
Hiring a plumber for faucet installation ensures correct fitting and prevents leaks. DIY is possible if you’re experienced. Check local regulations as some areas require professional installation.
What Would A Plumber Charge To Install A New Kitchen Faucet?
Plumbers typically charge $150 to $300 for installing a new kitchen faucet. Prices vary based on location and complexity. Additional costs may include parts and travel fees. Always request quotes from several plumbers to find the best deal for your budget.
Ensure your chosen plumber is licensed and experienced.
How To Replace A Faucet Step By Step?
Turn off the water supply. Disconnect water lines. Remove the old faucet. Install the new faucet. Reconnect water lines and check for leaks.
Conclusion
Installing a new kitchen faucet is easier than you think. Follow the steps carefully. Gather all tools before starting. Turn off the water supply. Remove the old faucet gently. Install the new one securely. Tighten all connections. Test for leaks.
Make sure everything works smoothly. Feel proud of your work. Enjoy your refreshed kitchen. Share your experience with friends. Help them with their faucets. A small change can make a big difference. Remember, patience leads to success. Happy plumbing!

Similar Posts