
Are you planning to revamp your kitchen and tackle the sink plumbing on your own? Installing a kitchen sink with a garbage disposal may seem like a daunting task, but with the right guidance, it’s something you can handle with ease.
Imagine the convenience of a smoothly functioning sink and the satisfaction of knowing you did it yourself. In this guide, we’ll walk you through the entire process, step by step. You’ll discover not only how to install your kitchen sink plumbing but also how to seamlessly integrate a garbage disposal unit, making your kitchen more efficient than ever.
Keep reading, and by the end of this article, you’ll be ready to transform your kitchen setup, saving time, money, and adding a touch of personal accomplishment to your home improvement project.
Credit: www.punctualplumberdallas.com
Tools And Materials Needed
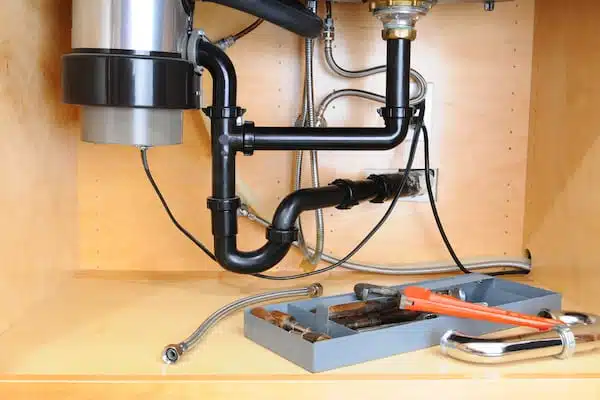
Installing kitchen sink plumbing with garbage disposal requires specific tools and materials. Essential items include a wrench, plumber’s putty, PVC pipes, and fittings. Ensure you have a bucket, pipe cutter, and a screwdriver for a smooth installation process.
When embarking on the exciting journey of installing kitchen sink plumbing with a garbage disposal, gathering the right tools and materials is crucial. This step ensures smooth sailing through the installation process and prevents frustrating setbacks. Imagine reaching under the sink, ready to connect pipes, only to realize you’re missing a crucial component. It’s a scenario you can easily avoid by preparing ahead.Tools You Will Need
- Adjustable Wrench:Essential for loosening and tightening nuts and bolts.
- Screwdriver Set:Both flathead and Phillips are necessary for various screws.
- Plumber’s Putty:Helps seal connections and prevent leaks.
- Pliers:Useful for gripping and twisting wires or small parts.
- Pipe Cutter or Hacksaw:Required for cutting pipes to the desired length.
- Tape Measure:Ensures accurate measurements for pipe lengths.
Materials Required
- Garbage Disposal Unit:Choose one that fits your sink and meets your waste disposal needs.
- Drain Pipe Kit:Includes the necessary pipes and fittings for your plumbing system.
- Mounting Ring and Sink Flange:They connect the disposal unit to the sink.
- Dishwasher Connector Kit:If you have a dishwasher, this kit will connect it to your disposal.
- Electrical Cord:Needed for powering the garbage disposal unit.
- Rubber Gaskets and Seals:Prevent leaks at connection points.

Credit: www.reddit.com
Preparing The Work Area
Clear the space under the sink before starting the installation. Remove any items that might obstruct your work. Ensure the area is well-lit to avoid any mistakes during the plumbing process.
Preparing the work area is essential before installing kitchen sink plumbing with a garbage disposal. A clean and organized space ensures a smooth installation process. It helps prevent accidents and keeps tools within easy reach. Following a few simple steps can make your work area ready for plumbing tasks.Clearing Under The Sink
Start by removing items stored under the sink. Empty the cabinet completely to make room for your tools and materials. Check for any leaks or mold that might need addressing. Cleaning the area helps you spot potential problems early. It also gives you more space to work comfortably.Safety Precautions
Wearing safety gear is crucial. Use gloves to protect your hands from sharp edges and chemicals. Safety goggles prevent debris from getting into your eyes. Turn off the water supply to avoid unexpected leaks. Make sure electrical outlets near the sink are turned off. These precautions keep you safe while working on plumbing.Removing The Old Sink Plumbing
Removing the old sink plumbing is the first step in installing new kitchen sink plumbing with a garbage disposal. This process involves detaching and removing the existing pipes and drain. Proper removal ensures a smooth installation of the new system.
Detaching Existing Pipes
Start by turning off the water supply to the sink. Use a wrench to loosen the nuts connecting the pipes. Place a bucket under the pipes to catch any water. Carefully detach the pipes from the sink and wall. Check for any worn-out washers or seals and replace them if necessary.
Removing The Old Drain
Use a screwdriver to loosen the screws holding the drain. Gently lift the drain from the sink. Clean the area where the drain was attached. This ensures a tight fit for the new drain. Dispose of the old drain properly and prepare the sink for the new installation.
Installing The Sink Drain
Install kitchen sink plumbing with garbage disposal by first connecting the drain pipes. Ensure all fittings are secure and leak-free. Finish by attaching the disposal unit, following manufacturer instructions.
Installing the sink drain is a crucial step in setting up your kitchen plumbing system, especially when integrating a garbage disposal. This task not only ensures proper water flow but also prevents leaks and clogs. With the right guidance, you can tackle this with confidence, creating a seamless connection that will serve your kitchen well.Fitting The New Drain
Begin by removing the old drain assembly if it’s still in place. Clean the sink thoroughly to remove any residue or old plumber’s putty. A sparkling clean surface ensures a tight seal. Next, take your new drain and position it over the sink hole. Make sure it fits snugly without any gaps. If your sink is a non-standard size, you may need an adapter to ensure the drain fits perfectly. When I first installed a sink drain, I underestimated the importance of a good fit. It led to minor leaks which I had to fix later. Learn from my mistake and double-check that everything aligns perfectly before moving on.Sealing And Securing The Drain
Apply a generous amount of plumber’s putty around the underside of the drain flange. This creates a watertight seal that prevents leaks. Press the drain firmly into the sink hole and wipe away any excess putty that squeezes out. Once in place, secure the drain with a washer and a locknut from beneath the sink. Tighten them by hand initially, then use a wrench for a firm fit. Be cautious not to over-tighten, as this can damage the sink or the drain itself. Here’s a tip: after securing, fill the sink with water and check for leaks. This simple test can save you from future headaches. If any water escapes, adjust and tighten as necessary. Remember, the goal is to create a secure and leak-proof connection. Are there any other kitchen tasks you’ve been putting off? Take the leap and tackle them with the same methodical approach. Your kitchen—and peace of mind—will thank you.Attaching The Garbage Disposal Unit
Attaching the garbage disposal unit is simple. Connect the disposal unit to the sink’s mounting assembly securely. Tighten screws to ensure a snug fit for optimal functionality.
Attaching a garbage disposal unit to your kitchen sink can seem daunting. With the right tools and steps, it becomes manageable. First, ensure the power supply is off to avoid accidents. You’ll need a few tools: a screwdriver, plumber’s putty, and a wrench. Also, check that the garbage disposal unit fits under your sink.Mounting The Disposal
Begin by preparing the mounting assembly. Apply plumber’s putty around the sink flange. Press the flange firmly into the sink drain opening. Under the sink, slide the backup ring and gasket onto the flange. Secure them with the mounting ring. Use a screwdriver to tighten the screws evenly. This creates a secure seal, preventing leaks. Attach the disposal to the mounting assembly. Align the disposal with the mounting bracket. Twist it until it locks into place. Ensure it’s tight and won’t wobble.Connecting The Disposal To The Drain
Connect the disposal to the drainpipe. Attach the discharge tube to the disposal’s outlet. Secure it with a clamp. Align the other end with the drainpipe. Use a slip nut to connect them. Tighten with a wrench to ensure no leaks. Check the drain connection. Ensure the P-trap aligns with the disposal outlet. Adjust as necessary. Tighten all connections securely. Your garbage disposal is now attached. Run water and check for leaks. Ensure everything is tight and secure.Connecting Water Supply And Drain Pipes
Ensure all connections are secure when installing kitchen sink plumbing with garbage disposal. Proper alignment of water supply and drain pipes prevents leaks. Regular checks maintain efficiency and extend the system’s life.
Connecting the water supply and drain pipes is a crucial task in installing kitchen sink plumbing with garbage disposal. It ensures seamless water flow and efficient waste management. Proper alignment and secure connections are vital for preventing leaks and maintaining functionality. Let’s delve into aligning pipes and securing connections to achieve a leak-free setup.Aligning The Pipes
Ensure all pipes align correctly for smooth water flow. Start by inspecting the existing plumbing setup. Measure the length of pipes needed between the sink and disposal. Use a measuring tape for accuracy. Cut pipes to the required length using a pipe cutter. Dry fit the pipes to check alignment. Adjust as needed for a perfect fit. This prevents strain on joints and reduces leak risks.Securing The Connections
Secure connections with appropriate fittings and tools. Use plumber’s tape to seal threaded connections. This prevents leaks at joint points. Tighten connections using a wrench, but avoid over-tightening. Over-tightening can damage fittings and cause leaks. For slip joints, use rubber washers for a snug fit. Ensure all connections are tight and leak-proof before proceeding. Regularly check connections for any signs of leakage.Testing The Installation
Testing the Installation Ensure all connections are secure by running water through the sink. Check for leaks around the pipes and garbage disposal. Turn on the disposal to verify its functionality and listen for any unusual noises.
Testing the installation is crucial for ensuring everything works smoothly. After setting up the kitchen sink plumbing with garbage disposal, the next step is testing. This ensures your installation is leak-free and the disposal functions properly.Checking For Leaks
Turn on the water supply. Inspect all connections for leaks. Use a flashlight to check under the sink. Dry any wet areas with a cloth. Tighten any loose connections. Repeat until no leaks are found. This step prevents water damage and keeps the kitchen safe.Running The Garbage Disposal
Plug in the garbage disposal. Turn it on for a few seconds. Listen for unusual noises. If it grinds smoothly, it’s working well. Test with small food scraps. Ensure it disposes of them easily. If any issues arise, consult the manual. Proper testing ensures it operates efficiently.
Credit: www.tiktok.com
Troubleshooting Common Issues
Installing kitchen sink plumbing with garbage disposal often requires addressing common issues. Ensure correct alignment of pipes to prevent leaks. Check for proper electrical connections to avoid malfunction.
Troubleshooting kitchen sink plumbing with garbage disposal involves addressing common issues. These issues often arise post-installation. Knowing how to fix them ensures smooth operation.Addressing Leaks
Leaks can occur around the sink or disposal. Start by checking connections. Tighten loose nuts with a wrench. Ensure the plumber’s putty is intact. Replace if needed. Examine the drain pipes for cracks. Use pipe sealant on suspect areas. If leaks persist, inspect the mounting assembly. It should be secure. Reinstall the disposal if necessary. Double-check the rubber gaskets. They should be in good condition.Disposal Not Working
First, check the power supply. Ensure the disposal is plugged in. Reset it using the reset button on the unit. If it still doesn’t work, inspect the breaker. Flip it off and on. Listen for humming sounds. A humming disposal may be jammed. Use a disposal wrench to clear jams. Examine the flywheel and blades. Remove obstructions carefully. Never use your hands. If problems continue, consider professional help.Maintenance Tips
Installing kitchen sink plumbing with garbage disposal requires careful planning and precision. Gather necessary tools and ensure the power is off. Connect the disposal unit to the sink and pipe securely, checking for leaks.
Installing kitchen sink plumbing with a garbage disposal can be a rewarding DIY project, but maintaining it is equally important to ensure longevity and efficiency. By focusing on regular maintenance, you can prevent costly repairs and keep your kitchen running smoothly. Let’s dive into some practical maintenance tips that will help you keep your kitchen sink and garbage disposal in top shape.Regular Cleaning
Regular cleaning is crucial to prevent unpleasant odors and clogs in your garbage disposal. Make it a habit to clean your disposal weekly using a mixture of baking soda and vinegar. This natural solution not only cleans but also deodorizes your disposal. Another effective cleaning method is to grind ice cubes and citrus peels. The ice sharpens the blades while the citrus peels leave a fresh scent. Always run cold water before, during, and after using the disposal to ensure any debris is thoroughly flushed out.Preventive Measures
Preventive measures can save you from many plumbing headaches. Avoid putting fibrous foods like celery or potato peels into the disposal, as these can wrap around the blades and cause jams. Instead, compost such items to maintain a healthy disposal. Also, refrain from pouring grease or oil down the sink. These substances can solidify and cause blockages in your pipes. Dispose of grease in a separate container and throw it away in the trash once it cools. Consider using a sink strainer to catch larger particles. This simple tool can prevent unwanted materials from entering your disposal, reducing the risk of clogs. A little prevention goes a long way in maintaining your kitchen sink plumbing. Taking these maintenance steps not only extends the life of your kitchen sink plumbing but also keeps it functioning efficiently. What are you doing today to ensure your plumbing remains trouble-free?Frequently Asked Questions
Do I Need Plumbers Putty To Install A Garbage Disposal?
You don’t always need plumber’s putty for installing a garbage disposal. Many disposals use rubber gaskets for sealing. Check the manufacturer’s instructions for specific requirements. Plumber’s putty can be used if a gasket isn’t included or recommended.
What Is The Code For Kitchen Sink Drain Pipe?
The code for kitchen sink drain pipes typically follows the International Plumbing Code (IPC) or local regulations. Commonly, a 1. 5-inch diameter pipe is used. Always check local building codes to ensure compliance.
What Do Plumbers Think Of Garbage Disposals?
Plumbers often view garbage disposals as convenient but sometimes problematic. They recommend careful use to prevent clogs. Overloading or improper use can lead to plumbing issues. Regular maintenance and avoiding fibrous or hard items can extend disposal life. Proper use ensures fewer repairs and smoother plumbing operation.
Can You Have Two P Traps Under The Kitchen Sink?
Yes, you can install two P traps under the kitchen sink. Ensure proper venting to avoid drainage issues. Check local building codes for compliance. Correct installation prevents sewer gas and clogs, maintaining efficient plumbing. Proper spacing and alignment are crucial for effective drainage and odor prevention.
Conclusion
Installing kitchen sink plumbing with garbage disposal is manageable. Follow steps carefully for success. Gather all needed tools first. Double-check connections for leaks. Tighten screws to secure parts firmly. Test disposal function before finishing. Proper installation prevents future issues. Remember, safety is crucial.
Turn off electricity when working. Clean up after completing the task. Keep manuals handy for reference. By doing this, you ensure efficiency. Enjoy your well-installed kitchen sink setup. It saves time and effort. Now, your kitchen tasks become smoother. You’ve learned valuable skills today.
Feel confident in your plumbing abilities. Happy plumbing!