How to Paint Stained Kitchen Cabinets: A Step-by-Step Guide
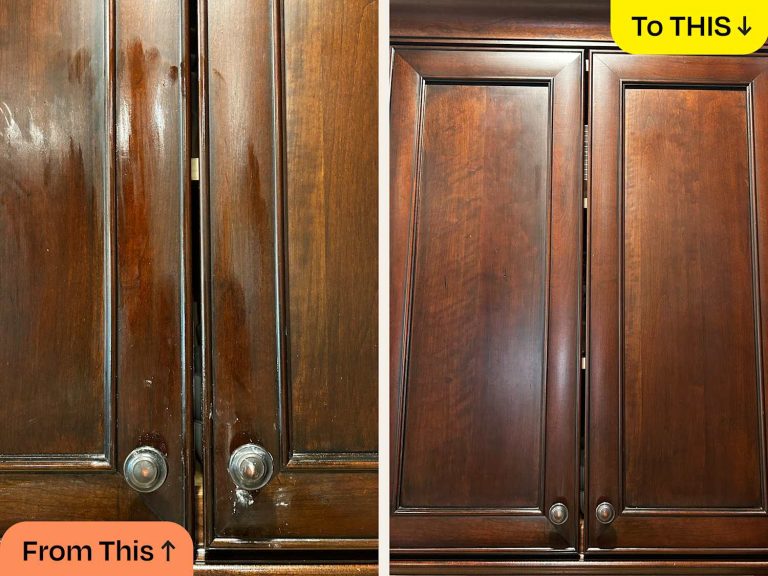
Have you ever looked at your kitchen cabinets and thought they could use a makeover? Stained cabinets can make your kitchen feel outdated or dull, but with a fresh coat of paint, you can transform the entire space.
Imagine walking into a kitchen that feels brighter, cleaner, and more inviting. Painting stained kitchen cabinets isn’t just about aesthetics; it’s about creating a space where you feel happy and inspired every day. You might worry about the hassle or mess involved, but don’t let these thoughts hold you back.
With the right steps and tips, you can achieve a professional look without the professional cost. This guide is here to show you how simple and rewarding painting your cabinets can be. Get ready to roll up your sleeves and uncover the secrets to giving your kitchen the facelift it deserves. Dive in and discover how you can breathe new life into your home with just a few strokes of a brush.

Credit: www.youtube.com
Tools And Materials
Gather brushes, rollers, and sandpaper for a smooth finish. Use primer, paint, and sealant to refresh your cabinets. Keep a drop cloth and painter’s tape handy to protect surfaces.
Painting stained kitchen cabinets can refresh your space without a major renovation. The right tools and materials make the process smoother and more effective. Preparing well ensures a professional finish. The following sections detail what you’ll need for this project.Preparation Tools
- Sandpaper: Choose medium and fine grits for smooth surfaces.
- Screwdriver: Helps remove cabinet doors and hardware.
- Drop cloths: Protect floors and countertops from spills.
- Painter’s tape: Masks areas to keep clean edges.
Painting Supplies
- Primer: Ensures paint adheres well to stained surfaces.
- Paintbrushes: Use angled brushes for corners and edges.
- Roller: Covers larger areas efficiently with smooth finishes.
- Paint: Choose durable, high-quality paint for kitchens.
Cleaning Materials
- Degreaser: Removes grease and grime from cabinets.
- Microfiber cloths: Perfect for wiping surfaces clean.
- Vacuum cleaner: Clears dust after sanding for a clean workspace.
Safety Equipment
- Gloves: Protect your hands from chemicals and paint.
- Mask: Keeps dust and fumes away during sanding and painting.
Preparation Steps
Start by cleaning the cabinets with mild detergent to remove grease. Sand the surfaces to ensure paint adhesion. Apply a primer suitable for glossy surfaces, allowing it to dry completely before painting.
Before transforming your kitchen cabinets with a fresh coat of paint, proper preparation is vital. This ensures a smooth, long-lasting finish. Follow these essential steps to get your cabinets ready for painting.Cleaning The Cabinets
Start by removing all dirt and grease from the cabinet surfaces. Use a mixture of warm water and mild detergent. Scrub gently with a sponge or cloth. Rinse well and let them dry completely. Clean cabinets help the paint adhere better.Removing Cabinet Doors And Hardware
Take off the cabinet doors using a screwdriver. Keep screws and hinges in a labeled container. Remove handles and knobs. This makes painting easier and avoids paint drips on hardware.Sanding The Surface
Sand the cabinet surfaces with fine-grit sandpaper. This smooths out any imperfections. It also helps the primer and paint stick better. Wipe away dust with a damp cloth after sanding. Ensure all surfaces are clean and ready for the next steps.Priming Techniques
Preparing stained kitchen cabinets for painting requires effective priming techniques. Begin by thoroughly cleaning the surfaces to remove grease and dirt. Apply a high-quality primer to ensure even paint adherence, enhancing the final look and durability.
Priming Techniques are crucial for transforming stained kitchen cabinets. The right primer ensures a smooth, durable finish. It acts as a base coat, helping the paint adhere well. Priming provides a clean slate, covering stains and imperfections. This section explores effective priming techniques to enhance your cabinet painting project.Choosing The Right Primer
Selecting the right primer is essential. Consider the type of wood and existing stain. Oil-based primers work well on stained surfaces. They block stains and odors effectively. Latex primers are great for less intense stains. They dry quickly and are easy to clean. Look for primers labeled for kitchen cabinets. These are specially formulated for high-traffic areas. Ensure the primer is compatible with your chosen paint type. A good primer reduces the need for multiple paint coats.Applying Primer Evenly
Even application of primer is key. Start by stirring the primer thoroughly. This ensures a consistent texture. Use a high-quality brush or roller for application. Brushes work well for detailed areas and corners. Rollers cover larger surfaces quickly. Apply primer in thin, even coats. Avoid thick layers, which can lead to drips. Allow each coat to dry fully before adding another. Sand lightly between coats for a smooth finish. Check for missed spots and touch up as needed. Proper application ensures a flawless paint job.
Credit: www.instagram.com
Painting Process
Transforming stained kitchen cabinets with a fresh coat of paint is a rewarding and creative project. It not only enhances the aesthetic appeal of your kitchen but also breathes new life into the space. The painting process is crucial in achieving a professional-looking finish that lasts. Let’s dive into the step-by-step process to ensure your cabinets look stunning.
Selecting The Paint Type
Choosing the right paint type is essential for durability and appearance. Opt for high-quality, water-based acrylic paints as they are easy to clean and provide a smooth finish. They are also less prone to yellowing over time compared to oil-based paints.
Consider the sheen level—satin or semi-gloss finishes work best for kitchen cabinets due to their resistance to moisture and ease of cleaning. If you are unsure, consult with a paint specialist who can guide you based on your kitchen’s specific conditions.
Painting Cabinet Frames And Doors
The secret to a flawless paint job lies in preparation. Remove all cabinet doors and hardware to ensure even coverage and avoid messy edges. Sand the surfaces lightly to create a texture that the paint can adhere to.
Begin with applying a primer to block stains and provide a solid base for the paint. Use a brush for corners and a roller for flat surfaces to achieve uniform coverage. Apply two coats of your selected paint, allowing sufficient drying time between layers.
Achieving A Smooth Finish
A smooth finish is the hallmark of a well-painted cabinet. To achieve this, ensure the room is dust-free before painting. Use a high-quality brush or roller designed for smooth finishes.
After the final coat, inspect the surface for any imperfections. Lightly sand any rough spots and touch up with additional paint if necessary. Consider adding a clear topcoat for extra protection and shine—this is particularly useful in high-traffic kitchens.
Do you find painting therapeutic? The satisfaction of seeing your efforts result in beautifully transformed cabinets is unparalleled. The key lies in patience and attention to detail. Are you ready to give your kitchen a makeover with a splash of paint?
Drying And Curing
Proper drying and curing are essential to ensure paint durability on stained kitchen cabinets. Allow sufficient time between coats for the paint to dry thoroughly. Complete curing can take several days, so avoid heavy use during this period.
Drying and curing are crucial steps in painting kitchen cabinets. These steps ensure a smooth, durable finish. Rushing this process can lead to unsightly results. Proper drying and curing protect your hard work. They also contribute to the overall longevity of the paint.Allowing Adequate Drying Time
Give each coat enough time to dry completely. This prevents smudging and peeling. Check the paint label for recommended drying times. Typically, this can range from a few hours to a full day. Humidity and temperature affect drying speed. A warm, dry room helps the paint dry faster. Use fans or dehumidifiers if needed. Avoid touching the surface to test dryness. It might leave fingerprints. Instead, gently press a clean fingernail into an inconspicuous spot. If it leaves no mark, it’s dry.Ensuring Proper Curing
Curing is different from drying. It makes the paint hard and durable. Curing can take several days to weeks. During this time, avoid heavy use of the cabinets. Keep doors and drawers slightly open. This allows air circulation. It helps the curing process. Be patient. Rushing can lead to scratches or dents. Proper curing ensures the paint withstands daily wear and tear. Keep the kitchen clean and dust-free. This prevents particles from sticking to the paint.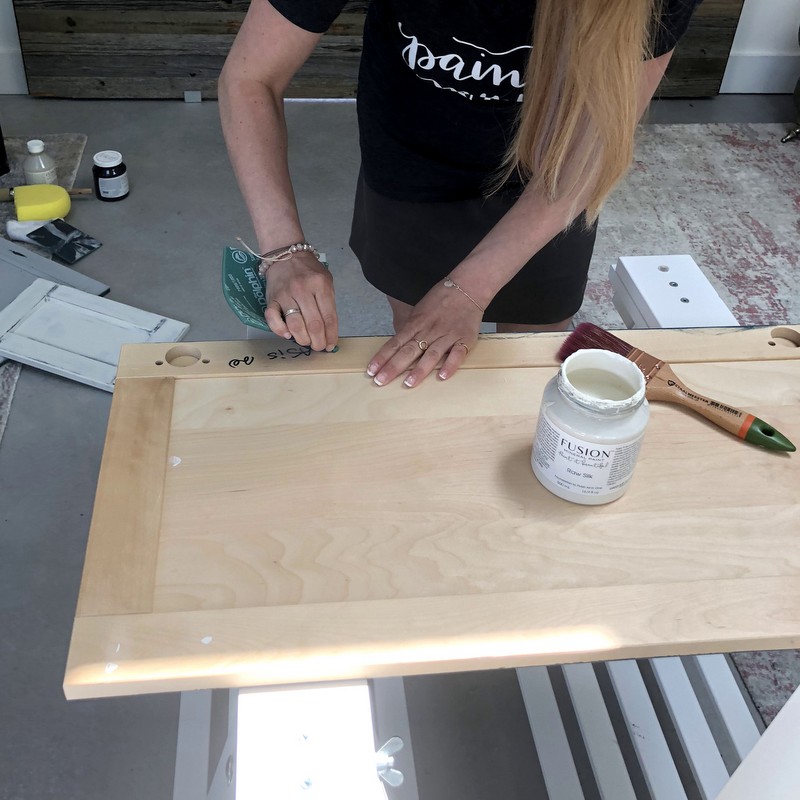
Credit: fusionmineralpaint.com
Reassembling Cabinets
Clean stained kitchen cabinets with a gentle cleaner. Sand lightly to create a smooth surface. Apply primer to ensure better paint adhesion. Choose quality paint for durability and vibrant color. Use a brush or roller for even application. Allow drying between coats for a polished finish.
Reassembling kitchen cabinets after painting them can seem like a daunting task. With patience and care, you can achieve a flawless finish. The process involves reattaching doors, installing hardware, and making final adjustments. Following a step-by-step approach ensures a professional look.Reattaching Doors And Hardware
Start by reattaching the doors to the cabinet frames. Use a screwdriver to secure the hinges firmly. Align each door to ensure they hang straight and evenly. Check for gaps and adjust the hinges if needed. Next, reinstall the hardware like knobs and handles. Place them in their original holes to maintain alignment. Tighten the screws securely but avoid over-tightening. This prevents damage to the freshly painted surface.Final Touches And Adjustments
Inspect the cabinets for any paint smudges or uneven spots. Touch up these areas with a small brush for a clean finish. Open and close the doors to ensure they operate smoothly. Adjust the hinges again if the doors stick or do not close properly. Finally, clean off any dust or debris from the reassembly process. Use a soft cloth to wipe the surfaces gently. This leaves your kitchen looking fresh and inviting.Maintenance Tips
Proper preparation is key. Clean cabinets thoroughly to remove grease and dirt. Lightly sand surfaces for better paint adhesion. Use a primer designed for stained wood before applying the final coat.
After transforming your stained kitchen cabinets with a fresh coat of paint, maintaining their pristine appearance is essential. Regular upkeep not only extends their life but also keeps them looking as good as new. With a few simple maintenance tips, you can preserve the beauty of your painted cabinets for years to come.Cleaning Painted Surfaces
Regular cleaning is crucial for painted cabinets. Use a soft cloth or sponge with a mild detergent solution to wipe away grease and dirt. Avoid abrasive cleaners or scouring pads, which can scratch the surface. A friend once shared how using vinegar and water kept her cabinets spotless. She simply mixed equal parts in a spray bottle and gently wiped the surfaces. It’s a great, eco-friendly option that you might want to try.Preventing Future Damage
Preventing damage begins with being mindful of what touches your cabinets. Use felt pads under objects to avoid scratching the paint. Additionally, always close cabinet doors gently to prevent chipping. Consider applying a clear, protective topcoat to shield the paint from moisture and heat. This is especially useful in kitchens where water splashes and steam are common. It’s a small step that adds significant durability. Do you often leave cabinet doors open while cooking? Make it a habit to close them promptly. This reduces the risk of accidental damage and keeps your kitchen looking tidy. By following these simple maintenance tips, you can keep your painted kitchen cabinets looking fresh and vibrant, enhancing the overall aesthetic of your kitchen.Frequently Asked Questions
Can You Just Paint Over Stained Cabinets?
Yes, you can paint over stained cabinets. Clean, sand, and prime them before painting for best results. Use high-quality paint for durability. Proper preparation ensures a smooth finish and enhances adhesion. Consider using a deglosser for better paint adherence and longevity.
What Kind Of Paint To Use On Stained Cabinets?
Use a high-quality bonding primer before painting stained cabinets. Choose acrylic or latex paint for best results. Semi-gloss or satin finishes are ideal for durability and easy cleaning. Ensure proper surface preparation for optimal adhesion and long-lasting finish.
Is It Better To Roll Or Brush Paint Cabinets?
Brushing paint on cabinets provides a smoother finish but takes longer. Rolling is faster and covers large areas effectively. Choose based on preference and project size. For detailed areas, brushing works best. Consider the type of paint and surface for optimal results.
What Is The Best Primer For Painting Over Stained Wood Cabinets?
The best primer for painting over stained wood cabinets is a high-quality, oil-based primer. This type of primer blocks stains effectively and provides excellent adhesion for paint. Kilz Original and Zinsser Cover Stain are popular choices. Always clean and sand the surface before application for best results.
Conclusion
Painting stained kitchen cabinets can transform your kitchen. Fresh colors make a big difference. Start by cleaning the cabinets well. Sand the surface for smoothness. Choose paint that suits your style. Apply primer for better coverage. Paint carefully, taking your time.
Let the paint dry completely. Enjoy your refreshed kitchen space. It feels like new again. The process may seem tough at first. But the results are worth it. Anyone can achieve this with patience. So, gather your tools and start today.
Your kitchen awaits its new look.