How to Install Lower Kitchen Cabinets: Step-by-Step Guide
Installing lower kitchen cabinets can seem like a daunting task, but what if I told you it doesn’t have to be? Imagine transforming your kitchen space with your own hands, creating a room that reflects your style and meets your needs.
This guide is here to simplify the process for you, breaking it down into easy, manageable steps. You’ll discover the secrets to perfectly aligned cabinets, ensuring they stand the test of time. By the end of this article, you’ll feel confident and equipped to tackle the installation on your own.
Are you ready to give your kitchen the makeover it deserves and take pride in a job well done? Let’s dive in and get started on making your kitchen dreams a reality!
Tools And Materials Needed
Gather a screwdriver, drill, level, and measuring tape for precise installation. Ensure you have the correct screws, brackets, and wood shims. Quality cabinets are essential for a perfect fit.
Embarking on the journey to install lower kitchen cabinets is both exciting and rewarding. Picture your kitchen transforming into a more functional and stylish space with your own hands. However, before diving into the installation process, it’s crucial to gather the right tools and materials. Having everything ready not only saves time but also ensures the installation runs smoothly. Let’s explore the essentials you’ll need for this DIY project.Tools Required
Having the right tools can make all the difference in your installation experience. Here’s what you need:- Measuring Tape:Precision is key. Measure twice, cut once.
- Level:Ensure your cabinets are perfectly horizontal and vertical.
- Drill:A powerful drill makes screwing cabinets a breeze.
- Screwdriver:Both Phillips and flathead types come in handy.
- Stud Finder:Locate studs to securely anchor your cabinets.
- Clamps:Stabilize your cabinets during installation.
- Hammer:Useful for minor adjustments and securing nails.
- Utility Knife:Perfect for precise cuts and trimming.
Materials Needed
Gathering materials is equally vital. Here’s your checklist:- Cabinet Units:Choose quality cabinets that suit your kitchen aesthetic.
- Screws:Ensure you have the right size and type for your wall and cabinets.
- Shims:These help level cabinets on uneven floors.
- Wood Glue:Provides extra bonding strength where needed.
- Caulking:Seal gaps for a polished look.
- Sandpaper:Smooth out rough edges for a clean finish.
- Protective Gear:Safety goggles and gloves protect you during work.
Preparing The Workspace
Preparing the workspace involves clearing the area and ensuring the floor is level. Gather necessary tools and materials for installation. Accurate measurements and a clean space make the process smoother.
Preparing the workspace is a crucial step in installing lower kitchen cabinets successfully. A well-prepared area ensures a smoother installation process, minimizes errors, and can save you time and frustration. Let’s dive into how you can effectively prepare your space to get the best results.Clearing The Area
Start by removing any items that might be in the way. This includes everything from small appliances to decorations. Consider moving any furniture that could obstruct your workspace. An open area gives you more room to work and helps prevent accidents. Don’t forget about the floor. Make sure it’s free of any debris or obstacles that could cause tripping or falling. A clear floor allows you to move freely and focus on the task at hand.Checking The Floor Level
Before you begin installing, it’s vital to check if your floor is level. Use a spirit level to assess this. Why is this important? An uneven floor can cause cabinets to sit unevenly, leading to doors and drawers not closing properly. If your floor isn’t level, consider using shims to create a stable and even base for the cabinets. This small step can make a big difference in ensuring your cabinets look professional and function correctly. Remember, a solid foundation is key to any successful project. Have you ever experienced issues with uneven floors in your own home? Now’s the time to ensure everything is perfectly aligned for a smooth installation process.Measuring And Marking
Measuring and marking are crucial steps in installing lower kitchen cabinets. Precise measurements ensure the cabinets fit perfectly and securely. Proper marking guides the installation, preventing errors. This process requires patience and accuracy to achieve a neat and professional look.
Marking The Cabinet Layout
Begin by identifying the cabinet locations on the wall. Use a tape measure to check the space where each cabinet will fit. Mark these spots using a pencil for clear visibility. Ensure marks are level by using a spirit level. This helps maintain straight lines and alignment.
Consider the layout of appliances and countertops. Leave space for them within the cabinet arrangement. Double-check your measurements to avoid installation mistakes. Accurate marking prevents cabinet misalignment and uneven surfaces.
Locating Wall Studs
Finding wall studs is essential for secure cabinet mounting. Use a stud finder to locate studs behind the wall. Mark their positions clearly with a pencil. Studs provide support for the cabinet’s weight, ensuring stability.
Measure the distance between studs. This helps plan the placement of screws or anchors. Avoid drilling into areas without studs, as this can weaken the installation. Confirm stud locations before proceeding with cabinet installation.
Assembling The Cabinets
Align cabinets with the wall and mark the stud locations. Secure the cabinets using screws at these points. Ensure they are level before tightening completely.
Assembling the kitchen cabinets is a critical step that sets the foundation for a flawless installation process. Whether you’re a seasoned DIY enthusiast or a first-timer, assembling your cabinets properly ensures they function efficiently and look great. With a bit of patience and attention to detail, you can achieve professional results that you’ll be proud to showcase in your kitchen.Checking Cabinet Parts
Before diving into the assembly, take a moment to inventory all the parts. Missing a piece mid-assembly can be frustrating and derail your progress. Lay out all components on a clean surface and cross-reference them with the instruction manual. While checking, ensure there are no damaged or defective parts. If you find any issues, contact the supplier for replacements. It’s easier to address these problems now than later in the process.Securely Fastening Pieces
Once all parts are accounted for, it’s time to start assembling. Use the provided screws and fittings, ensuring each piece is securely fastened. A loose connection can lead to structural issues later on. Consider using a power drill with a torque setting to avoid over-tightening screws. This small tip can prevent splitting the wood or damaging the material. Wouldn’t it be frustrating to discover a mistake after the cabinet is fully assembled? Double-checking each connection as you go can save you from unnecessary headaches. Remember, the effort you put in here pays off with a sturdy, reliable cabinet.Positioning And Securing Cabinets
Positioning and securing your lower kitchen cabinets is a vital step that can impact the functionality and aesthetics of your kitchen. Ensuring the cabinets are properly aligned and securely attached not only prevents future mishaps but also enhances your cooking space’s overall appeal. With some patience and a keen eye, you’ll find that setting up these cabinets is an achievable task.
Aligning Cabinets On The Floor
Start by clearing the floor area where your cabinets will sit. This allows you to accurately measure and mark the positions. Use a level to ensure the floor is even; any uneven spots can cause your cabinets to tilt or wobble.
Once the floor is prepped, arrange your cabinets according to your kitchen layout. An effective trick is to begin from a corner or the highest point of the floor. This helps maintain consistency and prevents gaps between cabinets.
It’s crucial to check the alignment after each cabinet is placed. A small discrepancy can lead to bigger issues down the line. Imagine opening a cabinet door only to have it clash with another—frustrating, right?
Attaching Cabinets To Wall Studs
With your cabinets aligned, the next step is securing them to the wall. Locate the wall studs using a stud finder; these are essential for providing a sturdy foundation.
Drill pilot holes through the cabinet’s back panel into the studs. This helps prevent wood splitting and ensures a snug fit. Remember, your cabinets will hold heavy items, so a secure attachment is vital.
Use screws that are long enough to penetrate the studs but not too long to damage the wall. A good rule of thumb is to use screws that are at least two inches longer than the cabinet thickness. Ever had a cabinet sag under the weight of pots and pans? That’s a scenario you’ll avoid with proper securing.
As you work through positioning and securing, consider how your kitchen’s flow will be affected. Will the arrangement make cooking more enjoyable? Thoughtful planning now will save time and frustration later.

Credit: www.familyhandyman.com
Adjusting And Leveling
Adjusting and leveling lower kitchen cabinets is crucial for a seamless installation. Uneven floors can lead to misaligned cabinets, affecting both functionality and aesthetics. Ensuring the cabinets are properly leveled will prevent future issues like doors swinging open or misaligned drawers. Proper adjustment ensures that every element fits perfectly, creating a harmonious kitchen space.
Using Shims For Leveling
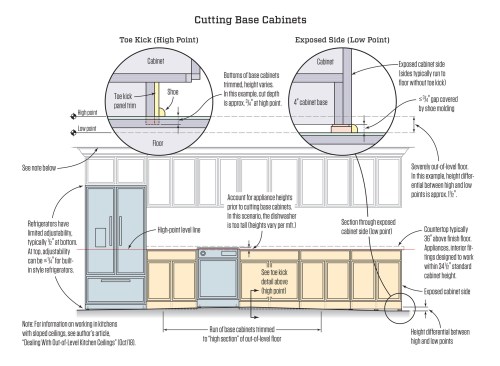
Shims are thin pieces of material used to level cabinets. They help compensate for uneven floors. Place shims under cabinet edges to raise them to the desired height. Check with a level tool to ensure accuracy. Adjust the shims until the cabinet sits perfectly horizontal. This process may require patience and precision for optimal results.
Ensuring Proper Alignment
Alignment of kitchen cabinets is vital for a polished look. Use a straight edge or laser level to check the alignment. Ensure the front edges of the cabinets are flush. Misalignment can cause gaps or uneven surfaces. Adjust the cabinets until they line up perfectly. Double-check with measuring tools to confirm the accuracy.
Installing Hardware And Finishing Touches
Completing your kitchen cabinet installation is an exciting milestone. You’ve laid the foundation, and now it’s time to add those crucial finishing touches that bring everything together. Installing hardware and applying finishing touches are essential steps that not only enhance functionality but also elevate the aesthetics of your kitchen. These details can make a significant difference in how your space looks and feels, leaving you with a kitchen that reflects your personal style and meets your practical needs.
Attaching Doors And Drawers
Start by ensuring all doors and drawers align perfectly with the cabinet frame. This step is crucial for smooth operation and a polished look. Use a level to check alignment and adjust hinges accordingly. If you’ve never adjusted hinges before, it can seem daunting, but with a screwdriver and a bit of patience, you’ll get the hang of it.
Consider the type of hinges you’re using. Soft-close hinges offer a modern touch and prevent those jarring bangs when closing. Once adjusted, attach the doors and drawers securely. Test each one to make sure they open and close effortlessly. It’s a satisfying feeling when everything clicks into place!
Installing Handles And Knobs
The handles and knobs you choose are like jewelry for your cabinets. They can transform a plain cabinet into a statement piece. Decide on a style that complements the overall theme of your kitchen. Whether you opt for sleek stainless steel or charming vintage brass, make sure it resonates with your taste.
- Measure carefully to ensure uniform placement. Uneven handles can disrupt the symmetry.
- Use a template or guide to drill holes. This ensures precision and saves you from mishaps.
Once installed, step back and admire your handiwork. These small details add character and functionality, making your kitchen uniquely yours. Have you ever thought about how a simple knob can change the entire vibe of your kitchen? It’s these thoughtful choices that truly personalize your space.

Credit: www.youtube.com
Final Checks And Clean-up
After installing your lower kitchen cabinets, ensure everything is perfect. Final checks and clean-up bring a satisfying end to your project. These steps keep your kitchen organized and ready for use.
Inspecting Installation
Start by checking the alignment of each cabinet. Use a level to ensure they are straight. Look for gaps between cabinets and walls. Adjust if necessary. Open and close cabinet doors. They should move smoothly. Inspect the screws and brackets. Tighten any loose fittings. Examine the countertops. They should sit flush on the cabinets. Confirm stability by gently pressing down. Everything should feel secure.
Cleaning The Workspace
Remove all debris from the area. Use a broom to sweep the floor. Wipe down the cabinet surfaces with a damp cloth. Remove any dust or fingerprints. Clean the countertops using a suitable cleaner. Ensure there are no smudges or stains. Gather and dispose of all packaging materials. Organize your tools and store them properly. Double-check that you haven’t left any behind. A clean space makes your kitchen inviting and functional.
Credit: www.jlconline.com
Frequently Asked Questions
What Tools Are Needed To Install Kitchen Cabinets?
To install lower kitchen cabinets, you’ll need a drill, level, measuring tape, and screws. A stud finder can help locate wall supports. Additionally, clamps and a screwdriver are useful for securing the cabinets. Ensure you have safety gear, like gloves and goggles, to protect yourself during installation.
How Do I Prepare The Kitchen Space?
Begin by clearing the area and removing old cabinets. Measure and mark the wall for precise cabinet placement. Check for any plumbing or electrical obstructions. Ensure the floor is level and make adjustments if necessary. Proper preparation ensures smooth installation and helps avoid costly mistakes.
Can I Install Cabinets By Myself?
Yes, you can install cabinets by yourself if you’re handy. Ensure you follow the instructions closely. It’s helpful to have someone assist with lifting and aligning the cabinets. Take your time and double-check measurements for accuracy. If unsure, consider hiring a professional for a seamless finish.
How Long Does Cabinet Installation Take?
Installing lower kitchen cabinets typically takes a few hours to a day. This depends on your experience and the kitchen’s size. Preparation and careful measurement are crucial for efficiency. Ensure all tools and materials are ready beforehand. Proper planning can significantly reduce installation time.
Conclusion
Installing lower kitchen cabinets can transform your space. Follow the steps carefully for great results. Start with planning your layout. Gather all necessary tools and materials. Measure accurately before cutting and drilling. Secure cabinets to the wall properly. Ensure they align well with one another.
Double-check stability and alignment. Consider professional help if needed. Small mistakes might lead to bigger issues later. Maintenance is key for long-lasting cabinets. Regular cleaning keeps them looking new. Enjoy your organized and functional kitchen space. You’ve made a significant improvement by yourself.
Happy cooking in your refreshed kitchen!