Are you looking to add a touch of elegance to your kitchen without breaking the bank? Installing crown molding on your kitchen cabinets could be the answer you’ve been searching for.
This simple yet effective upgrade can transform your space, giving it a polished and custom look. You might think it sounds complicated, but with the right guidance, you can tackle this project like a pro. Imagine walking into your kitchen and feeling a sense of pride as you admire your handiwork.
We’ll guide you step-by-step on how to install crown molding on your kitchen cabinets, making the process straightforward and achievable. Keep reading to discover how you can enhance your kitchen’s aesthetic appeal and make it a place you love to spend time in.
Tools And Materials Needed
Tools and Materials Needed Gather a miter saw, measuring tape, and wood glue for precise cuts and secure installation. Use a nail gun and finish nails to attach the molding. Sandpaper and paint complete the look.
Installing crown molding on kitchen cabinets can be a rewarding DIY project that elevates the look of your kitchen. Before diving into the installation, you need to gather the essential tools and materials to ensure a smooth process. Having everything at your fingertips not only saves time but also prevents frustration during the installation. Let’s explore what you’ll need to get started.Essential Tools
To ensure precision and ease, a few specific tools are indispensable:- Miter Saw:This is crucial for making accurate angled cuts on the molding, ensuring seamless corners.
- Measuring Tape:Accurate measurements are the backbone of a successful installation.
- Nail Gun:A nail gun speeds up the process and secures the molding firmly.
- Level:Keep your molding straight with a level, preventing any unwanted tilts.
- Caulk Gun:Seal gaps with caulk for a polished finish.
Materials Required
Gathering the right materials is equally important to achieve a professional look:- Crown Molding:Choose a style and material that complements your cabinets and kitchen decor.
- Wood Glue:Provides additional bonding strength alongside nails.
- Finishing Nails:These are used with the nail gun to attach the molding securely.
- Paint or Stain:Match or contrast the molding with your cabinets for the desired aesthetic.
- Caulk:Fill any gaps or seams for a flawless appearance.
Safety Gear
Don’t overlook safety. Protect yourself while working:- Safety Glasses:Shield your eyes from dust and debris.
- Ear Protection:Protect your hearing from noisy tools like the miter saw and nail gun.
- Dust Mask:Avoid inhaling wood particles during cutting and sanding.
Preparation Tips
Preparation is key to a hassle-free installation. Are you ready to take on this project? – Double-check Measurements: Before making any cuts, verify your measurements twice to avoid costly mistakes. – Test Cuts: Practice on a scrap piece to perfect your angles and fitting. – Organize Your Workspace: Keep your area tidy to ensure efficiency and avoid losing tools. By gathering the right tools and materials, you’re setting the stage for a successful crown molding installation. Do you have any tips or experiences to share from your own DIY projects?
Credit: www.thisoldhouse.com
Choosing The Right Crown Molding
Choosing the right crown molding can transform your kitchen cabinets from ordinary to extraordinary. Whether you’re aiming for a modern look or a classic touch, the right molding can enhance your space and bring it all together. But how do you decide which one suits your kitchen best?
Selecting The Style
Consider the overall design theme of your kitchen. If your space leans toward contemporary, sleek and simple moldings might be a better fit. On the other hand, if your kitchen has a rustic or traditional feel, ornate and detailed moldings could complement the existing decor beautifully.
Material Matters
The material of your crown molding can affect both its appearance and durability. Wood is a popular choice for its versatility and warmth, but it requires more maintenance. Polyurethane offers a durable, lightweight alternative that can mimic wood’s appearance without the upkeep.
Size And Proportion
Measure the height of your cabinets and the ceiling clearance before deciding on the molding size. Larger moldings can make a bold statement but might overwhelm smaller spaces. Conversely, smaller moldings might get lost in a room with high ceilings.
Color Coordination
Think about the color scheme of your kitchen. Matching the crown molding color to your cabinets or contrasting it with a bold hue can dramatically alter the room’s vibe. Consider using paint or stain to achieve the desired look.
Personal Experience And Preferences
Your personal taste plays a crucial role in choosing the right crown molding. Reflect on what styles resonate with you and how they fit into your everyday life. If you love hosting, perhaps a grander style aligns with your social gatherings. Or if you prefer a cozy ambiance, something subtler might suit better.
What does your kitchen say about you, and how can crown molding enhance that message?
Measuring The Cabinets
Measuring the cabinets accurately is essential for a perfect crown molding fit. Ensure you take precise measurements to cut the molding pieces correctly. This step helps avoid gaps and ensures a seamless installation, enhancing your kitchen’s overall look.
Installing crown molding on your kitchen cabinets can elevate the overall aesthetic of your kitchen, giving it a more polished and elegant look. But before you get to the fun part of attaching the molding, accurate measurements are crucial. Even a slight miscalculation can lead to a lot of wasted time and materials. So, how do you ensure you get it right? Let’s dive into the essentials of measuring your cabinets for crown molding.Understanding The Layout
Before you start measuring, stand back and look at your kitchen layout. Note any corners, irregular shapes, or unique features that might affect the crown molding installation. This will help you visualize the path your crown molding will take and identify potential problem areas.Gathering Your Tools
Make sure you have all the necessary tools at hand. A reliable tape measure, a pencil for marking, and a notepad to jot down measurements are essential. You might also want a step stool or ladder for those hard-to-reach spots.Measuring The Cabinet Tops
Place the tape measure at one end of the cabinet top and extend it to the other side. Ensure the tape is straight and level for an accurate measurement. Write down the exact length, rounding to the nearest 1/16th of an inch.Accounting For Corners And Joints
Corners can be tricky. Measure each side of the corner separately and consider the type of joint you plan to use. Miter joints will need precise angle measurements, so double-check these to avoid gaps in your crown molding.Factoring In The Molding Size
Consider the size and style of the molding you plan to use. Larger moldings may require additional clearance above the cabinets. Ensure your measurements include enough space for the molding to fit comfortably.Double-checking Measurements
Before purchasing or cutting any molding, go through your measurements again. Double-checking can save you from costly mistakes. It’s always better to measure twice and cut once. By carefully measuring your cabinets, you lay the groundwork for a smooth and successful crown molding installation. Do you feel ready to start your DIY project? Remember, precision is key, and with the right measurements, your kitchen will soon boast a stunning new look.Cutting The Crown Molding
Crown molding adds a touch of elegance to kitchen cabinets, transforming them from ordinary to extraordinary. Cutting the crown molding is a critical step that demands precision and attention to detail. It’s where the magic begins, allowing you to create seamless joints that elevate your kitchen’s aesthetic.
Using A Miter Saw
A miter saw is your best friend when it comes to cutting crown molding. Its versatility and accuracy make it indispensable for achieving perfect angles. When using a miter saw, ensure the blade is sharp and set at the correct angle to avoid splintering the wood. Practice makes perfect, so consider testing on a scrap piece before making your final cuts.
Angles And Measurements
The key to flawless crown molding lies in mastering angles and measurements. Measure twice, cut once—this mantra is vital. Crown molding typically requires a 45-degree angle cut, but double-check your cabinet’s corners, as some may need slight adjustments. Using a protractor can help verify angles before cutting, ensuring every piece fits snugly.
Are you ready to transform your kitchen cabinets with crown molding? Attention to detail and precision in cutting can make all the difference. What creative ideas do you have for your kitchen’s new look?
Attaching The Molding To Cabinets
Installing crown molding on kitchen cabinets adds elegance and style. First, measure the cabinet’s dimensions for a precise fit. Then, securely attach the molding using nails and adhesive, ensuring it sits flush against the cabinet edges.
Attaching the molding to your kitchen cabinets can seem like a daunting task, but breaking it down into manageable steps makes it much simpler. Once you have your crown molding cut to size, the next step is securing it firmly to the cabinets. This requires precision and a few handy tools, but the result is a polished and elevated kitchen design that is well worth the effort.Pre-drilling Holes
Before you start hammering away, take the time to pre-drill holes in your crown molding. This helps to prevent the wood from splitting and ensures a cleaner finish. Use a drill bit that is slightly smaller than the diameter of your nails. This allows the nails to grip the wood securely without damaging it. Align the molding with the top of your cabinets, and mark the spots where the nails will go. Pre-drill these points to make the nailing process smoother and more precise.Securing With Nails
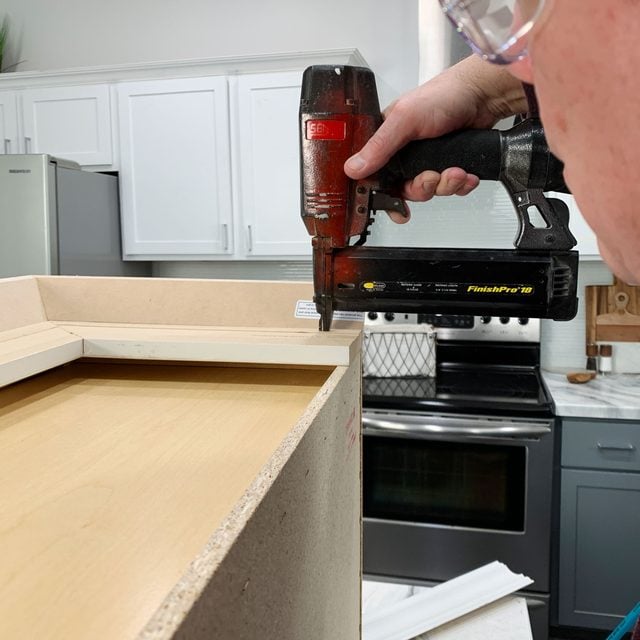
With the holes pre-drilled, you’re ready to secure the molding to the cabinets. A pneumatic nail gun can make this process quicker and easier, but a hammer and finishing nails will work just fine as well. Ensure that the molding is perfectly aligned before you start nailing. Begin at one end and work your way to the other, nailing at each pre-drilled hole. Keep an eye on the alignment as you go, adjusting as necessary to maintain a seamless look. This attention to detail will ensure that your crown molding not only looks professional but also adds the perfect finishing touch to your kitchen cabinets. Have you ever noticed how the smallest details make the biggest impact in a room? Taking the time to properly attach your crown molding can transform your kitchen from ordinary to extraordinary.
Credit: www.youtube.com
Filling Gaps And Seams
Filling gaps and seams ensures a polished look when installing crown molding on kitchen cabinets. Begin by measuring the cabinet dimensions accurately. Use caulk or wood filler to close any spaces, creating a seamless transition between the molding and the cabinet.
Installing crown molding on kitchen cabinets adds elegance and style. But gaps and seams can reduce the charm. Filling these gaps is crucial for a seamless look. This process ensures your cabinets appear polished and professional.Understanding Gaps And Seams
Gaps occur between the crown molding and the cabinet surface. These can be due to uneven surfaces or slight measurement errors. Seams appear where two pieces of molding meet. Proper filling hides these imperfections.Choosing The Right Filler
Select a filler that matches your molding material. Wood filler works well for wooden moldings. Caulk is ideal for painted surfaces. Ensure the filler is easy to sand and paint.Applying Wood Filler
Use a putty knife to apply wood filler. Press it into the gaps and seams. Smooth the surface with the knife. Allow it to dry completely before sanding.Using Caulk For Painted Surfaces
Caulk is flexible and covers gaps effectively. Use a caulk gun for even application. Run a bead along the gap. Smooth it with a damp finger for a neat finish.Sanding For A Smooth Surface
Once the filler or caulk is dry, sand the area. Use fine-grit sandpaper for a smooth finish. Ensure the surface is even with the cabinet and molding.Painting And Finishing Touches
After sanding, paint the filled areas. Match the paint with the existing molding color. Apply a second coat if needed for uniformity. Enjoy the flawless look of your kitchen cabinets.Painting Or Staining The Molding
Painting or staining the molding adds a polished look to kitchen cabinets. Choose a color that complements your decor. Apply even coats for a smooth finish.
Painting or staining the crown molding on your kitchen cabinets can dramatically enhance the overall look of your kitchen. This process allows you to customize the molding to perfectly match or complement your existing cabinets, creating a cohesive and polished appearance. Whether you choose to paint for a modern touch or stain for a more classic finish, the choice can significantly impact your kitchen’s aesthetic.Choosing Between Paint And Stain
Deciding whether to paint or stain your molding depends on the style and feel you want in your kitchen. Paint offers a sleek, modern look and can easily be matched with your cabinet color. Stain, on the other hand, highlights the natural beauty of the wood, offering a warm, traditional appeal.Preparing The Molding
Before you begin, ensure your molding is clean and smooth. Sand it lightly to remove any imperfections and dust it off thoroughly. Applying a primer is crucial if you decide to paint, as it helps the paint adhere better and last longer.Applying Paint Or Stain
Use a high-quality brush or spray to apply your chosen finish. For paint, apply thin coats and allow each to dry completely before adding the next. Staining requires a bit more patience; apply the stain evenly and wipe off any excess to prevent blotches.Sealing And Finishing
After the paint or stain has dried, apply a clear sealant to protect the molding. A sealant enhances durability and keeps your molding looking fresh. Consider a satin or gloss finish for paint, or a matte finish for stain to maintain a natural look. Rushing the process can lead to uneven finishes or peeling. Ensure each coat is fully dry before proceeding to the next step. Also, don’t skip the primer when painting; it’s essential for a long-lasting finish.Personalizing Your Space
This is your chance to add a personal touch to your kitchen. Consider using contrasting colors for an eye-catching effect or matching tones for a seamless look. What story do you want your kitchen to tell?Common Mistakes To Avoid
Incorrect measurements can lead to gaps or misalignment. Choose the right tools to ensure clean cuts and fits. Avoid rushing; take time to secure each piece properly for a polished finish.
Installing crown molding on kitchen cabinets can elevate the room’s aesthetic, making it look polished and refined. However, achieving that seamless finish isn’t always straightforward. Many encounter pitfalls that can transform a promising project into a frustrating ordeal. Avoiding these common mistakes can save you time, money, and a lot of stress.Misjudging Measurements
Precision is key in crown molding. Misjudging measurements can lead to gaps or overlap that disrupt the design. Always measure twice before cutting. Consider using a template to ensure accuracy.Ignoring The Importance Of Angles
Angles can be tricky. Incorrect angles can lead to mismatched pieces that disrupt the flow of the molding. Use a miter saw set precisely to the required angle, and practice on scrap pieces first.Choosing The Wrong Type Of Molding
Not all crown moldings are created equal. Selecting the wrong size or style can clash with your cabinets. Match the molding to the cabinet’s design and scale for a cohesive look.Skipping The Paint Or Finish Step
Unfinished molding can appear raw and unfinished. Always paint or stain your molding to match or complement your cabinets. This step ensures a polished and cohesive final appearance.Neglecting To Use A Support System
Crown molding requires support during installation. Without it, the molding can sag or become misaligned. Use a brad nailer or clamps to hold the molding securely in place while you work.Overlooking Ceiling Irregularities
Ceilings aren’t always perfectly level. Overlooking this can lead to gaps between the molding and ceiling. Use a level to check for irregularities and adjust the molding accordingly.Failing To Account For Cabinet Doors
Molding that obstructs cabinet doors is a common oversight. Ensure your molding doesn’t interfere with the opening and closing of cabinet doors. Position the molding carefully to maintain functionality. Avoiding these pitfalls can make your crown molding installation a success. Have you ever tackled a similar project? What unexpected challenges did you face? Share your thoughts and experiences in the comments!Maintenance Tips
Maintaining crown molding on kitchen cabinets is essential to keep your kitchen looking fresh and elegant. While installing crown molding can add a touch of sophistication, it’s the upkeep that ensures it remains a stunning feature in your home. Do you often find yourself wondering how to make your crown molding last? Here are some practical maintenance tips to help you preserve its beauty.
Regular Cleaning
Dust and grease can accumulate over time, especially in the kitchen. Use a soft microfiber cloth to wipe down the molding regularly. For stubborn spots, a mixture of warm water and mild dish soap works wonders.
Inspect For Damage
Periodically check for any cracks or gaps in the molding. Repairing small issues promptly prevents them from becoming bigger problems. Wood filler can be an effective solution for minor imperfections.
Touch-up Paint
A fresh coat of paint can rejuvenate the look of your crown molding. Keep some of the original paint handy for touch-ups. This is particularly useful after minor repairs or cleaning sessions that may dull the finish.
Humidity Control
Excessive moisture can warp or damage wooden crown molding. Ensure your kitchen is well-ventilated and consider using a dehumidifier. This is especially crucial if you live in a humid climate.
Protect From Heat
Heat can affect the integrity of your molding. Keep heat-producing appliances away from the molding as much as possible. If your kitchen layout necessitates proximity, consider using heat shields.
Have you ever noticed how much a small detail like crown molding can elevate the entire look of your kitchen? By following these maintenance tips, you’ll ensure that your crown molding remains a timeless addition to your space.
Credit: www.familyhandyman.com
Frequently Asked Questions
How Do You Attach Crown Molding To A Cabinet?
Use a miter saw to cut crown molding at the correct angles. Secure it with wood glue and nails. Align carefully for a seamless fit. Ensure corners are tight and smooth. Fill gaps with caulk or wood filler for a polished look.
Should I Nail Or Glue Crown Molding?
Nailing crown molding ensures stability and longevity. Glue can be used for lightweight moldings or extra support. Use both for best results, especially in high-traffic areas. Proper installation prevents issues and enhances room aesthetics. Always choose methods that suit your molding material and room conditions.
Should You Put Crown Molding On Kitchen Cabinets?
Crown molding enhances kitchen cabinet aesthetics, adding elegance and height. It creates a seamless look, especially in traditional designs. Consider ceiling height and kitchen style before installing. Choose a color and style that complements your cabinets for a cohesive appearance.
Proper installation ensures durability and visual appeal.
Can You Add Crown Molding To Existing Cabinets?
Yes, you can add crown molding to existing cabinets. It enhances style and adds a polished look. Measure carefully, choose the right molding, and ensure secure attachment. This upgrade can transform your kitchen’s appearance and increase home value. Consider professional help for precise installation.
Conclusion
Installing crown molding on kitchen cabinets adds style. The process is simple with the right tools. Measure accurately and cut carefully for perfect fit. Secure the molding in place using nails or glue. Double-check alignment for a seamless look. This upgrade enhances the kitchen’s elegance.
Now, your cabinets have a sophisticated finish. Take your time and enjoy the transformation. Crown molding blends function with beauty. It’s a worthwhile investment for any kitchen space. With patience, you achieve stunning results. Happy decorating!