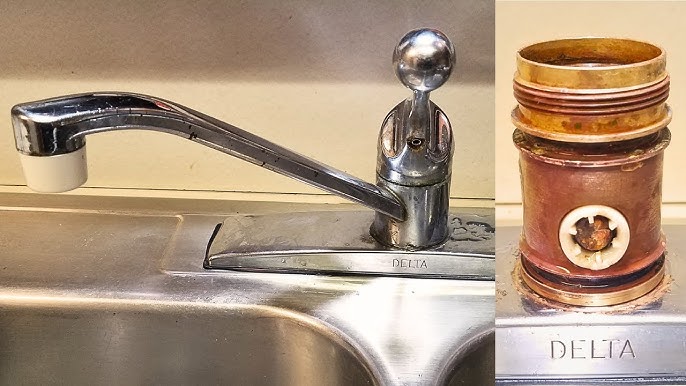
Are you frustrated by the constant drip-drip-drip of your Delta kitchen faucet? You’re not alone.
That persistent sound can drive anyone up the wall, not to mention the waste of water it causes. But here’s the good news: fixing a dripping faucet is easier than you might think, and you don’t need to be a plumbing expert to tackle it.
Imagine the satisfaction of solving this annoying problem yourself, saving money and potentially avoiding a costly plumber visit. In this guide, we’ll walk you through the simple steps to fix your Delta kitchen faucet, so you can regain peace in your kitchen. Keep reading to discover how straightforward it can be to silence that drip for good!
Identifying The Cause
Your Delta kitchen faucet is dripping, and it’s driving you crazy. Before you can fix it, you need to identify the cause. This is crucial because understanding where the leak originates can save you from unnecessary repairs and expenses. Once you’ve pinpointed the issue, you can tackle it efficiently and effectively. Let’s break down the process of diagnosing the source of that pesky drip.
Common Leak Sources
Start by examining the most common culprits. Often, a leak stems from the faucet’s O-rings or washers, which can wear out over time. These small components are critical in ensuring a tight seal, and when they deteriorate, water escapes.
Another common issue is a loose or damaged valve seat. This part connects the spout to the faucet body and can cause leaks if not properly maintained. Have you ever noticed water pooling around the base? This might indicate a problem with the valve seat.
Lastly, check the cartridge. In many Delta faucets, the cartridge is the central component controlling water flow. A damaged or misaligned cartridge might be the reason your faucet won’t stop dripping.
Tools Needed For Diagnosis
Before diving into repairs, gather your tools. Having the right equipment makes the job much smoother. Here’s what you’ll need:
- Adjustable wrench:Essential for loosening and tightening nuts and bolts.
- Screwdriver:Often required for removing the faucet handle.
- Plumber’s tape:Handy for ensuring tight seals when reassembling parts.
- Replacement parts:Have some O-rings, washers, and a cartridge on hand, in case they need swapping.
With these tools at your disposal, you’re well-equipped to identify and fix the leak. Are you ready to dive in? Remember, tackling a dripping faucet is not only about stopping the leak but also about understanding its source for a long-term solution.

Credit: www.youtube.com
Gathering Essential Tools
Fixing a dripping Delta kitchen faucet can be a satisfying project, but before you dive in, it’s crucial to gather all the essential tools. With the right tools on hand, the process becomes smoother, quicker, and far less frustrating. Whether you’re an experienced DIY enthusiast or a newcomer to home repairs, having a well-prepared toolkit is your first step to success. Let’s explore what you need to ensure you’re ready for the task ahead.
Basic Tools Checklist
Start by assembling a straightforward toolkit. Some items are likely already in your home, while others might require a quick trip to the hardware store. Here’s a checklist to help you get organized:
- Adjustable wrench:Perfect for loosening nuts without damaging them.
- Screwdriver set:Ensure you have both flathead and Phillips-head options.
- Allen wrench set:Essential for removing faucet handles.
- Plumber’s tape:Helps prevent leaks when reconnecting fixtures.
- Replacement parts:Check your faucet model to purchase the correct parts like O-rings or seals.
Having these tools ready can save you from unwanted trips to the store mid-repair. Have you ever found yourself halfway through a task only to realize you’re missing a critical tool? Preparation is key.
Safety Equipment
While fixing a faucet might seem like a simple task, safety should never be overlooked. Protecting yourself ensures that you can carry out the repair without any mishaps. Consider these safety essentials:
- Safety glasses:Prevents debris or water from splashing into your eyes.
- Rubber gloves:Keeps your hands dry and protected from harsh cleaning agents.
- Non-slip shoes:Avoid accidents, especially when working in a potentially wet kitchen.
Safety gear might seem unnecessary for such a simple task, but it’s always better to be prepared. Have you ever had a close call while doing home repairs that made you wish you’d taken more precautions?
With your tools and safety equipment ready, you’re now well-equipped to tackle the dripping faucet with confidence. Remember, preparation is half the battle won!
Shutting Off Water Supply
Shut off the water supply before fixing a dripping Delta kitchen faucet. This step prevents water spills and ensures safety. Locate the valve under the sink and turn it clockwise to stop the flow.
Shutting off the water supply is crucial to fixing a dripping Delta kitchen faucet. Ensuring no water flows during repair prevents mess and damage. Properly shutting off the supply also safeguards plumbing. Here’s how to do it effectively.Locating The Shut-off Valve
Finding the valve is the first step. Check under the sink. Look for two small handles or knobs. These are usually located near the base of the sink. Turn them clockwise to stop the water. If you can’t find them, check the basement or utility room.Draining Remaining Water
Even after shutting off the valve, some water might remain in the pipes. Open the faucet to drain leftover water. Keep it open until the flow stops. This ensures no water is left to drip. Use a bucket to catch any remaining drops. This simple step helps in maintaining a clean workspace.Disassembling The Faucet
Disassembling the faucet is crucial to fixing a dripping Delta kitchen faucet. Start by turning off the water supply. Gently remove the handle to access internal parts.
Disassembling a dripping Delta kitchen faucet may seem daunting, but it’s an essential step in fixing the problem. By taking apart the faucet, you gain access to the internal components that might be causing the leak. With some patience and the right tools, you can restore your faucet to its optimal condition.Removing The Handle
Begin by turning off the water supply to prevent any accidental sprays. Locate the small screw on the underside of the handle, often hidden beneath a decorative cap. Use a screwdriver to remove this screw, allowing you to gently lift the handle off. Removing the handle might reveal some wear and tear. This can be surprising, especially if the faucet seemed fine from the outside. You may notice mineral buildup or corrosion, which could be contributing to the leak.Accessing Internal Components
With the handle removed, the internal components are now accessible. This includes the cartridge and seals, which are common culprits for leaks. You may need a specialized tool, like a cartridge puller, to safely extract these parts. As you pull out the components, consider their condition. Are the seals worn out or damaged? A simple replacement could solve your dripping issues. Have you ever wondered why a tiny seal can cause such a big problem? It’s often the unnoticed details that impact your daily life. Taking these components out might reveal insights into the quality of your water or how often maintenance is needed. It’s a chance to take control and prevent future problems. Disassembling your faucet isn’t just about fixing a leak; it’s about understanding your kitchen’s plumbing system. Are you ready to dive deeper and tackle those hidden issues?Inspecting And Replacing Parts
Inspecting and replacing parts can solve a dripping Delta kitchen faucet. Begin by turning off the water supply. Next, check the O-rings and seals for wear and tear, and replace them if necessary. Finally, reassemble the faucet and test for leaks.
Inspecting and replacing parts in a Delta kitchen faucet can stop the drip. This approach targets worn-out components that cause leaks. Regular inspection and timely replacement ensure smooth operation. Here are steps to inspect and replace key parts.Cartridge Inspection
Start by turning off the water supply. Then, remove the faucet handle. Use a screwdriver to loosen any screws. Gently lift off the handle to access the cartridge. Check the cartridge for cracks or mineral buildup. A damaged cartridge often causes leaks. If you see damage, consider a replacement.Replacing Worn Seals And Springs
After inspecting the cartridge, check the seals and springs. These small parts wear out over time. Remove the faucet spout to access them. Pull out the old seals and springs with needle-nose pliers. Compare them with new ones to ensure a match. Insert new seals and springs into the faucet. Reassemble the spout and handle. Turn on the water supply and test for leaks.
Credit: www.youtube.com
Reassembling The Faucet
Reassemble the faucet by aligning the parts carefully. Ensure each component fits snugly to prevent future leaks. Tighten screws and nuts securely to finish the repair.
Reassembling a Delta kitchen faucet requires attention to detail. This part ensures the faucet functions smoothly, avoiding any future leaks. After replacing the necessary parts, it’s crucial to reassemble them correctly. Proper reassembly guarantees the faucet operates efficiently and looks neat.Reattaching The Handle
Begin by placing the handle back onto the stem. Ensure it fits snugly. Use a screwdriver to secure the handle with the set screw. Tighten it firmly to prevent any wobbling. Check if the handle moves smoothly. If not, adjust the screw.Ensuring Proper Alignment
Aligning the faucet parts correctly is vital. Ensure the cartridge is seated properly within the faucet body. Position the faucet’s spout correctly over the cartridge. This prevents any misalignment that might cause leaks. Double-check the alignment before proceeding.Testing For Leaks
Testing for leaks ensures a secure kitchen faucet. Check all connections and seals for drips. Tighten or replace parts as needed.
Testing for leaks is an essential step in fixing a dripping Delta kitchen faucet. After you’ve replaced or repaired the necessary components, ensuring that everything is properly sealed and functional is crucial. This process not only verifies your repair but also safeguards against any future water damage. Here’s how you can efficiently test for leaks and make sure your faucet is working flawlessly.Restoring Water Supply
First, you need to restore the water supply to your faucet. Turn the water valves under the sink clockwise to open them. You can usually find these valves on either side of the faucet pipes. Once the valves are open, turn on the faucet to full pressure. This step helps in flushing out any air trapped in the lines and ensures a smooth water flow. Check for any immediate leaks at the base and handles of the faucet. If you notice any water pooling or dripping, it might be a sign that something needs further tightening or adjustment.Monitoring For Drips
Now that the water is flowing, monitor the faucet closely for any drips. Watch the spout for a few minutes; even a small drop could indicate a problem. Keep an eye on the base and handle areas as well. Sometimes leaks can originate from these spots, even if the spout seems fine. Consider using a dry towel to wipe around the faucet base and handles. If the towel picks up moisture, it’s a clear indication that there’s still a leak. Have you ever wondered why a faucet might still leak after a seemingly successful repair? Often, it’s the tiny unnoticed components that can cause persistent drips. Check washers and O-rings for wear and tear. Be proactive; if you spot a leak, tackle it immediately rather than waiting for it to worsen. A stitch in time saves nine, right?Maintenance Tips
Fixing a dripping Delta kitchen faucet can save water and prevent damage. First, turn off the water supply beneath the sink. Then, carefully remove the faucet handle and replace worn-out washers or seals.
Maintaining your Delta kitchen faucet is crucial for its longevity and to prevent annoying drips. Regular maintenance not only keeps your faucet looking shiny but also ensures it functions seamlessly. By dedicating a little time to upkeep, you can avoid common faucet issues and save on potential repair costs.Routine Cleaning
Consistent cleaning is your first line of defense against grime and mineral buildup. Use a soft cloth and mild soap to wipe down the faucet regularly. Avoid harsh chemicals as they can damage the finish. For stubborn spots, a mixture of vinegar and water can work wonders. This solution helps dissolve mineral deposits without harming the faucet. Rinse thoroughly to prevent any residue from settling.Regular Inspection
Regular inspection is key to catching potential issues early. Check for any signs of leaks around the base and handle. Even a small drip can escalate into a bigger problem if left unchecked. Look out for rust or corrosion, especially around the joints. This could indicate a need for replacement parts. Listen for unusual noises when the faucet is in use; these could signal internal wear. Routine checks can save you from unexpected hassles. Wouldn’t you rather spend a few minutes now than deal with a costly repair later?
Credit: www.youtube.com
Frequently Asked Questions
How Do I Stop My Delta Sink Faucet From Dripping?
Turn off the water supply. Remove the faucet handle. Replace the worn-out washer or O-ring. Reassemble the faucet. Test for drips.
How Do I Get My Kitchen Faucet To Stop Dripping?
Fix a dripping kitchen faucet by replacing the worn-out washer or O-ring. Turn off the water supply first. Unscrew the faucet handle to access the parts. Replace damaged components and reassemble. Turn the water back on to check for leaks.
Regular maintenance prevents future drips.
Why Does A Faucet Still Drip When The Water Is Turned Off?
A dripping faucet often indicates a worn-out washer or seal. Mineral deposits or corrosion can also cause leaks. Replacing the faulty parts usually resolves the issue. Regular maintenance can prevent future drips. Ensure all connections are tight to stop leaks.
How Do I Change The O-rings On My Delta Kitchen Faucet?
Turn off the water supply. Remove the faucet handle using a hex key. Unscrew the cap and collar. Take out the spout. Replace the worn O-rings. Reassemble the faucet in reverse order. Ensure everything is tightened properly. Turn the water back on and check for leaks.
Conclusion
Fixing a dripping Delta kitchen faucet is simple. First, gather your tools. Next, turn off the water supply. Carefully remove the faucet handle. Inspect and replace the worn-out parts. Reassemble everything securely. Turn on the water to check for leaks.
A drip-free faucet saves water and money. Regular maintenance prevents future leaks. Anyone can handle this task with basic tools. Enjoy a quiet kitchen without the annoying drip. Remember, patience is key. A little effort leads to great results. Happy repairing!