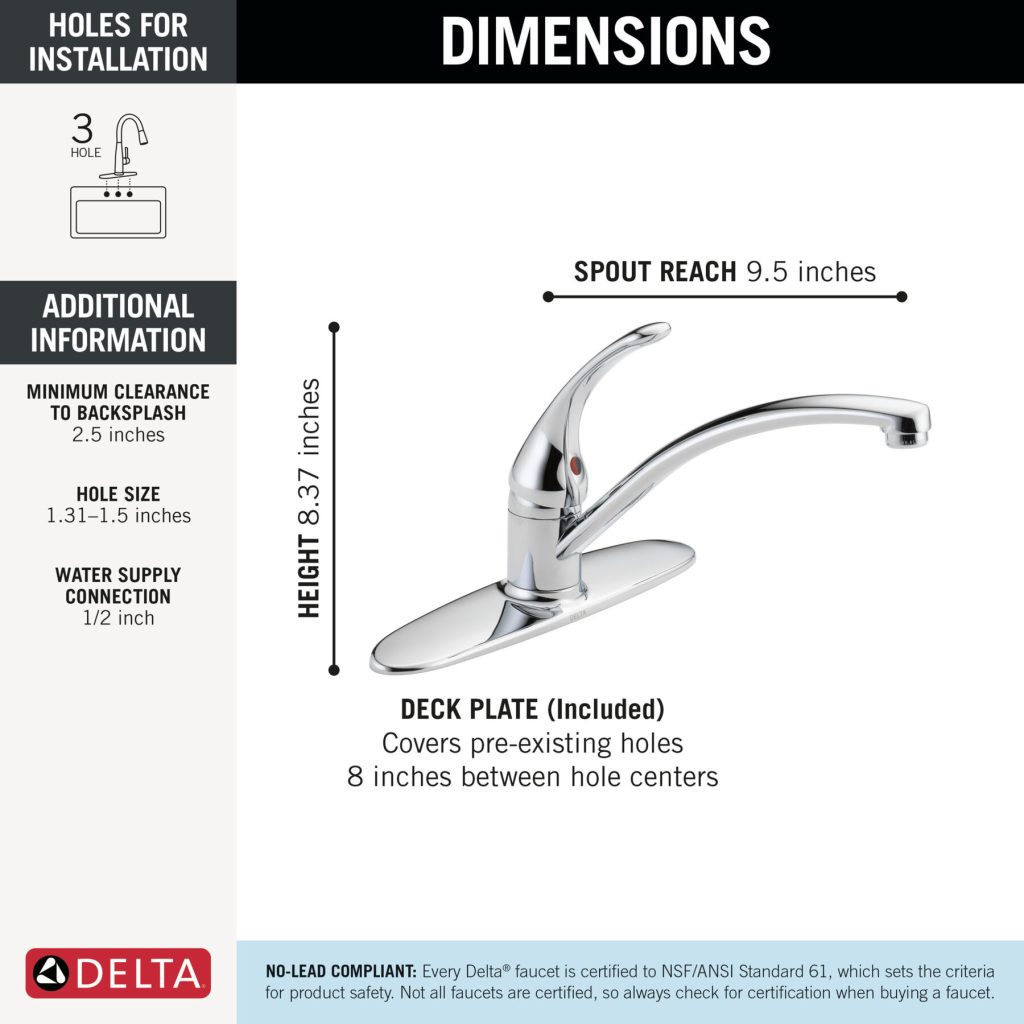
Are you ready to give your kitchen a fresh new look with a sleek Delta faucet? Installing a kitchen faucet might seem like a daunting task, but with the right guidance, you can do it yourself and save money on hiring a professional.
Imagine the satisfaction of turning on your newly installed faucet, knowing you accomplished it on your own. This guide is designed to help you through each step, ensuring you get it right the first time. With clear instructions and helpful tips, you’ll discover that installing your Delta kitchen faucet is simpler than you think.
Dive in to learn how you can transform your kitchen with ease and confidence.

Credit: www.youtube.com
Tools And Materials Needed
Gather a wrench, plumber’s tape, and a basin wrench for the installation. Have a bucket and towel handy for spills. Ensure the Delta kitchen faucet kit is complete with all necessary components.
Installing a Delta kitchen faucet can refresh your kitchen’s look. Before beginning, gather the essential tools and materials. These will ensure a smooth and efficient installation process. Having everything ready will make the task easier and faster. Let’s explore the necessary items.Tools You’ll Need
A few basic tools are essential for this project. These will help you remove the old faucet and install the new one. Ensure you have these tools handy.- Adjustable Wrench:Useful for loosening nuts and bolts.
- Phillips and Flathead Screwdrivers:For removing screws.
- Plumber’s Putty:Helps seal the faucet base.
- Basin Wrench:Ideal for tight spaces under the sink.
- Bucket:Catches water when you disconnect pipes.
- Tape Measure:Ensures accurate measurements.
Materials You’ll Need
Having the right materials is crucial. They ensure a secure and leak-free installation. Gather these materials before starting the project.- Delta Kitchen Faucet:Choose a model that fits your sink.
- Supply Lines:Connect water lines to the faucet.
- Thread Seal Tape:Seals pipe connections to prevent leaks.
- Cleaning Cloth:Keeps the area clean and dry.
Preparing The Workspace
Installing a Delta kitchen faucet can refresh your space. But before diving in, preparing the workspace is key. A well-prepared area ensures a smooth installation process. This involves clearing the space and turning off the water supply.
Clearing The Area
Begin by removing items under the sink. This provides easy access to plumbing connections. Store cleaning supplies and pots elsewhere. Ensure the sink area is free of clutter. A clear space helps avoid accidents and makes maneuvering tools easier.
Check above the sink as well. Move anything that might obstruct your work. This includes dish racks or decorative pieces. A tidy area means fewer distractions. It allows you to focus on the task at hand.
Turning Off Water Supply
Locate the water shutoff valves. These are usually under the sink. Turn them clockwise to stop the water flow. This prevents leaks during installation. Ensure both hot and cold lines are off.
If your home doesn’t have individual shutoff valves, turn off the main water supply. It’s often found near the water meter. Confirm water is off by testing the faucet. No water should come out.
Turning off the water safeguards your workspace. It prevents unwanted spills and ensures safety. Double-check the valves before proceeding to the next steps.
Removing The Old Faucet
Begin by shutting off the water supply and disconnecting the old faucet from the sink. Loosen nuts and remove the fixture carefully, ensuring no parts fall into the drain.
Removing the old faucet is an essential step in upgrading your kitchen with a new Delta faucet. This task may seem daunting, but with the right approach, you can handle it smoothly. By following a few straightforward actions, you’ll be ready to install your new faucet in no time.Disconnecting Water Lines
Start by turning off the water supply. Locate the shut-off valves under your sink and turn them clockwise until they are completely closed. If your home doesn’t have individual shut-off valves, you might need to turn off the main water supply. After shutting off the water, relieve pressure by turning on the faucet and letting any remaining water drain out. This step prevents unexpected leaks during removal. With a wrench, disconnect the water supply lines from the faucet, taking care to catch any drips with a towel or bucket.Taking Out The Old Unit
Once the water lines are disconnected, it’s time to remove the old faucet. Check under the sink for mounting nuts or screws that secure the faucet to the sink. Use a basin wrench or a similar tool to loosen and remove these fasteners. Lift the old faucet out of its position. If it feels stuck, gently wiggle it back and forth to break the seal. Sometimes, mineral deposits can cause a bit of resistance. As you remove the faucet, consider the condition of your sink. Is there any corrosion or grime that needs cleaning before installing the new faucet? Taking a few extra minutes now can make a big difference in the final result. By addressing these steps methodically, you not only ensure a smoother installation process but also gain valuable DIY skills. What unexpected insights have you discovered while tackling home improvement projects?Installing The Delta Faucet
Installing a Delta kitchen faucet is simple with the right tools. Begin by turning off water supply. Remove the old faucet, then secure the Delta faucet in place. Connect water lines and check for leaks. Enjoy your new faucet!
Installing a Delta kitchen faucet can be a rewarding DIY project that enhances both the functionality and aesthetic of your kitchen. With a few tools and some patience, you can have your new faucet up and running in no time. This guide will walk you through the crucial steps of positioning and securing the faucet, ensuring a smooth and hassle-free installation.Positioning The New Faucet
Begin by placing the gasket or trim ring over the faucet holes on your sink. This is essential to prevent any water leaks. If your sink has a deck plate, position it first, then align the faucet. Ensure the faucet is centered over the sink holes. It’s a simple but crucial step that affects both appearance and functionality. You don’t want your faucet looking off-center every time you glance at your sink. Connect the water supply lines to the faucet. If you’re using a pull-down model, make sure the hose is threaded properly through the faucet. This prevents any tangling or hindrances during use.Securing The Faucet In Place
Under the sink, attach the mounting nuts to secure the faucet. This step might require a bit of flexibility, so be ready to stretch or use a basin wrench. Tighten the nuts until the faucet is snug and doesn’t move. Check for stability by gently wiggling the faucet. If it shifts, tighten the nuts a little more. A stable faucet is crucial for long-term use and avoids future issues. Finally, connect the water supply lines to the shut-off valves. Turn on the water and check for leaks. If you spot any, a quick tightening usually resolves the issue. Taking the time to properly position and secure your Delta faucet ensures it will work efficiently for years. Have you considered how these small details can significantly impact your daily kitchen experience?Connecting Water Supply Lines
Ensure the faucet connections align with the water supply lines. Tighten the nuts using a wrench for secure fitting. Check for leaks by running water through the faucet.
Connecting the water supply lines is a crucial step in installing your Delta kitchen faucet. Proper connection ensures a steady flow of water and prevents leaks. This task might seem challenging, but with a clear guide, it becomes manageable. Let’s break it down into simple steps.Attaching Hot And Cold Lines
First, identify the hot and cold water lines. They are usually marked or colored for easy identification. Attach the hot water line to the left inlet of the faucet. Secure it by hand, then use a wrench for a snug fit. Repeat the same for the cold water line on the right. Ensure both are tightly connected to avoid any leaks.Ensuring Leak-free Connections
Tight connections are essential for preventing leaks. Once attached, turn on both water valves slowly. Watch for any drips or leaks under the sink. If you notice a leak, tighten the connections slightly. Use a wrench but avoid over-tightening. This could damage the fittings. Check again for any signs of water escaping. If all is dry, your connections are secure.
Credit: www.youtube.com
Testing The Installation
Ensure the faucet functions correctly by running water through it. Check for leaks around the base and connections. Verify that hot and cold water flow smoothly and adjust if necessary.
After successfully installing your Delta kitchen faucet, it’s crucial to ensure everything is functioning perfectly. Testing the installation is a vital step to confirm that your hard work has paid off, and you’re free from any pesky leaks or loose connections. It’s all about peace of mind and a smoothly running kitchen.Turning On The Water
Begin by slowly turning on the water supply under your sink. You might hear some noises as air escapes the lines—this is normal. Let the water run for a minute or two to clear out any debris or air bubbles. Adjust both hot and cold water handles to check temperature control. Does the water flow smoothly? If so, you’re on the right track. If not, you may need to revisit your connections.Checking For Leaks
Grab a flashlight and inspect all connection points under the sink. Look for any signs of moisture. A dry paper towel placed around the joints can help detect even small leaks. If you spot any drips, turn off the water and tighten the connections. Sometimes a simple adjustment can save you from future water damage. Consider using a leak detector—a small investment for long-term peace. These handy gadgets alert you if they detect moisture, providing an extra layer of security. Taking these steps ensures your Delta kitchen faucet is not only installed but ready to serve you without a hitch. Have you found any common issues during your installations? Share your tips and tricks for a leak-free kitchen!Final Touches
Secure the faucet in place and ensure all connections are tight. Check for leaks and adjust as needed. Clean the area and test the water flow.
Once you’ve successfully installed your Delta kitchen faucet, it’s time for the final touches. These steps ensure not only a clean and functional setup but also the longevity of your new faucet. Let’s make sure everything is perfect!Cleaning The Area
After installation, take a moment to clean the sink area. Use a mild cleaner to remove any residue left from the installation process. Wipe down the countertop and faucet to give your kitchen a polished look. This step is crucial as it prevents any buildup that could affect the faucet’s operation. A clean workspace also helps you spot any minor issues, like loose screws or misalignments.Ensuring Proper Functionality
Test your faucet by turning it on and off several times. Check for smooth operation and ensure there are no leaks around the base. Adjust the water flow and temperature controls. Make sure they respond accurately to adjustments. It’s also wise to fill a glass with water and check for proper pressure. This small test confirms that everything is working correctly and efficiently. What small detail have you overlooked that might affect the faucet’s performance? Address it now for peace of mind.
Credit: www.youtube.com
Frequently Asked Questions
How Do I Prepare For Installation?
Before installing your Delta kitchen faucet, gather essential tools such as a wrench and plumber’s tape. Ensure water supply lines are turned off. Clear the area under the sink for easy access. Check the faucet packaging for any additional parts or instructions required for installation.
What Tools Are Needed For Faucet Installation?
For installing a Delta kitchen faucet, you’ll need a wrench, plumber’s tape, and a basin wrench. You might also need screwdrivers and a bucket to catch water. These tools help ensure a smooth installation process and prevent leaks or loose fittings.
How Long Does Installation Take?
Installing a Delta kitchen faucet typically takes about one to two hours. Time can vary based on experience and kitchen layout. Ensure you have all necessary tools and follow instructions carefully for an efficient installation.
Can I Install A Faucet Myself?
Yes, you can install a Delta kitchen faucet yourself with basic plumbing knowledge. Follow the instructions provided with the faucet. Ensure you have the right tools and take necessary precautions like turning off the water supply before starting.
Conclusion
Installing a Delta kitchen faucet can be simple. Follow the steps closely. Start by gathering your tools. Remove the old faucet carefully. Install the new one with precision. Tighten all connections securely. Check for leaks to ensure proper installation. Test the faucet’s functionality.
Enjoy your new kitchen upgrade. Practice makes perfect, so don’t rush. With patience, your kitchen will shine. Remember, safety first during installation. Your kitchen will look refreshed. Now, you’re ready to tackle other home projects. Happy plumbing!