How to Remove Moen Kitchen Faucet Cartridge: Expert Guide
Executive Chef & Lead Commercial Kitchen Specialist at Daily Kitchup Test Lab
Is your Moen kitchen faucet acting up, leaving you frustrated with every attempt to wash dishes or fill a pot? You’re not alone.
Many homeowners face the same issue, but the good news is that you can fix it yourself. Understanding how to remove your Moen kitchen faucet cartridge is a simple skill that can save you both time and money. Imagine the satisfaction of solving this common problem without having to wait for a plumber or spend extra cash on repairs.
This step-by-step guide will empower you to take control of your kitchen sink maintenance, ensuring smooth water flow and peace of mind. Let’s dive in and discover how you can easily tackle this task, transforming your kitchen experience.
Credit: www.accio.com
Tools And Materials Needed
Gather a Phillips screwdriver, adjustable wrench, and pliers. Have a replacement cartridge ready. Ensure you have a towel to catch any water spills.
Removing a Moen kitchen faucet cartridge requires specific tools and materials. Having them ready can make the process smoother. This guide will help you gather everything you need for the task. It ensures you don’t face any interruptions during the removal process.Tools Required
- Adjustable wrench
- Phillips screwdriver
- Hex wrench
- Needle-nose pliers
- Flathead screwdriver
Materials Needed
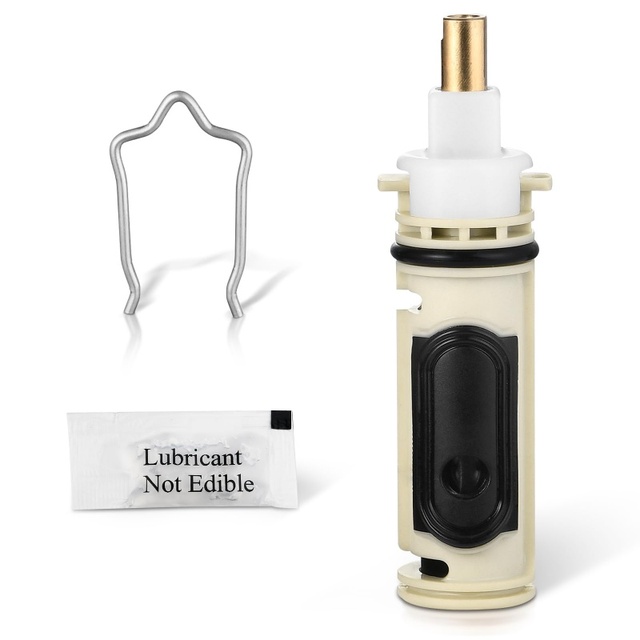
- Replacement cartridge
- Plumber’s grease
- Old towel or rag
- Bucket
- Cleaning brush
Optional Items
- Instruction manual
- Safety gloves
- Flashlight
Preparation Steps
Turn off the water supply and drain the faucet to prevent leaks. Gather necessary tools, including a wrench and screwdriver. Remove the handle to access the cartridge, and carefully take out the old cartridge for replacement.
Preparation is key to successfully removing a Moen kitchen faucet cartridge. Before diving into the process, taking a few simple steps can save you from unexpected surprises and potential messes. By setting the stage properly, you’ll ensure a smoother and more efficient repair experience.Shut Off Water Supply
Begin by turning off the water supply to your faucet. This essential step prevents water from gushing out when you remove the cartridge. Locate the shut-off valves under your sink. If you can’t find them, you might need to turn off the main water supply to your home. It’s always wise to test the faucet after shutting off the water to ensure no water flows out.Clear The Sink Area
Next, clear the area around your sink. This gives you ample space to work and prevents any parts from getting lost. Remove any dishes, cleaning supplies, or other items in the sink or surrounding countertop. Have a small container ready to hold screws and small faucet parts. Imagine the frustration of losing a tiny screw down the drain—better to avoid it altogether! With these preparation steps completed, you’re ready to tackle the task of removing the Moen kitchen faucet cartridge. What other simple preparations can you think of that might make DIY tasks easier?Removing The Faucet Handle
Removing the faucet handle is a crucial step in replacing your Moen kitchen faucet cartridge. It might seem daunting, but with a little patience and the right tools, you can handle it like a pro. Let’s break it down into manageable tasks.
Locate The Handle Screw
First, identify the screw that holds the handle in place. It’s usually hidden beneath a decorative cap or located on the underside of the handle. You might need a flashlight to get a good look. If you’ve ever tried to open a stubborn jar lid, you’ll understand that sometimes, the hardest part is just finding the right angle.
Use a flathead screwdriver to gently pry off the cap. This small step is surprisingly satisfying, revealing the screw that’s been hiding all along. Remember, patience is your best tool here.
Detach The Handle
With the screw exposed, use a suitable screwdriver to loosen it. This can be a moment of triumph or frustration; sometimes the screw turns easily, other times it’s as stubborn as a mule. If it resists, a little spray of lubricant can help ease things along.
Once the screw is removed, gently pull the handle off. It might require a bit of wiggling, but should come off without too much fuss. As you hold the handle in your hand, you might wonder what else in life is held together by a simple screw.
Congratulations! You’ve successfully removed the faucet handle, paving the way for the next step in replacing the cartridge. What other household tasks could you conquer with this newfound confidence?
Accessing The Cartridge
Accessing the cartridge involves turning off the water supply and unscrewing the handle. Remove the retaining nut and gently pull out the cartridge.
Accessing the cartridge in a Moen kitchen faucet is crucial for maintenance. This task helps fix leaks or improve water flow. Follow these steps carefully to access the cartridge without causing damage.Remove The Dome And Collar
Start by turning off the water supply. Locate the small screw under the handle and use an Allen wrench to remove it. Gently lift the handle off the faucet. You will see a dome-shaped cap. Twist the dome counterclockwise with your hand and remove it. Below the dome is the collar. Use pliers to unscrew the collar. Be gentle to avoid scratches.Unscrew The Retaining Nut
Once the collar is off, you will see a retaining nut. This nut holds the cartridge in place. Use a wrench to unscrew the retaining nut. Turn it counterclockwise until it comes off. Keep the nut in a safe place for reassembly. Now, the cartridge is exposed and ready for removal.Extracting The Old Cartridge
Extracting the old cartridge from a Moen kitchen faucet can seem daunting. With the right tools and approach, it becomes a straightforward task. Removing the cartridge is crucial for restoring your faucet’s smooth operation. Follow these steps to ensure a hassle-free experience.
Use A Cartridge Puller
A cartridge puller is essential for removing the old cartridge. This tool grips the cartridge firmly, enabling easy extraction. Insert the puller into the cartridge, ensuring a snug fit. Apply steady force while pulling to avoid damaging the faucet. The cartridge should slide out smoothly. If it resists, double-check the alignment and grip.
Inspect The Cartridge Area
Once the cartridge is out, inspect the area thoroughly. Check for any debris or mineral buildup. Clean the faucet housing with a soft brush and mild detergent. This ensures the new cartridge fits perfectly. Look for any signs of wear or damage in the housing. Addressing these issues now prevents future leaks or problems.
Installing The New Cartridge
Removing the Moen kitchen faucet cartridge requires turning off the water supply. Unscrew the handle and use pliers to gently pull out the old cartridge. Ensure you install the new cartridge by aligning it correctly before securing everything back in place.
Installing a new cartridge in your Moen kitchen faucet is a pivotal step in ensuring a smooth operation and leak-free experience. It might seem daunting at first, but with a bit of patience and the right guidance, you can accomplish this task without a hitch. Think of it as a mini-project that contributes to the longevity of your kitchen’s functionality. Embrace the challenge and consider it a learning opportunity that saves you a call to the plumber. Once you have the old cartridge removed, the path to installation becomes clearer and more straightforward.Position The New Cartridge
Start by ensuring the new cartridge aligns perfectly with the faucet housing. The cartridge should slide in smoothly, matching the notches to avoid any misalignment. Remember how puzzle pieces fit together? It’s a similar concept here. Double-check that the cartridge’s tab is in the correct slot to prevent leaks. Isn’t it satisfying when things click into place perfectly? That’s the feeling you want when positioning the cartridge.Secure With Retaining Nut
After positioning the cartridge, secure it with the retaining nut. Use a wrench to tighten the nut snugly, ensuring it holds the cartridge firmly in place. Be mindful not to overtighten, as this could lead to damage. Think of it like securing the lid on a jar—tight enough to stay, but not so much that it becomes impossible to open later. A properly secured cartridge is essential for preventing leaks. Have you ever dealt with a leaky faucet before? This step is your safeguard against that annoyance. In conclusion, taking the time to ensure the cartridge is correctly positioned and secured will pay off in a smooth-functioning faucet. This process not only enhances your DIY skills but also gives you confidence in tackling other home improvement tasks. You might even find yourself looking forward to the next project!Reassembling The Faucet
To remove the Moen kitchen faucet cartridge, first turn off the water supply. Unscrew the handle to access the cartridge. Carefully pull out the old cartridge and replace it with a new one.
Reassembling the faucet is crucial for ensuring smooth operation. After removing the old cartridge, you need to put everything back in place. This step-by-step guide will help you reassemble the Moen kitchen faucet with ease. Follow each section carefully to ensure your faucet works like new.Reattach The Dome And Collar
The dome and collar protect the internal parts. Slide the dome over the cartridge and tighten it. Ensure it fits snugly. This prevents leaks and maintains the faucet’s appearance. Next, position the collar around the dome securely. Double-check alignment to ensure everything is seated properly. A misaligned collar can cause issues later.Replace The Handle
The handle is the final piece. Position it over the dome. Make sure the handle aligns with the cartridge stem. Secure it with the screw you removed earlier. Tighten the screw until the handle feels firm. Test the handle movement to confirm it operates smoothly. This ensures the faucet functions well. Adjust as needed for optimal performance.
Credit: www.amazon.ca
Testing The Faucet
Testing the faucet ensures successful cartridge removal. Turn on the water to check for leaks or irregular flow. If everything works smoothly, the Moen kitchen faucet cartridge removal is complete.
Testing the faucet is a crucial step after replacing your Moen kitchen faucet cartridge. This ensures that your hard work has paid off and that your faucet is functioning properly. Imagine the satisfaction of seeing a steady stream of water without any leaks or drips. Let’s dive into the steps to test your faucet effectively.Restore Water Supply
Begin by turning on the water supply under your sink. Make sure both the hot and cold water valves are fully open. This will allow water to flow back into the faucet, so you can test its functionality.Check For Leaks
Now, turn the faucet handle to the on position and let water flow for a minute or two. Observe the faucet body, spout, and under the sink for any signs of leakage. If you notice any leaks, you might need to tighten the cartridge or check the O-ring seals. — Testing the faucet is not just about checking for leaks. It’s about knowing that you can trust your kitchen fixture to perform well without unexpected drips or issues. Have you ever wondered why a small leak can be so annoying? It’s the sound of something not quite right, and we all deserve peace in our kitchens.Troubleshooting Common Issues
Removing the Moen kitchen faucet cartridge can solve leaks and improve functionality. Begin by turning off the water supply. Use a wrench to loosen the handle and remove the cartridge, ensuring you note its position for easy reinstallation.
Troubleshooting common issues with your Moen kitchen faucet can save you time and money. Understanding the root of the problem can make the repair process smoother. Whether it’s a sticking handle or water flow problems, addressing these issues promptly ensures your kitchen remains functional and efficient.Handle Sticking
A sticking faucet handle can be frustrating, especially when you’re in the middle of meal prep. Often, mineral buildup is the culprit. Regular cleaning can prevent this issue, but if it’s already sticky, a vinegar soak might be your solution. To address this, remove the handle and soak it in a mixture of vinegar and water. This helps dissolve the mineral deposits that cause the sticking. If the problem persists, consider checking the cartridge for damage.Water Flow Problems
Have you noticed a decrease in water pressure? Or perhaps the water flow is inconsistent? This can be due to a clogged cartridge or aerator. First, ensure the aerator is clean. Unscrew it from the faucet and rinse it under running water. If the water flow remains irregular, it might be time to inspect the cartridge. Replacing the cartridge can be intimidating, but it’s a task you can handle with a bit of patience. Make sure to turn off the water supply before you begin. Remove the old cartridge and check for any debris or damage before installing a new one. By tackling these common issues, you not only extend the life of your faucet but also enhance your kitchen experience. Why let a simple problem disrupt your daily routine when a quick fix is within your grasp?
Credit: www.youtube.com
Frequently Asked Questions
How To Remove A Moen Cartridge From A Faucet?
Turn off the water supply. Remove the handle using an Allen wrench. Unscrew the retaining nut. Gently pull out the Moen cartridge using pliers. Reassemble the faucet in reverse order.
How To Remove Single Handle Kitchen Faucet Cartridge?
Turn off water supply and remove handle. Unscrew retaining nut, then pull out the old cartridge. Replace with new cartridge and reassemble.
Why Won’t My Faucet Cartridge Come Out?
Your faucet cartridge may be stuck due to mineral buildup or corrosion. Use penetrating oil to loosen it. Ensure proper tools are used, like pliers or a cartridge puller. Avoid excessive force to prevent damage. Regular maintenance can prevent future problems.
Consider professional help if it remains stubborn.
How To Stop Moen Kitchen Faucet From Dripping?
Turn off the water supply. Remove the handle and replace the worn-out cartridge. Reassemble the faucet.
Conclusion
Replacing a Moen kitchen faucet cartridge is simple. Follow each step carefully for success. You’ll save money and feel accomplished. Always turn off water before starting. Gather all tools first. This makes the process easier. Double-check your work to prevent leaks.
Practice patience; it’s worth it. Remember, a well-maintained faucet lasts longer. Proper care prevents future issues. Share this guide with friends who need help. Fixing things yourself is rewarding. You gain skills and confidence. Now, enjoy your leak-free kitchen faucet.
Feel proud of your handiwork. Happy fixing!

Similar Posts