How Do You Install a Kitchen Faucet: Easy DIY Guide
Are you tired of that old, leaky kitchen faucet that just doesn’t cut it anymore? Or maybe you’re just looking to spruce up your kitchen with a sleek, new design.
Whatever your reason, installing a new kitchen faucet might seem daunting at first. But what if you could do it yourself and save some money in the process? Imagine the satisfaction of turning on a brand-new faucet that you installed with your own hands.
It’s simpler than you think, and we’re here to guide you through every step. Whether you’re a seasoned DIY enthusiast or a complete beginner, by the end of this article, you’ll be ready to tackle this project confidently. So grab your tools and let’s get started!
Choosing The Right Faucet
Choosing the right kitchen faucet is crucial for a functional space. It enhances your kitchen’s style and efficiency. Selecting the perfect faucet involves considering style, compatibility, and functionality.
Consider Style And Finish
The style and finish of a faucet can transform your kitchen’s look. Sleek, modern designs fit contemporary spaces. Classic shapes suit traditional kitchens. Finish options include chrome, stainless steel, and brushed nickel. Each finish brings unique aesthetics. Choose one that complements your kitchen decor.
Check Compatibility With Sink
Ensure the faucet matches your sink’s configuration. Count the holes on your sink. This determines the faucet style you can install. Single-hole sinks need single-handle faucets. Three-hole sinks accommodate wider faucet designs. Measure the sink’s depth and width for proper fit. Verify the faucet’s reach suits your needs.
Evaluate Features And Functionality
Consider what features are essential for your daily tasks. Pull-down sprayers offer flexibility for cleaning. Touchless faucets provide convenience and hygiene. Check water flow rates for efficiency. Select faucets with easy-to-use handles. Prioritize features that enhance your cooking and cleaning experiences.
Gathering Necessary Tools And Materials
Gather tools and materials like a wrench, plumber’s tape, and a basin wrench. Ensure you have the new faucet, supply lines, and mounting hardware ready. A bucket and cleaning supplies are also helpful to manage spills and clean up.
Gathering the right tools and materials ensures a smooth kitchen faucet installation. Proper preparation avoids delays and enhances efficiency. Before starting the project, review the necessary items. This section guides you through what you need for a successful faucet installation.Tools Required For Installation
Having the right tools makes the installation easier. Here’s a list of essential tools:- Adjustable wrench: Adjusts to fit various nut sizes.
- Basin wrench: Reaches tight spaces under the sink.
- Screwdriver: Useful for securing screws.
- Plumber’s tape: Ensures a watertight seal.
- Bucket: Catches any water leaks during installation.
- Flashlight: Illuminates dark areas under the sink.
Materials And Supplies Checklist
Gathering the right materials prevents mid-task interruptions. Ensure you have these supplies:- New faucet: Choose one that fits your sink’s design.
- Supply lines: Connects water supply to the faucet.
- Rubber gaskets: Prevents leaks at connection points.
- Sealant: Provides extra protection against leaks.
- Cleaning cloth: Wipes away excess water and debris.
- Instruction manual: Guides you through the installation process.
Preparing The Workspace
Clear the area under the sink to access plumbing easily. Gather all necessary tools like wrenches and plumber’s tape. Ensure the water supply is turned off before beginning installation to prevent leaks.
Preparing the workspace for installing a kitchen faucet is crucial for a smooth and hassle-free installation process. A well-organized area not only saves time but also helps prevent any unnecessary mishaps. Whether you’re an experienced DIY enthusiast or a first-time faucet installer, taking a few moments to properly prep your space can make all the difference.Clearing The Area Under The Sink
Begin by removing any items stored under the sink. You might find cleaning supplies, tools, or even forgotten items that have been lurking in the shadows. Clearing this space will give you easy access to the plumbing and make maneuvering much easier. Consider placing a small mat or towel underneath to protect your knees while you work. Having a clear view and freedom of movement will help you focus on the task rather than worrying about knocking things over.Turning Off Water Supply
The next essential step is to turn off the water supply. Look for the shut-off valves, usually located behind or below the sink. Turn them clockwise until tight to stop the water flow. If you can’t find the valves or they seem stuck, you might need to turn off the main water supply for your home. Remember, a quick check for leaks can prevent unexpected water sprays that could dampen your spirits and your kitchen floor. Have you ever turned off the wrong valve, causing chaos? Double-check your work to ensure you’re turning the right knobs, saving yourself from a potential mini-flood.
Credit: www.familyhandyman.com
Removing The Old Faucet
Begin by turning off the water supply. Disconnect the hoses. Remove the mounting nuts. Gently lift the old faucet. Clean the area thoroughly before installing the new one.
Removing the old faucet is the first step in installing a new one. This task might seem daunting, but with the right guidance, it becomes manageable. A little patience and preparation go a long way. Make sure you have the necessary tools before starting. You’ll need a wrench, pliers, and possibly a basin wrench for tight spaces. Remember to turn off the water supply. This prevents any accidental leaks or spills during the process. Once you’re prepared, you can begin removing the old faucet.Detaching Water Supply Lines
Locate the water supply lines under the sink. These are typically flexible hoses. Use a wrench to loosen the nuts connecting these lines to the faucet. Turn the wrench counterclockwise. Once loose, you can disconnect the lines completely. Keep a bucket nearby to catch any water that drips out. This step is crucial to prevent water damage.Loosening Mounting Nuts
Look under the sink to find the mounting nuts. These nuts hold the faucet in place. Use a basin wrench to reach and loosen them. Some may require pliers instead. Turn the nuts counterclockwise until they are free. If they’re stubborn, apply some penetrating oil. This helps ease them out. Once loose, you can remove them entirely.Lifting Out The Old Faucet
After removing the mounting nuts, the faucet should be loose. Grip the faucet firmly from above the sink. Lift it straight up to remove. If it resists, check for any remaining connections. Ensure everything is detached properly. Once free, set the old faucet aside. Your sink is now ready for the new faucet installation.Installing The New Faucet
Begin by shutting off the water supply. Then, remove the old faucet by loosening the nuts underneath. Next, place the new faucet into the mounting holes and tighten the nuts securely. Connect the water supply lines and check for leaks.
Installing a new kitchen faucet can enhance your kitchen’s functionality. It also gives a fresh look. The process might seem challenging, but it’s manageable with the right guidance. Here’s how you can successfully install your new faucet.Positioning The New Faucet
Start by placing the new faucet into the sink holes. Ensure the faucet aligns perfectly with the sink. This step is crucial for a neat appearance. Hold it steady and check the alignment from above.Securing The Mounting Hardware
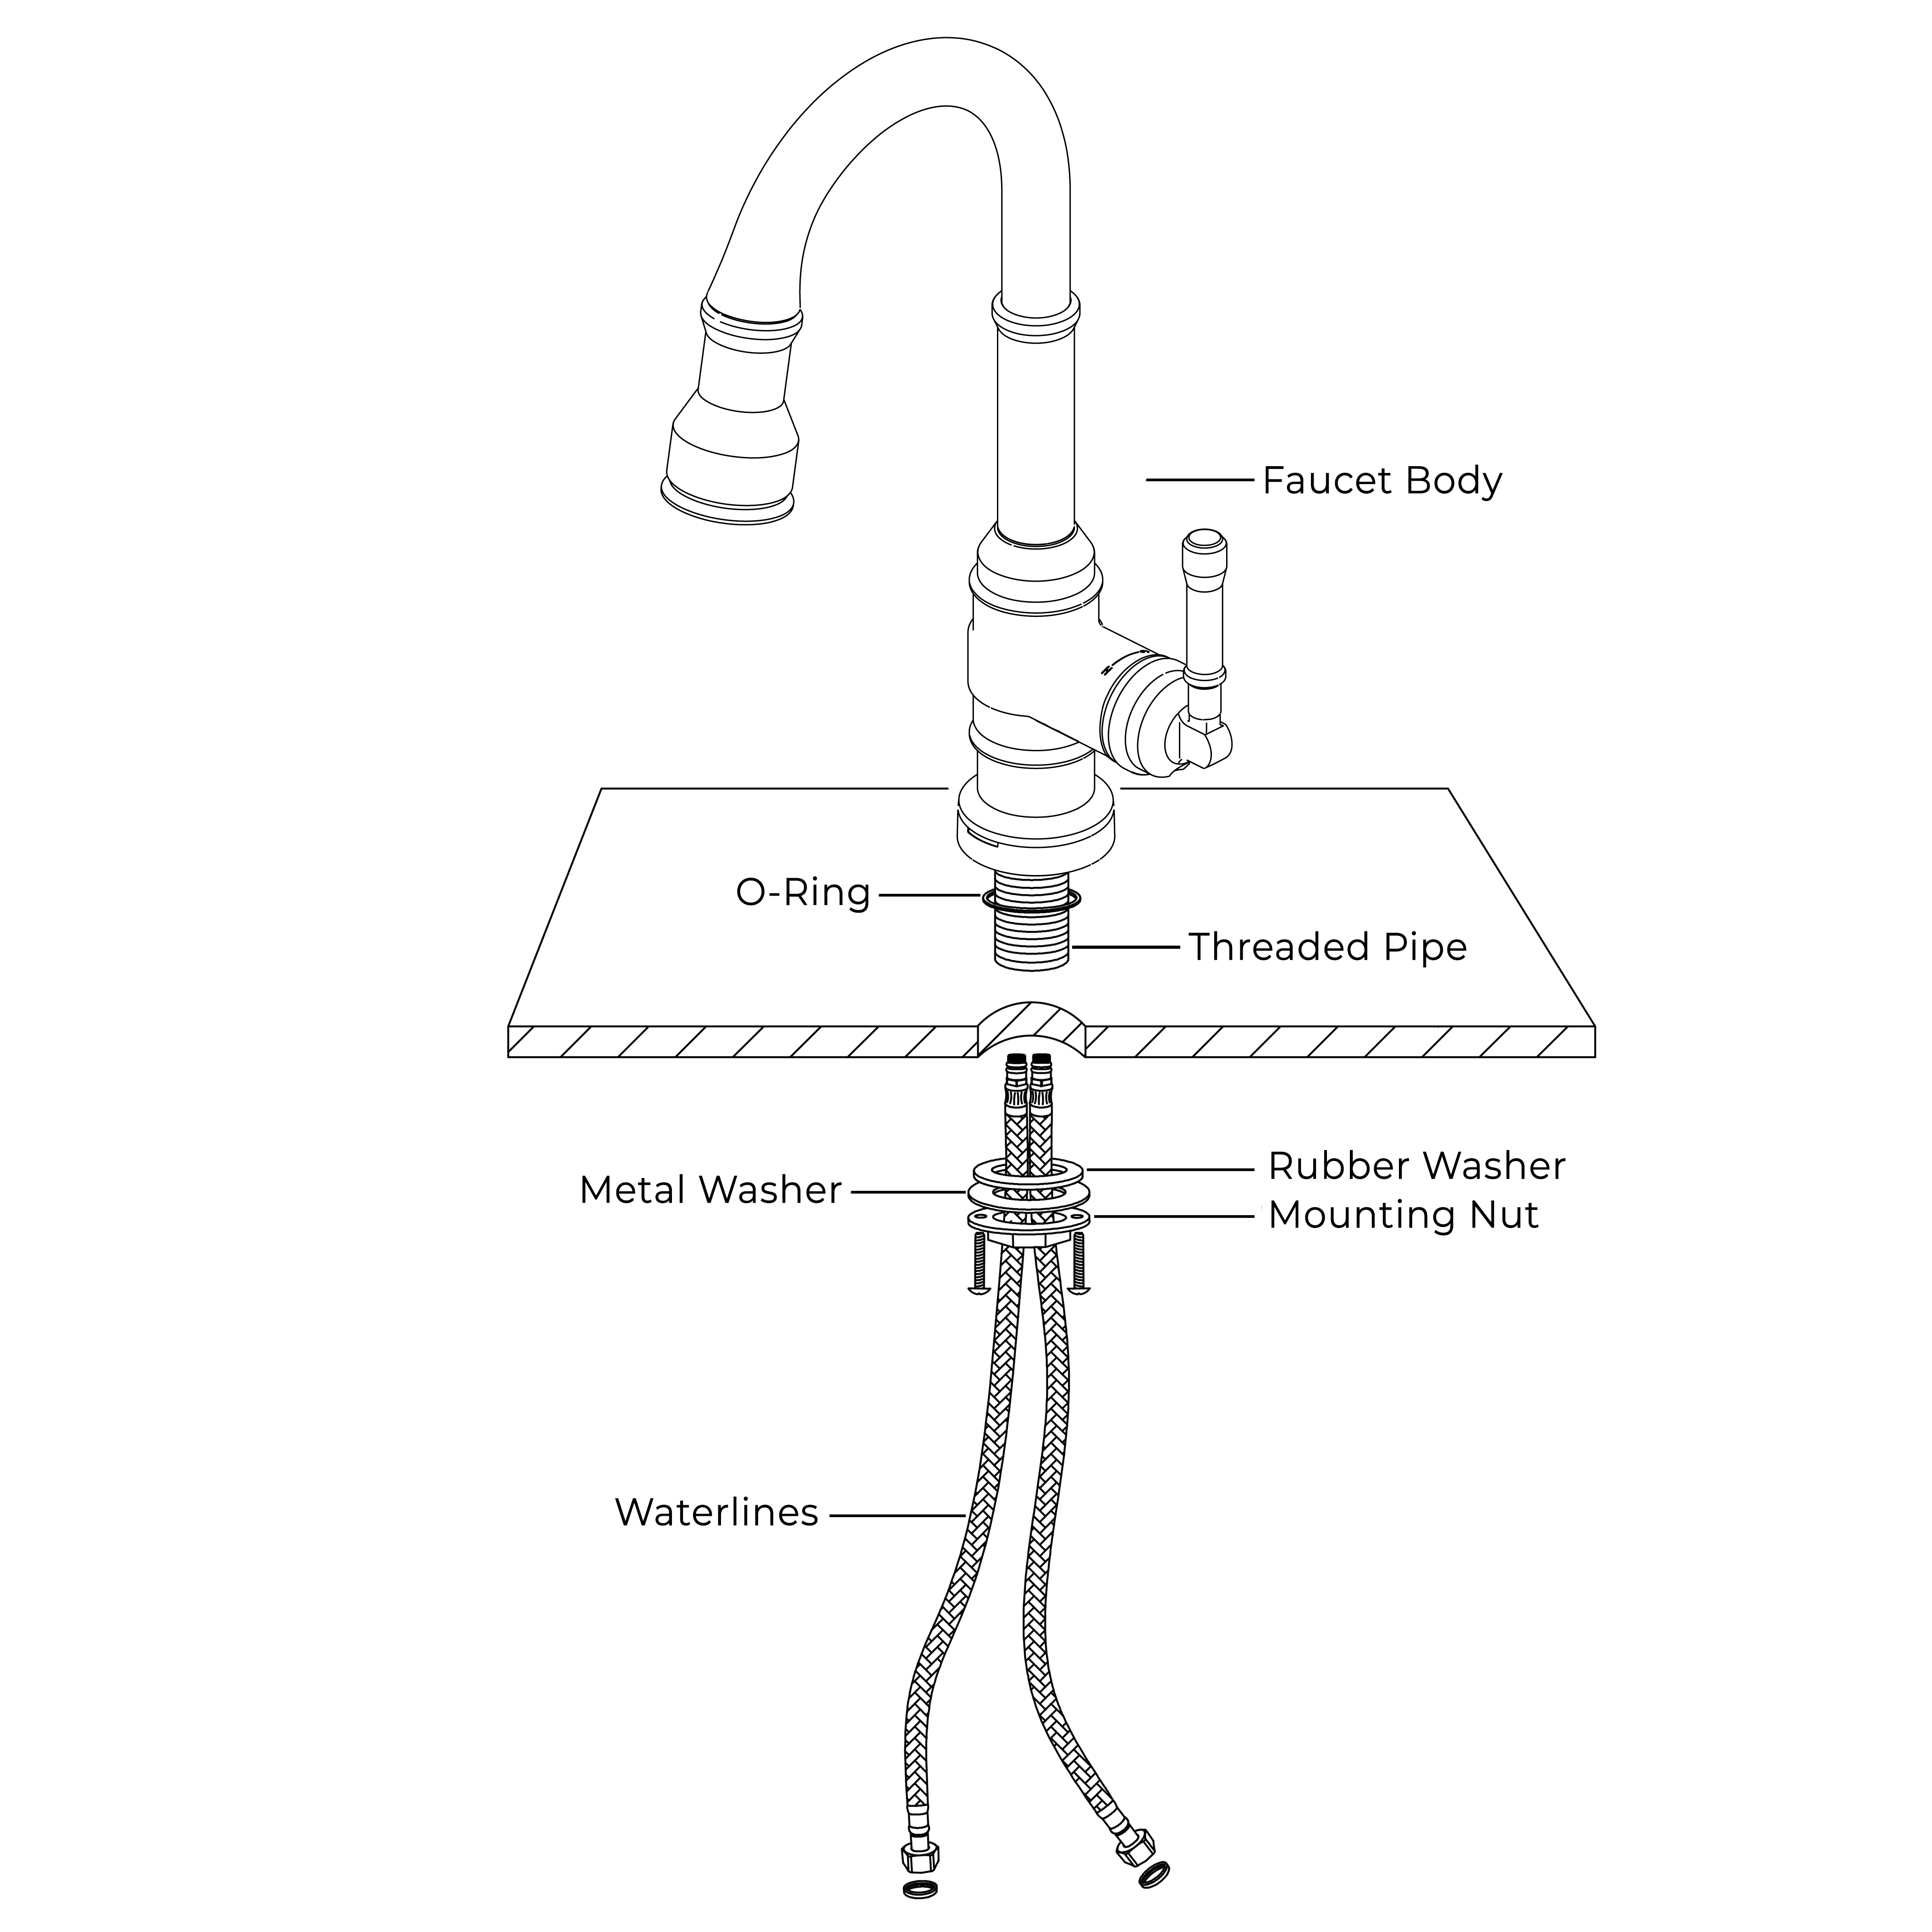
Underneath the sink, secure the faucet with mounting hardware. Use a wrench to tighten nuts and bolts. Ensure they are firm but not overly tight. This prevents any damage to the sink or faucet.Connecting Water Supply Lines
Attach the water supply lines to the faucet’s inlet pipes. Ensure the hot and cold lines are connected correctly. Use a wrench to tighten connections. Check for any leaks after connecting. Adjust if needed to ensure everything is secure.Testing The Installation
Testing the installation of your new kitchen faucet is a crucial step to ensure everything is functioning correctly. After the effort of installing, you want to guarantee that your faucet not only looks great but works perfectly. This involves checking for leaks and ensuring proper water flow. Let’s dive into these important checks to finalize your installation successfully.
Checking For Leaks
Turn on the faucet and let the water run for a few minutes. Carefully inspect the area around the faucet base and underneath the sink. Are there any signs of moisture or dripping? Even a small leak can lead to bigger issues over time.
Consider using a flashlight to get a better view of tight spaces. Sometimes leaks hide in the shadows. Take your time to ensure that all connections are dry. If you find any leaks, tighten the connections or apply plumber’s tape to seal them.
Ensuring Proper Water Flow
Adjust the faucet handles to test both hot and cold water flow. Is the water pressure consistent? A strong flow indicates that the connections are secure and the lines are clear.
Pay attention to any sputtering or interruptions in flow. These can signal trapped air or debris in the lines. If necessary, remove the aerator from the faucet and clean it to improve water flow.
Ask yourself: Is the water flow smooth and predictable? A seamless flow is a sign of a successful installation. Enjoy your new faucet and the satisfaction of a job well done!
Finishing Touches
After securing your new kitchen faucet, it’s time for the finishing touches. These final steps ensure your kitchen looks tidy and functions perfectly. Pay attention to detail for a flawless finish.
Cleaning Up The Workspace
Gather all tools and materials left around. A clean workspace makes a big difference. Wipe down the sink and countertop to remove any debris. Use a damp cloth to polish the faucet. This gives it a sparkling appearance. Dispose of any packaging or old parts responsibly. A tidy kitchen enhances your home’s appeal.
Final Adjustments And Checks
Turn on the water supply and test the faucet. Check for any leaks around the connections. Tighten any loose fittings if needed. Ensure the faucet handle moves smoothly. Adjust the water flow to your preference. Inspect the sprayer and hoses for proper operation. Make sure everything is secure and functioning well. Your new faucet should work seamlessly.

Credit: www.youtube.com
Credit: www.fontanashowers.com
Frequently Asked Questions
Can I Install A Kitchen Faucet By Myself?
Yes, you can install a kitchen faucet yourself with basic tools and instructions. Ensure you have the right tools, including a wrench and plumber’s tape. Follow the manufacturer’s instructions carefully. Check for leaks after installation. If unsure, consider hiring a professional plumber for assistance.
How Do You Install A Faucet Step By Step?
Turn off water supply and remove old faucet. Secure new faucet on the sink. Connect water lines tightly. Turn on water supply and check for leaks. Ensure proper operation by testing the faucet.
Do I Need A Plumber To Install A New Faucet?
Installing a new faucet yourself is possible with basic plumbing skills. Hiring a plumber ensures professional installation, preventing leaks or future issues. Consider complexity and your comfort level with tools. A plumber provides expertise and peace of mind, especially for intricate setups or if you’re unsure about the task.
Are You Supposed To Caulk Around A Kitchen Faucet?
Yes, caulking around a kitchen faucet prevents water leaks and protects the countertop. Use a waterproof, mold-resistant caulk. Ensure the area is clean and dry before applying. Regular maintenance extends faucet and countertop life.
Conclusion
Installing a kitchen faucet is straightforward with the right steps. Begin by gathering tools. Follow the instructions carefully. Tighten connections securely. Check for leaks. Test the faucet’s function. It’s important to ensure everything works smoothly. Patience is key. Take your time.
Don’t rush. You can do it. A new faucet can freshen up your kitchen space. It adds style and utility. Enjoy the satisfaction of a job well done. You’ve improved your kitchen with a simple project. Feel proud of your accomplishment.
Happy plumbing!