How to Replace Kitchen Sink Sprayer Hose: Easy DIY Guide
Are you tired of dealing with a leaky or malfunctioning kitchen sink sprayer hose? You’re not alone.
A faulty sprayer can turn your daily kitchen tasks into frustrating chores. But what if you could fix it quickly without calling a plumber? Imagine the satisfaction of tackling this common issue yourself, saving both time and money. You’ll discover the simple steps to replace your kitchen sink sprayer hose.
With a few basic tools and a bit of guidance, you can restore your kitchen to its full functionality. Dive in and learn how to reclaim your kitchen’s efficiency and enjoy seamless dishwashing once again.

Credit: www.reddit.com
Tools And Materials Needed
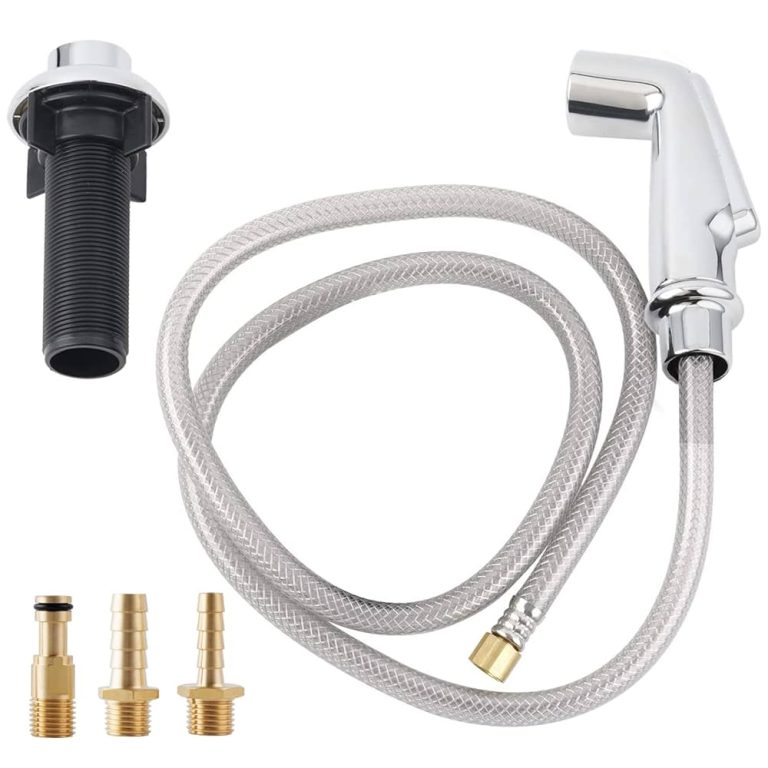
Gather a wrench, pliers, and a new sprayer hose for replacement. Prepare a bucket to catch any water spills. Ensure you have Teflon tape and a towel handy for sealing and cleanup.
Replacing a kitchen sink sprayer hose might sound like a daunting task, but with the right tools and materials, you’ll find it’s simpler than it seems. Whether you’re a seasoned DIY enthusiast or just starting out, gathering everything you need beforehand will set you up for success. Imagine the satisfaction of fixing that leaky hose yourself, transforming a potential kitchen disaster into a triumph with just a few tools.Wrench Set
Having a reliable wrench set is crucial. You might need a variety of sizes depending on the fittings of your sink. A good adjustable wrench can save the day when you’re dealing with stubborn nuts or bolts.Basin Wrench
A basin wrench is specifically designed for tight spaces, making it perfect for reaching under the sink. It’s a must-have tool for this job, especially if you’re working with awkward angles.Bucket Or Container
Water can still be trapped in the hose even if the tap is off. Placing a bucket or container underneath will catch any spills and keep your workspace dry.Replacement Hose
Ensure you have a compatible replacement hose. Check the specifications of your existing setup to find the right match. Bringing the old hose to a hardware store can help you find the perfect replacement.Plumber’s Tape
This tape is essential for ensuring watertight seals on threaded connections. It’s a small investment that prevents leaks and saves you from future headaches.Cleaning Supplies
A few cleaning supplies like rags or paper towels will be handy for wiping down fittings and cleaning up any water drips. Keeping the area tidy will make the process smoother and less stressful.Screwdriver Set
Some sprayer hoses may have screws that need removing. A basic screwdriver set will help you tackle any unexpected obstacles without a hitch. Gathering these tools and materials can save you time and frustration. Picture yourself as a kitchen hero, equipped and ready to tackle the task head-on. Are you ready to dive into your DIY adventure and replace that sprayer hose?
Credit: www.amazon.com
Preparing The Work Area
Clear the area under the sink to create space. Remove cleaning supplies and other items. Place a towel or bucket to catch any water drips. This ensures a tidy workspace and prevents mess.
Preparing the work area is a crucial step in replacing a kitchen sink sprayer hose. A well-organized space makes the task smoother and prevents accidents. Follow these steps to ensure a safe and efficient work environment.Clearing Under The Sink
Start by removing all items under the sink. Cleaning supplies, trash bins, and other stored items can get in the way. Having a clear space gives you ample room to work. It also helps you spot any leaks or damages. Use a flashlight to see clearly in dark corners. Check for any obstacles that might hinder your work. Ensuring a tidy area reduces the risk of misplaced tools or parts.Turning Off The Water Supply
Locate the water supply valves under the sink. These are typically found at the back. Turn the valves clockwise to shut off the water supply. Ensure both hot and cold water valves are closed. To verify, turn on the faucet and check if the water stops flowing. If water still flows, check the valves again for a tight seal. Turning off the water helps prevent spills and keeps your workspace dry.Removing The Old Sprayer Hose
Removing the old sprayer hose requires turning off the water supply. Disconnect the hose from the sprayer head and faucet. Ensure no water leaks before installing the new hose.
Replacing a kitchen sink sprayer hose might seem like a daunting task, but it’s quite straightforward when broken down into simple steps. Removing the old sprayer hose is the first step in the process, and it’s crucial to do it carefully to avoid any damage. This guide will walk you through the removal process, ensuring you have a hassle-free experience.Detaching The Sprayer Head
Start by locating the sprayer head connected to the hose. It’s usually attached at the end of the hose with a simple threaded connection. Carefully unscrew the sprayer head using your hand. If it’s too tight, a wrench can help, but be cautious not to scratch or damage it. Once detached, inspect the sprayer head for any build-up or wear. This might be a good time to clean it if you plan to reuse it.Loosening The Hose Connections
Now, you need to focus on the hose connections underneath the sink. These are typically secured with a nut or clip. Use a wrench to loosen the nut or remove the clip holding the hose in place. It might be helpful to have a towel handy to catch any dripping water. As you detach the hose, pay attention to how it was connected. This will make installing the new hose much easier. Removing the old sprayer hose can be a satisfying task when done right. Have you ever thought about the small victories in home maintenance? Each successful removal is a step towards a more functional kitchen space.Installing The New Sprayer Hose
Replacing a kitchen sink sprayer hose involves detaching the old hose and connecting the new one securely. Ensure the water supply is off before starting to avoid leaks.
Installing the New Sprayer Hose Replacing a kitchen sink sprayer hose can seem daunting, but with a bit of guidance, you can tackle this task with confidence. Once you’ve removed the old hose, it’s time to install the new one. This step is crucial because a properly installed hose ensures a leak-free and functional sprayer. Imagine the satisfaction of completing a home improvement project yourself! Let’s dive into making sure your new sprayer hose is installed perfectly.Connecting The New Hose
Begin by aligning the new hose with the sprayer nozzle connection. Ensure you have a secure fit to prevent any leaks. A snug connection means no water waste and efficient usage. Slide the hose into the designated hole on your sink. You’ll feel it click into place, signaling that it’s secure. Test the hose by gently pulling to see if it stays put. If it moves, adjust until it feels firm. Have you ever wondered why some hoses leak? A loose connection is often the culprit.Securing The Sprayer Head
Attach the sprayer head to the hose, twisting it until it’s tightly fastened. A firm grip is essential to prevent water from escaping. Check the alignment and ensure it’s pointing in the right direction. A misplaced sprayer head can lead to water splashing everywhere. Finally, turn on the water to test the sprayer. Look for any leaks and adjust as necessary. Is there anything more rewarding than seeing your DIY project work flawlessly?Testing The New Sprayer Hose
Testing the new sprayer hose ensures proper installation and functionality. Check for leaks and smooth water flow. Adjust fittings and connections for optimal performance.
Once you’ve successfully installed your new kitchen sink sprayer hose, it’s time to test it. This step ensures everything is functioning correctly and helps you catch any issues before they become bigger problems. After all, there’s nothing worse than discovering a leak or a malfunction during a crucial cooking session.Checking For Leaks
Begin by turning on the water supply. Slowly let the water flow through the hose to see if there are any immediate leaks. Keep an eye on the connections, especially where the hose attaches to the faucet and sprayer. If you notice any drips or wet spots, tighten the connections or reseal them as necessary. It might be helpful to use a dry paper towel to dab around the connections; if it comes away wet, you know you have a leak.Ensuring Smooth Operation
Once you’ve confirmed there are no leaks, test the sprayer’s functionality. Pull the hose out to its full length and retract it back. You should feel a smooth motion without any hitches or snags. Spray water into the sink, checking for consistent water pressure and even distribution. If the sprayer hesitates or sputters, it might indicate a clog or air trapped in the hose. In this case, running the water for a few minutes can help clear any debris or air pockets. Does the sprayer return to its holder comfortably? A well-installed hose should easily retract back into place without force.Tips For Maintenance
Replacing a kitchen sink sprayer hose involves first turning off the water supply. Disconnect the old hose from the faucet and sprayer head. Attach the new hose securely and ensure there are no leaks after turning the water back on.
Replacing a kitchen sink sprayer hose can be a straightforward task. To ensure your new hose stays in good condition, regular maintenance is essential. Proper care extends the life of your sprayer hose and keeps it functioning smoothly. Follow these simple tips to maintain your kitchen sink sprayer hose effectively.Regular Cleaning
Cleaning the sprayer hose is crucial. Residue can build up over time. Use a soft cloth and mild detergent. Wipe the hose gently to remove dirt. Rinse it with warm water. Ensure the nozzle is clear. A blocked nozzle affects water flow.Checking For Wear And Tear
Regularly inspect the hose for signs of wear. Look for cracks or leaks. Check the connections tightly. Loose connections cause water leakage. Replace worn-out washers promptly. A damaged hose needs replacement. Early detection prevents bigger issues.
Credit: www.reddit.com
Frequently Asked Questions
How To Repair A Kitchen Sink Spray Hose?
Turn off water supply and disconnect spray hose. Check for leaks or damage. Replace faulty parts or tighten connections. Reattach the hose and ensure proper sealing. Restore water supply and test for functionality. Always follow manufacturer guidelines for specific repairs.
How Do You Remove A Sink Sprayer Hose?
First, turn off the water supply. Then, disconnect the hose from the faucet and sprayer head. Use pliers or a wrench to loosen any nuts or fittings. Finally, pull the hose out carefully, checking for any clamps or brackets.
How To Replace A Sink Sprayer Diverter?
To replace a sink sprayer diverter, turn off the water supply first. Remove the faucet handle, then the spout. Locate and remove the old diverter. Install the new diverter in its place. Reassemble the spout and handle. Turn on the water supply and check for leaks.
How To Remove Moen Kitchen Sprayer Hose?
To remove a Moen kitchen sprayer hose, first turn off the water supply. Unscrew the hose from the sprayer head and the faucet connection. Carefully pull the hose out, ensuring no debris enters the plumbing. Consider replacing with a compatible Moen hose for optimal performance.
Conclusion
Replacing a kitchen sink sprayer hose is simple. Follow the steps carefully. Gather all necessary tools and new parts first. Turn off the water supply. Detach the old hose, and connect the new one. Tighten connections securely to prevent leaks.
Turn water back on and check for leaks. If everything looks good, you’re done. This task saves time and money. No need for a plumber. Enjoy your fully functional kitchen sink sprayer. With these easy steps, anyone can do it.
You’ll feel accomplished with your DIY skills. Happy fixing!