How to Install a Kitchen Sink And Faucet: Easy Steps
Tired of that old, leaky kitchen sink that just doesn’t serve your needs anymore? Imagine the sleek, new sink and faucet combo that could transform your kitchen’s functionality and style.
With just a bit of guidance, you can make this vision a reality. Installing a kitchen sink and faucet might seem daunting, but with the right steps, it’s a task you can tackle yourself. Not only will you save money, but you’ll also gain the satisfaction of upgrading your space with your own hands.
Dive into this step-by-step guide, and discover how surprisingly straightforward it is to breathe new life into your kitchen. By the end, you’ll not only have a stunning new sink but also the skills and confidence to take on more home improvement projects. Are you ready to get started? Let’s make your kitchen the heart of your home once again.
Choosing The Right Sink And Faucet
Selecting the perfect kitchen sink and faucet enhances both function and style. Begin by measuring your sink space accurately. Choose a faucet that complements your sink’s design and fits your installation needs.
Choosing the right sink and faucet is more than just picking something that looks good. It’s about finding a balance between aesthetics, functionality, and your kitchen’s overall design. Whether you’re renovating your entire kitchen or simply replacing an outdated fixture, the right choice can transform your space.Material Considerations
When selecting a sink, consider materials like stainless steel, porcelain, or granite. Stainless steel is durable and easy to clean, making it a popular choice. However, if you’re looking for something more traditional, porcelain might add the classic touch you seek. Granite, on the other hand, offers a modern look with its impressive durability against scratches and stains. Faucets also come in various materials such as brass, stainless steel, and chrome. Brass is known for its longevity and resistance to corrosion. Stainless steel offers a sleek, modern appearance, while chrome provides a shiny, reflective finish that can be a real eye-catcher.Style And Design
Your sink and faucet should complement your kitchen’s style. If you have a contemporary kitchen, a sleek, undermount sink with a pull-down faucet might be perfect. Traditional kitchens may benefit from a farmhouse sink paired with a classic bridge faucet. Design isn’t just about looks; think about the functionality. Do you want a single or double bowl sink? A double bowl can be useful for multitasking, but it takes up more space. Faucets with high arcs allow for easier washing of large pots and pans, adding both style and practicality to your kitchen.Size And Fit
Before purchasing, measure your existing sink space carefully. This ensures your new sink will fit without the need for extensive countertop modifications. Remember, a larger sink might offer more convenience, but it also requires more space. The faucet should also be proportionate to the sink. A small sink with a massive faucet can look unbalanced, while a tiny faucet on a large sink may lack functionality. Consider the height and reach of the faucet to ensure it meets your needs and fits well within your kitchen’s layout. Choosing the right sink and faucet involves more than just aesthetics. By focusing on material, style, and size, you ensure a beautiful and functional kitchen upgrade. What does your dream kitchen look like? Start with the right sink and faucet, and watch it come to life.
Credit: www.youtube.com
Gathering Necessary Tools And Materials
Gather essential tools like a wrench, plumber’s tape, and screwdriver. Collect materials such as sink, faucet, and hoses. Organizing these items ensures a smooth installation process.
Embarking on the journey of installing a kitchen sink and faucet can be both exciting and daunting. Before diving into the installation process, it’s crucial to have all the necessary tools and materials at your fingertips. Imagine starting the work only to realize you’re missing something essential—frustrating, right? By taking the time to gather everything you need, you set yourself up for a smooth and efficient installation. Let’s explore what’s essential for this task.Essential Tools
Having the right tools is like having the key to unlock a treasure chest. It makes your work easier and more efficient. You’ll need:- Adjustable wrench:Perfect for tightening and loosening nuts and bolts.
- Plumber’s tape:Ensures a watertight seal on threaded connections.
- Bucket:Handy for catching water when disconnecting old pipes.
- Screwdriver:Useful for fastening screws in the faucet.
- Pipe wrench:Ideal for gripping and turning pipes.
Required Materials
Once you’ve gathered your tools, it’s time to gather the materials. Here’s what you’ll need:- Kitchen sink:Choose one that complements your kitchen’s style.
- Faucet:Opt for a faucet with features that match your needs, like a pull-down sprayer.
- Plumbing pipes and fittings:Essential for connecting the sink to your water supply.
- Sealant:Helps prevent leaks around the sink edges.
- Mounting hardware:Necessary for securing the sink and faucet.
Preparing The Work Area
Begin by clearing the space under the sink, removing any items or debris. Ensure the countertop is clean and dry to prevent damage during installation.
Preparing the work area is a crucial first step in installing a kitchen sink and faucet. This process ensures that you have a clean and organized space to work in, reducing the risk of mistakes and damage. Imagine you’re about to embark on a simple yet rewarding project that will transform your kitchen space.Clearing The Space
Start by removing any items under the sink. This includes cleaning supplies, trash bins, and anything else that might be stored there. You want full access to the plumbing without any obstacles. Once cleared, wipe down the area. This helps you spot any leaks or issues that might need attention before installing your new sink and faucet.Shutting Off Water Supply
Locate the water shut-off valves. They are usually positioned under the sink. Turn them clockwise to stop the water flow. It’s a simple twist, yet it’s amazing how often people forget this step. Test the faucet to ensure water is completely off. Imagine the mess if water floods your space mid-installation. By taking these preparatory steps, you’ll set yourself up for a smooth and hassle-free installation process. Are you ready to dive in?Removing The Old Sink And Faucet
Begin by turning off the water supply to the sink. Next, disconnect the plumbing and carefully remove the old sink and faucet. Make sure to clean the area thoroughly before installing the new kitchen sink and faucet.
Removing an old kitchen sink and faucet might seem daunting, but breaking it down into manageable steps can make the process smooth and straightforward. Before you start, gather your tools: an adjustable wrench, a bucket, and a pair of pliers. Remember, patience is key, and taking your time will save you from potential mishaps.Detaching Plumbing Connections
Begin by turning off the water supply. You don’t want an unexpected shower while working under the sink. Locate the shutoff valves under the sink and twist them clockwise. If they’re stuck, a gentle tap with a wrench can help. Once the water is off, place a bucket under the sink to catch any residual water. Use your wrench to unscrew the supply lines from the faucet. A little water might spill, but that’s what the bucket is for! Next, detach the drainpipes. Loosen the slip nuts connecting the pipes to the sink and carefully remove them. Keep a towel handy to wipe any excess water.Lifting Out The Old Sink
With the plumbing detached, it’s time to remove the sink. If your sink is secured with clips, use a screwdriver to remove them. This is where an extra pair of hands can be helpful. Carefully lift the sink from the countertop. Depending on its size, it might be heavy, so ensure you have a firm grip. If it’s stuck, a gentle nudge with a putty knife around the edges can loosen it. Once removed, clean the area thoroughly. This ensures a perfect fit for your new sink and faucet. As you admire your clear countertop, think about how rewarding it will feel to install your new sink!Installing The New Sink
Installing a kitchen sink and faucet requires careful preparation. Begin by measuring the space and selecting compatible fixtures. Securely fasten connections, ensuring no leaks occur, and test the water flow for functionality.
Installing the new sink is a crucial part of your kitchen upgrade. A new sink enhances the kitchen’s functionality and aesthetics. Ensuring it fits perfectly requires careful attention to detail. Let’s dive into the steps for a successful installation.Positioning The Sink
Begin by placing the sink into the countertop cutout. Ensure the sink aligns with the edges. Check that it sits evenly without tilting. Adjust the position until it fits snugly. Ensure the faucet holes match your plumbing setup. Use a level to confirm the sink is horizontal. A misaligned sink can cause water to pool improperly.Securing The Sink In Place
Once positioned, secure the sink with mounting clips. These clips hold the sink firmly to the countertop. Tighten each clip evenly to avoid gaps. Apply silicone sealant around the sink edges. This prevents water from seeping underneath. Allow the sealant to dry as per the instructions. Recheck the sink’s level after securing. Ensure everything is tight and secure.
Credit: www.bonkekitchen.com
Installing The New Faucet
Begin by gathering tools like a wrench and screwdriver. Turn off the water supply to prevent leaks. Remove the old faucet, clean the area, and position the new faucet securely. Connect the water lines and ensure they are tightly sealed.
Finally, turn the water back on and check for leaks.
Installing a new faucet can transform your kitchen space. It’s a straightforward task with the right tools. Follow these steps for a seamless installation. Ensure all tools and parts are ready. This will save time and effort.Attaching The Faucet
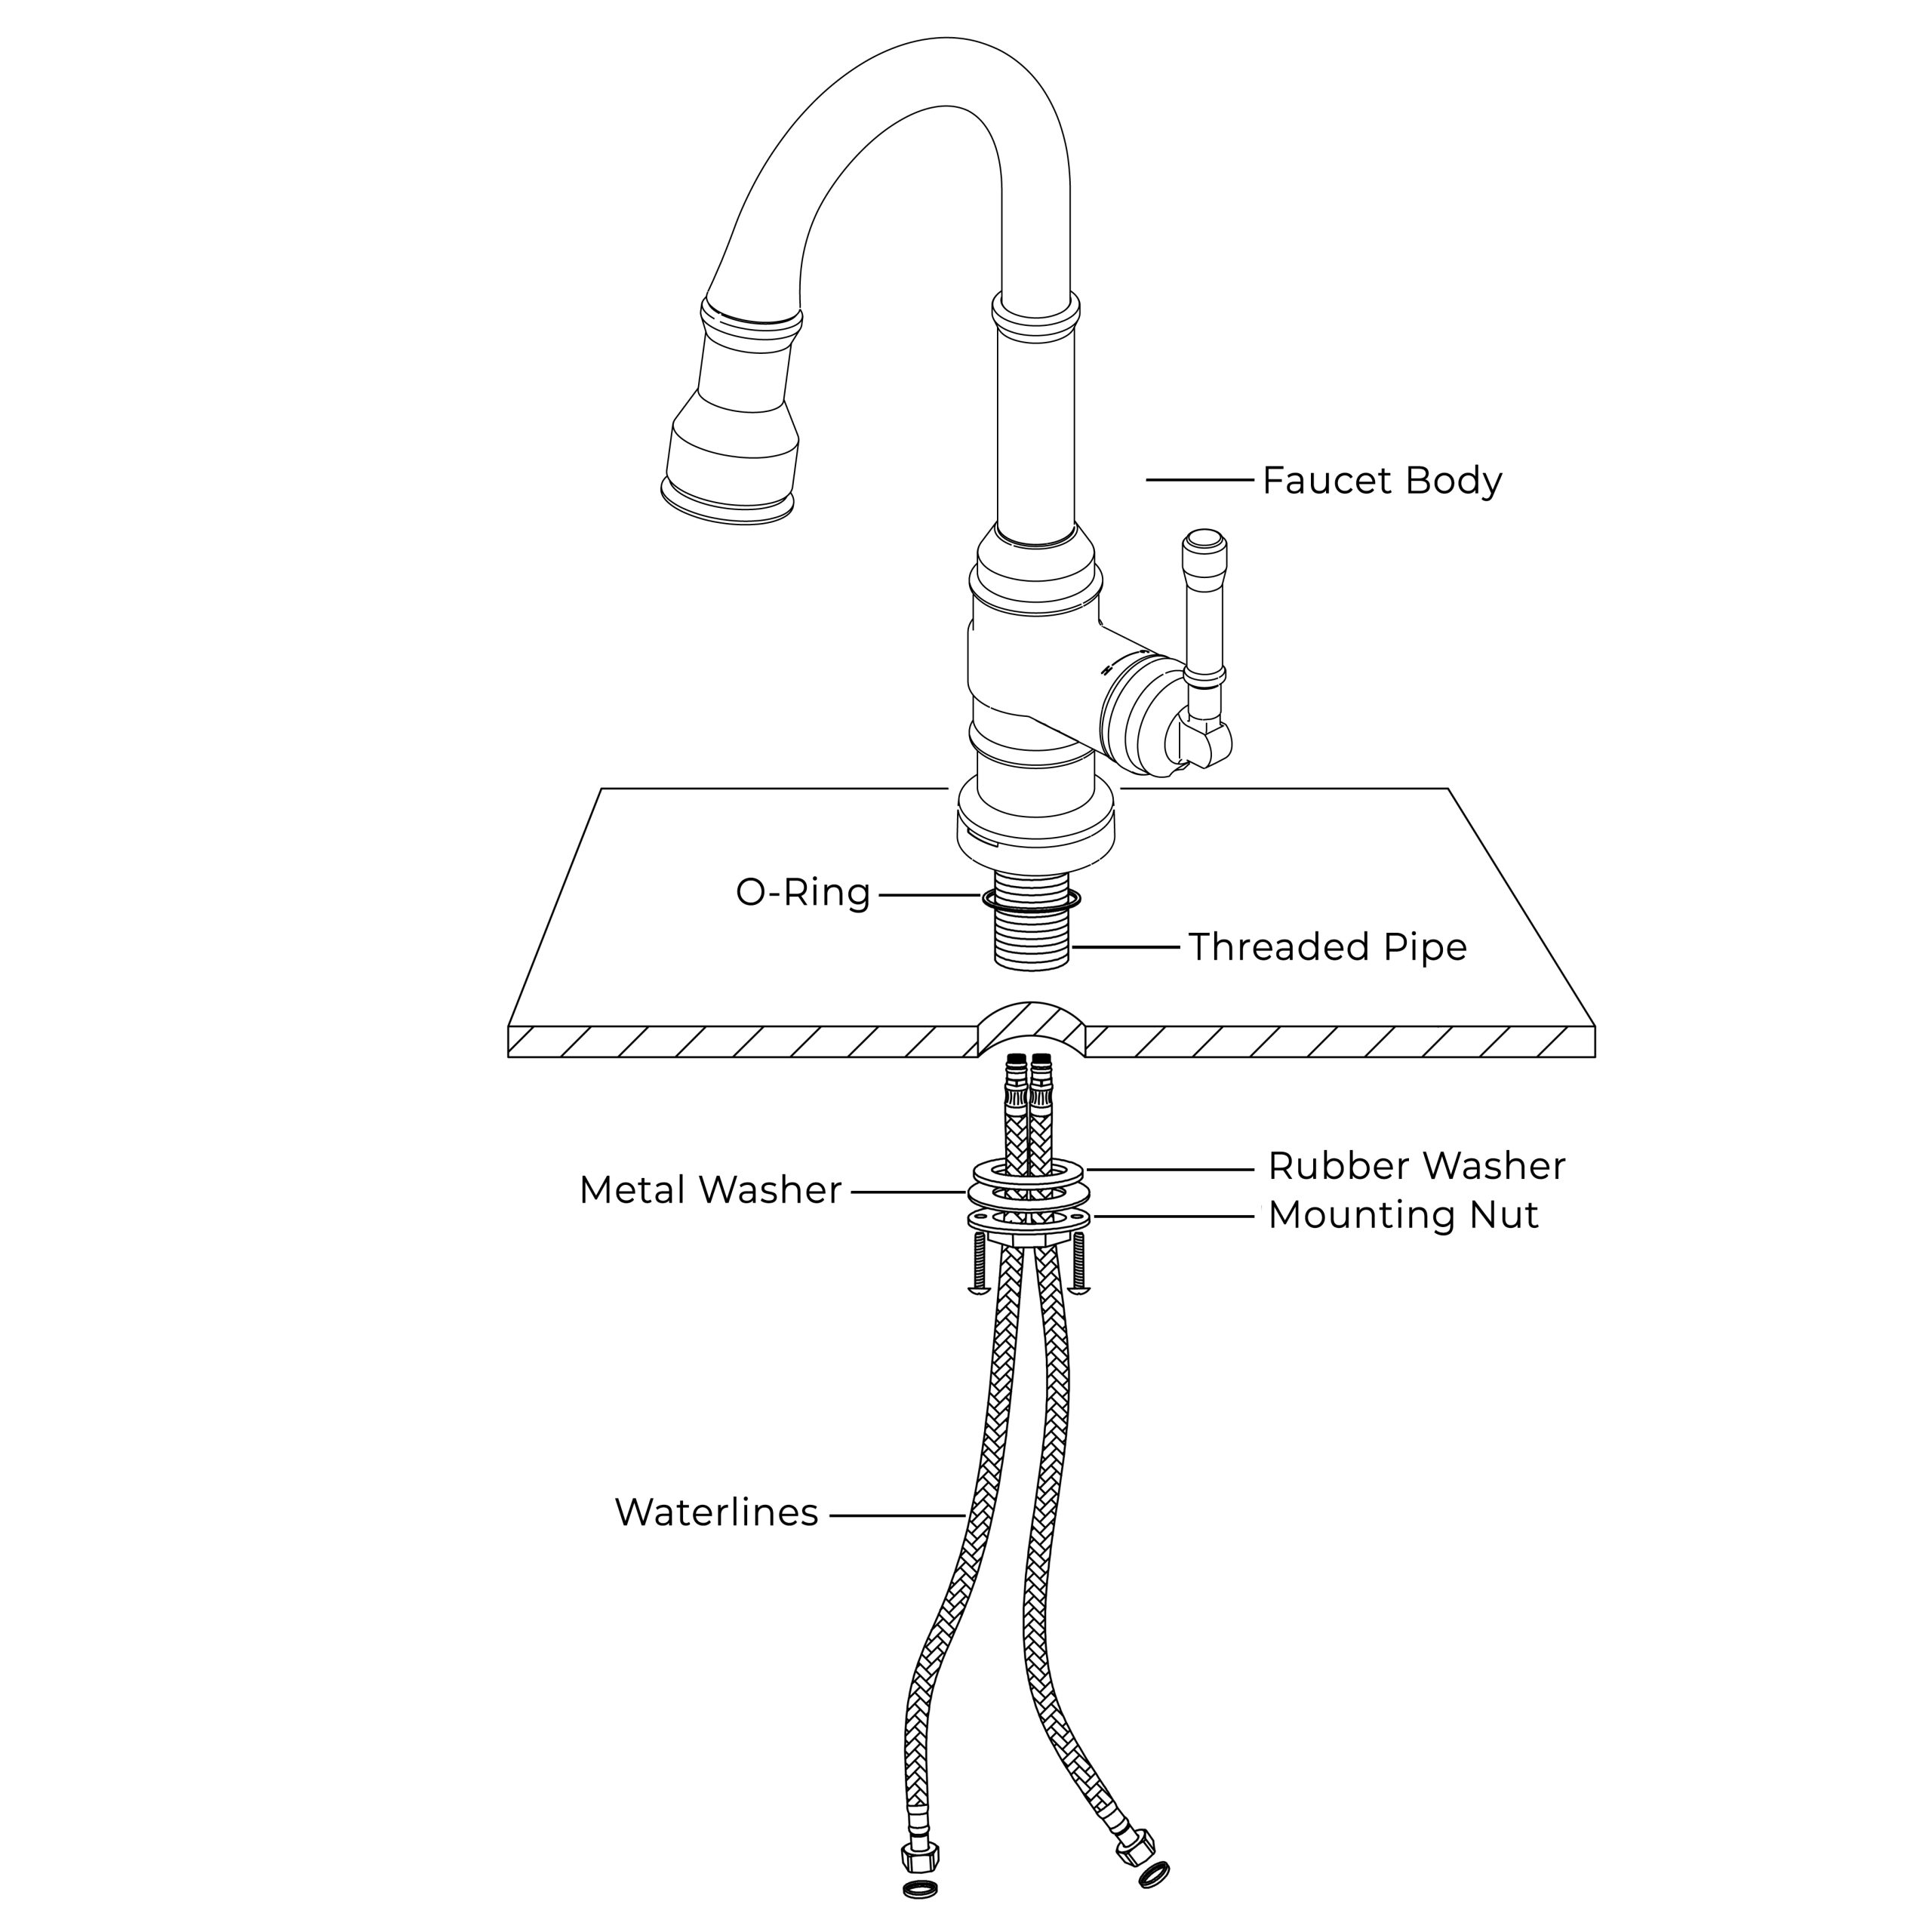
Place the faucet through the sink’s mounting holes. Check that it sits firmly. Secure it with nuts underneath. Use a basin wrench for tight spaces. Tighten until the faucet is stable. Avoid over-tightening to prevent damage. Double-check alignment before moving to the next step.Connecting Water Supply Lines
Connect the water supply lines to the faucet. Ensure the hot and cold lines match correctly. Hand-tighten each line first. Use a wrench for a snug fit. Avoid overtightening to prevent leaks. Check the connections for any visible gaps. Turn on the water supply. Test the faucet for leaks and proper flow. If leaks occur, recheck the connections. Ensure everything is secure and functioning well.Sealing And Testing
Proper sealing ensures a leak-free kitchen sink and faucet installation. Test for leaks by running water and checking connections. Tighten fittings if necessary for a secure setup.
Sealing and testing are crucial steps in kitchen sink installation. Proper sealing prevents water damage and mold growth. Testing ensures the sink and faucet function correctly. Both steps guarantee a long-lasting installation.Applying Sealant
Begin by cleaning the area around the sink. This removes debris and ensures a strong seal. Choose a waterproof sealant suitable for kitchen use. Apply it evenly around the sink’s edges. Use a caulking gun for precise application. Smooth the sealant with a damp finger or tool. Allow it to dry as per the manufacturer’s instructions.Checking For Leaks
Once the sealant is dry, it’s time to test for leaks. Turn on the water supply to the faucet. Check all connections under the sink for drips. Place paper towels beneath the pipes to spot leaks easily. Run water through the faucet and drain to test functionality. If you find leaks, tighten connections or reapply sealant as needed. Ensure everything is secure before finalizing the installation.
Credit: www.amazon.com
Final Touches
Ensure all connections are secure and leak-free. Apply silicone sealant around the sink edge for a watertight finish. Adjust the faucet handles for smooth operation, completing the installation with a thorough check for any drips or loose fittings.
After successfully installing your kitchen sink and faucet, the journey doesn’t end there. The final touches can make all the difference between an ordinary finish and a polished, professional look. Paying attention to these details ensures everything works smoothly and looks impeccable.Cleaning The Area
Once the sink and faucet are in place, it’s time to tidy up. Remove any excess sealant or plumber’s putty that might have oozed out during installation. A damp cloth can work wonders in wiping away smudges and fingerprints on shiny surfaces. Don’t forget the tiny crevices around the sink and faucet base. These areas can trap dirt and grime, diminishing the overall look. Use a soft brush or an old toothbrush for a thorough clean. A spotless sink area isn’t just about aesthetics; it also prevents build-up that could lead to long-term issues. Consider it a small investment for future ease.Inspecting The Installation
Before you declare the job done, take a moment to inspect your work. Turn on the faucet and let the water run for a few minutes. Check under the sink for any signs of leaks. Pay attention to the water pressure and temperature. Are they as expected? If not, there might be an issue with the connections or the faucet itself. Tighten any loose connections with a wrench. It’s better to address these now than to discover a problem later when it might cause damage. By focusing on these final touches, you ensure the longevity and functionality of your new kitchen addition. What small steps will you take today to ensure a job well done?Frequently Asked Questions
Can I Install A Kitchen Faucet By Myself?
Yes, you can install a kitchen faucet yourself. With basic tools and instructions, it’s a manageable DIY project. Ensure you turn off the water supply first. Follow the manufacturer’s guide for precise steps. Consult online tutorials for additional help.
Can I Install A New Kitchen Sink Myself?
Yes, you can install a kitchen sink yourself. Ensure you have the right tools and follow installation instructions. It requires basic plumbing skills and careful attention. Consider watching tutorials or consulting guides for assistance. Always turn off the water supply before starting the installation process.
How Much Does A Plumber Charge To Install A New Kitchen Sink And Faucet?
Plumbers typically charge between $150 and $400 for installing a new kitchen sink and faucet. Prices vary based on location, complexity, and materials. Always request a detailed quote before hiring.
What To Put Between A Faucet And A Sink?
Install a rubber gasket or plumber’s putty between the faucet and sink. It prevents leaks. Tighten connections securely to ensure a watertight seal. Always check manufacturer instructions for specific recommendations. Using these materials ensures durability and prevents water damage to your countertops.
Regularly inspect for wear and replace if necessary.
Conclusion
Installing a kitchen sink and faucet isn’t too hard. With the right tools, it becomes manageable. Follow each step carefully. Remember to check for leaks after installation. Ensure everything is tightly secured. A well-installed sink enhances your kitchen’s functionality. It also adds a fresh, clean look.
Take your time and stay patient. Mistakes can lead to problems later. Always refer to your manual for specific guidance. Practice safety when using tools. Proper installation ensures lasting results. Enjoy the satisfaction of a job well done. Your kitchen is now more efficient and stylish.