
Are you tired of rummaging through cluttered kitchen drawers every time you need a spoon or spatula? Imagine having beautifully crafted kitchen cabinet drawers that not only enhance the aesthetic of your kitchen but also provide easy access to all your essentials.
By learning how to make your own kitchen cabinet drawers, you can tailor them to fit your needs perfectly. Whether you’re a DIY enthusiast or someone looking to upgrade their kitchen space, this guide will walk you through each step with clarity and ease.
Dive in to discover how you can transform your kitchen into an organized haven that sparks joy every time you step in.
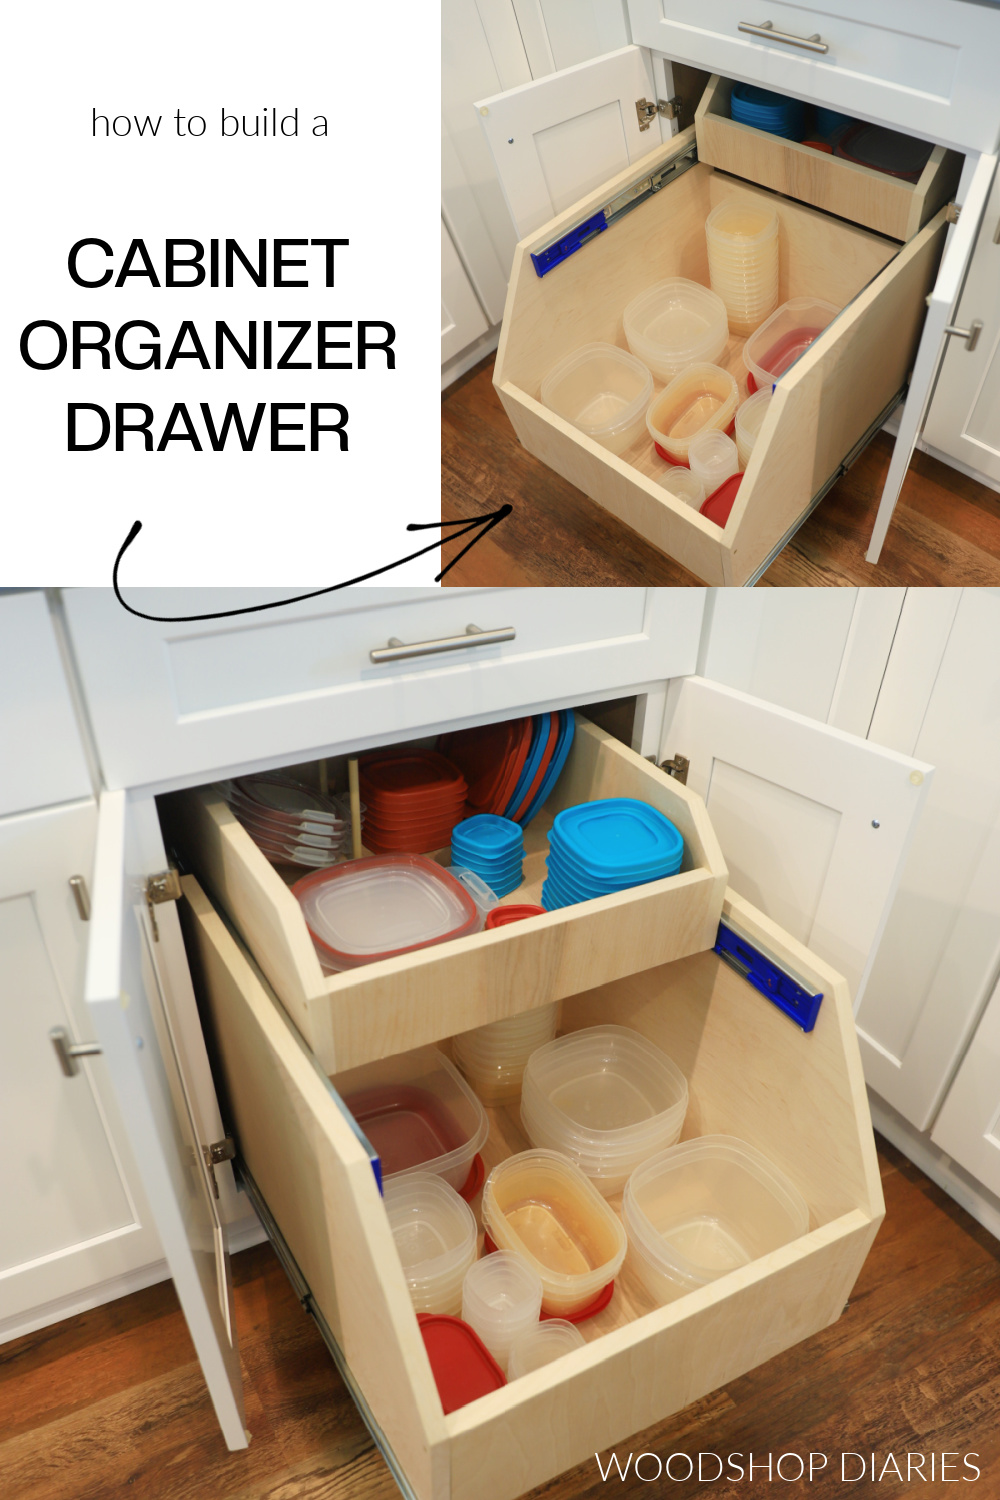
Credit: www.woodshopdiaries.com
Tools And Materials
To craft kitchen cabinet drawers, gather essential tools like a drill, saw, and measuring tape. Use materials such as plywood, screws, and drawer slides for sturdy construction. Ensure precise measurements for a perfect fit and finish.
Creating kitchen cabinet drawers can be a rewarding DIY project that enhances both the functionality and aesthetics of your kitchen. Before you dive into the construction, it’s crucial to gather the right tools and materials. Having everything at your fingertips not only streamlines the process but also prevents frustrating delays. Let’s explore what you’ll need to successfully build your own kitchen cabinet drawers.Essential Tools List
Having the right tools is half the battle in any DIY project. Here are the essential tools you’ll need to make your cabinet drawers:- Measuring Tape:Accuracy is key, so ensure your measurements are precise.
- Circular Saw:Perfect for cutting large panels of wood to the desired size.
- Drill:A versatile tool for making holes and driving screws.
- Clamps:Keep your pieces steady while you work, ensuring perfect alignment.
- Screwdriver:You’ll need this for assembling the drawer components.
- Square:Essential for checking angles and ensuring everything is perfectly perpendicular.
Materials Needed
Just as important as the tools are the materials. You want your drawers to be durable and stylish, so choose wisely:- Wood Panels:Choose a sturdy wood like birch or oak for the drawer fronts and sides.
- Drawer Slides:Opt for high-quality slides for smooth operation and long-lasting use.
- Wood Screws:Ensure they are the right size for a secure fit.
- Wood Glue:Provides additional stability alongside screws.
- Sandpaper:Smooths out rough edges for a professional finish.
- Finish:Consider using varnish or paint to protect and beautify your new drawers.
Planning Your Cabinet Drawers
Organize your kitchen efficiently with planned cabinet drawers. Choose materials that suit your style and needs. Consider the size, design, and placement for easy access to utensils and cookware.
Planning your cabinet drawers is a crucial step. It sets the foundation for functionality and style. Thoughtful planning ensures your drawers meet your needs. It also enhances the kitchen’s overall look. Focus on key aspects like measurements, design, and hardware choice.Measuring The Space
Accurate measurements are essential. Use a tape measure for precision. Measure the width, height, and depth of the cabinet area. Note any obstacles like pipes or electrical outlets. Consider the drawer’s intended contents. This helps determine the necessary size and depth.Design Considerations
Think about the drawer layout. Decide if you need deep or shallow drawers. Deep drawers work well for pots and pans. Shallow drawers suit utensils and cutlery. Choose materials that match your kitchen’s style. Consider wood, metal, or composite materials.Choosing The Right Hardware
Select hardware that complements your drawer design. Handles and knobs add personality. Choose durable materials like stainless steel or brass. Ensure the hardware matches the cabinet finish. Test the hardware for ease of use and comfort.Cutting And Preparing Materials
Cutting and preparing materials is crucial for building kitchen cabinet drawers. Begin by measuring and marking each piece precisely. Use a saw to cut wood panels and edges smoothly. Sand the surfaces to ensure a clean finish. Organize all pieces before assembling for efficiency and accuracy.
Cutting and preparing materials is a crucial step in making kitchen cabinet drawers. Proper preparation ensures that your drawers fit perfectly and function smoothly. Start by gathering all necessary materials and tools. Use quality wood for durable and reliable drawers. This section will guide you through cutting and preparing each component with precision.Cutting The Wood
Start with measuring the wood accurately. Use a tape measure and mark the measurements with a pencil. Ensure you measure twice to avoid mistakes. Choose a circular saw or table saw for clean cuts. Always follow safety guidelines while using power tools. Cut the wood pieces according to your drawer dimensions. Include pieces for the front, back, sides, and bottom. Keep edges smooth to prevent splinters.Preparing Drawer Components
Organize your cut pieces neatly. Begin with the sides of the drawer. Sand all pieces to remove rough spots. Use fine-grit sandpaper for a smooth finish. Drill pilot holes in the wood to prevent splitting. These holes will guide the screws during assembly. Label each piece to remember their positions. This step helps during the drawer assembly process.Assembling The Drawer Box
Assembling the drawer box is a crucial step in crafting sturdy kitchen cabinet drawers. It involves joining various pieces to form a functional unit that slides effortlessly and supports the weight of your utensils and gadgets. The process demands precision and care, ensuring that each part fits seamlessly and securely. Whether you’re a seasoned DIY enthusiast or a beginner, understanding the techniques involved in this process can make a significant difference in your project’s outcome.
Joining Techniques
There are several ways to join the pieces of your drawer box. Dovetail joints are a popular choice for their strength and aesthetic appeal. They require precise cutting, but the interlocking design ensures a durable connection.
If you’re looking for something simpler, consider using pocket holes. They are easy to create with a jig and offer a strong bond when combined with screws. This method is particularly useful for hidden joints, providing a clean finish.
Another option is using dowels, which can add strength without visible screws. Align the dowels carefully and apply wood glue for a secure hold. Each technique has its advantages, so consider your skill level and the tools available to you.
Securing The Box
Once you’ve chosen your joining technique, securing the box is the next step. Use clamps to hold the pieces together while the glue dries. This ensures the joints remain tight and aligned.
Check the squareness of the box frequently. A small error can result in a drawer that doesn’t fit or slide properly. Adjust as needed to maintain right angles.
After clamping, reinforce the box with screws or nails where necessary. This adds extra security and peace of mind. Are you confident in the strength of your drawer box? Taking a moment to double-check might save future headaches.
Installing Drawer Slides
Installing drawer slides enhances kitchen cabinet drawers efficiently. Align and attach slides to ensure smooth movement. Securely fastening them offers durability and ease of use.
Installing drawer slides is a key step in making kitchen cabinet drawers. Proper installation ensures smooth operation and durability. This process might seem complex, but breaking it down makes it manageable. Let’s explore the types of drawer slides and their installation steps.Types Of Drawer Slides
Drawer slides come in various types. Each type offers unique benefits. Here are the most common:- Side-Mounted Slides:These attach to the sides of the drawer and cabinet. They are visible when the drawer is open.
- Under-Mounted Slides:These are installed beneath the drawer. They are hidden from view, offering a clean look.
- Center-Mounted Slides:These slides are fixed at the bottom center of the drawer. They provide moderate support and are less common.
Installation Steps
Installing drawer slides requires precision. Follow these simple steps:- Measure and Mark:Measure the drawer and cabinet openings. Mark where the slides will go.
- Attach Slides to Cabinet:Use screws to fix the slides inside the cabinet. Ensure they are level and aligned.
- Mount Slides to Drawer:Attach the corresponding slides to the sides of the drawer. Double-check alignment for smooth operation.
- Insert Drawer:Carefully insert the drawer into the cabinet. Test for smooth opening and closing.
- Adjust as Needed:Make small adjustments for perfect alignment. Ensure the drawer moves easily without wobbling.
Attaching The Drawer Front
Attach the drawer front by aligning it with the box’s face. Secure it using screws for stability. Ensure it’s level and adjust as needed for a perfect fit.
Attaching the drawer front requires patience and precision. It’s the final touch that completes the look of your kitchen cabinet drawers. Proper alignment and securing are key to achieving a professional appearance. Follow these steps to ensure your drawer fronts are attached correctly.Aligning The Front
Start by aligning the drawer front with the cabinet. Use a ruler to measure the spacing on all sides. Consistent gaps create a balanced look. Hold the front against the drawer box. Check the alignment visually. Adjust as needed until it’s even. Next, use clamps to hold the front in place. Clamps prevent shifting during attachment. Check the alignment again after clamping. This ensures the front is still centered.Securing The Front
Once aligned, secure the drawer front with screws. Drill pilot holes through the drawer box into the front. Pilot holes prevent splitting and ensure a snug fit. Use screws long enough to hold firmly but not protrude. Fasten screws on each corner. This keeps the front stable. Check each screw for tightness. Loose screws can cause the front to wobble. Finally, remove the clamps and test the drawer. Open and close it several times. Ensure smooth operation. Adjust screws if necessary for better fit. With these steps, your kitchen cabinet drawers will have a polished look.Finishing Touches
The finishing touches on your kitchen cabinet drawers are what truly transform them from functional pieces into personalized elements of your home. With the right approach, you can ensure that your drawers not only serve their purpose but also add a touch of style and uniqueness to your kitchen space. It’s time to focus on the details that make all the difference.
Sanding And Painting
Before painting, take the time to sand your drawers. Sanding smooths out any rough edges and prepares the surface for an even coat of paint.
Choose sandpaper with the right grit for your wood type. A finer grit will result in a smoother finish.
After sanding, it’s crucial to remove dust particles. Use a damp cloth or a tack cloth to wipe down the surface.
Now, it’s painting time. Opt for a durable, washable paint that complements your kitchen’s color scheme.
Apply thin coats and let them dry completely before adding another layer. This ensures a more professional and lasting finish.
Have you considered a bold color or a subtle shade? These choices can dramatically alter the mood of your kitchen.
Adding Handles Or Knobs
Handles and knobs are not just functional; they’re the jewelry of your drawers. They can dramatically enhance the look of your cabinetry.
Consider the style of your kitchen. Do you prefer sleek modern handles or vintage knobs? These elements should align with your overall design.
Placement matters. Ensure handles or knobs are positioned for easy access and comfort.
Installing them is straightforward. Mark the spot, drill holes, and attach securely.
Looking for a touch of uniqueness? Mix and match styles for a playful, eclectic vibe.
Remember, it’s these small choices that make your kitchen truly yours. What will your finishing touches say about you?
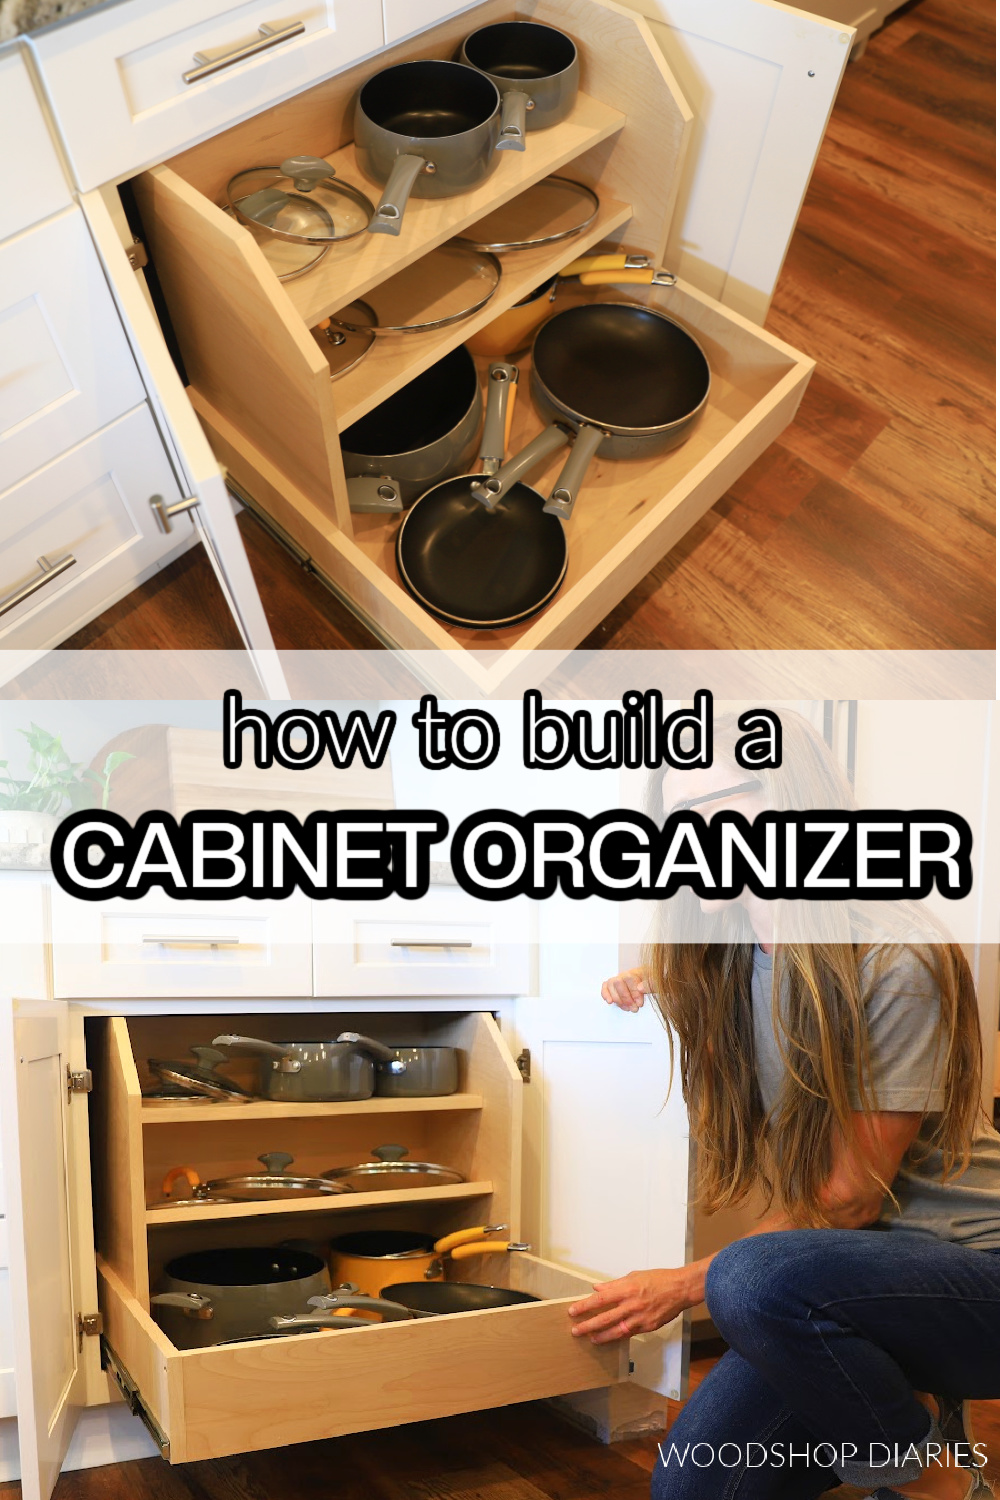
Credit: www.woodshopdiaries.com

Credit: www.familyhandyman.com
Frequently Asked Questions
What Material To Use To Make Cabinet Drawers?
Use plywood for durable and cost-effective cabinet drawers. Solid wood provides a premium look but can be expensive. MDF is affordable but less durable. Baltic birch plywood offers excellent strength and stability. Metal or plastic options suit specific needs, such as moisture resistance.
Choose based on budget and purpose.
How Do You Turn Your Cabinets Into Drawers?
To convert cabinets into drawers, measure the cabinet space. Purchase drawer kits that fit. Remove cabinet doors, install rails, and attach the drawer fronts. Ensure everything aligns and operates smoothly. This DIY project enhances storage accessibility and functionality, making kitchen organization more efficient.
What Is The Easiest Joint To Make For Drawers?
The easiest joint for drawers is the butt joint. It involves simply gluing and nailing or screwing the pieces together. This joint requires minimal skills and tools, making it ideal for beginners. While it lacks the strength of dovetail joints, it is sufficient for light-duty drawer applications.
What Can I Use Instead Of Drawer Slides?
Use wooden runners, friction slides, or ball-bearing rails as alternatives to drawer slides. Consider using rollers or tracks for smooth movement. Wooden guides offer a traditional look, while ball-bearing rails provide durability and ease. Ensure your choice fits the drawer size and weight for optimal functionality.
Conclusion
Building kitchen cabinet drawers can be a rewarding project. You gain storage space and improve kitchen organization. The process is simple with the right tools and materials. Measure carefully to ensure a perfect fit. Choose quality wood for durability. Assemble parts securely for a strong structure.
Sand surfaces smoothly for a polished look. Add handles or knobs for easy access. Enjoy your new drawers and tidy kitchen. With practice, your skills will improve. Creating more drawers becomes easier. A practical way to enhance your kitchen’s functionality and style.
Start today and transform your space!