
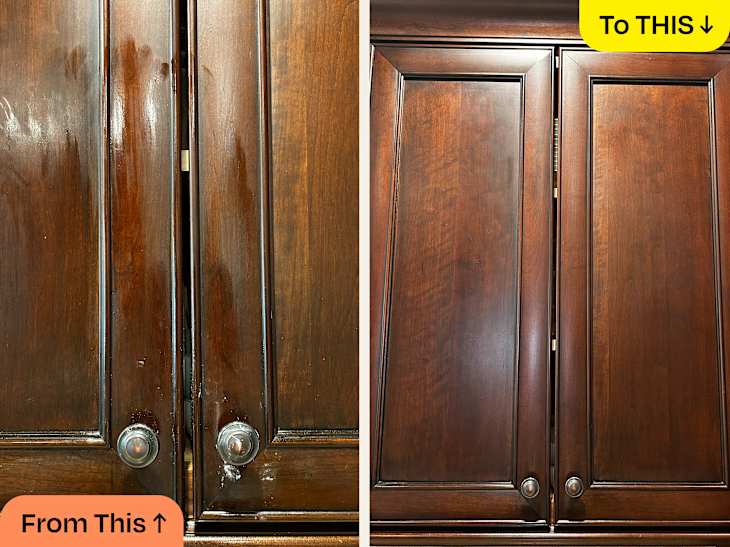
Are you tired of your kitchen’s outdated look? Transforming your kitchen cabinets with a fresh stain might just be the perfect solution.
Not only can staining breathe new life into your cabinets, but it’s also a cost-effective way to revamp your entire kitchen space. You might be wondering, how do I stain kitchen cabinets without making a mess or wasting time? Don’t worry, you’re not alone.
Many homeowners are looking for an easy and effective way to upgrade their kitchens. You’ll discover simple steps and expert tips to achieve a professional finish that will impress anyone who steps into your kitchen. Stick around, and you’ll learn how to make your cabinets look like new, saving money and adding value to your home.
Credit: www.thekitchn.com
Choosing The Right Stain
Choosing the Right Stain Different stains can change the look of your kitchen cabinets. Consider the wood type and desired finish. Test a small area to see the result before applying it to all cabinets.
Choosing the right stain for your kitchen cabinets is crucial to achieving the look you desire. It’s more than just picking a color; it’s about understanding the types of stains available and how they fit into your kitchen’s overall aesthetic. Making the right choice can refresh your kitchen’s appearance, adding warmth and charm.Types Of Stains
There are several types of stains to consider, each with unique benefits.- Oil-based stains:These are popular for their rich finish and durability. They penetrate deeply, offering long-lasting color.
- Water-based stains:Ideal for a quicker drying time and easy cleanup. They provide a more even finish and are often less odorous.
- Gel stains:These are thicker and less likely to drip, making them perfect for vertical surfaces like cabinet doors.
Color Selection
Choosing the right color stain is an exciting part of the process. Think about the mood you want to set in your kitchen. Do you prefer the classic look of deep mahogany, or does a lighter, more modern ash appeal to you? Try testing a few sample colors on a hidden part of your cabinets. You’ll be able to see how the color looks in different lighting throughout the day. It’s also a great way to ensure that the stain matches your expectations and complements other elements in your kitchen.Matching Kitchen Decor
Your kitchen cabinets should harmonize with your existing decor. Consider the color of your countertops, backsplash, and floors. Do they have warm tones that would pair well with a golden oak stain, or cooler shades that might be enhanced by a slate gray? Think about your kitchen’s style. A rustic kitchen might benefit from a distressed finish, while a contemporary space could look sleek with a smooth, matte stain. Remember, the goal is to create a cohesive look that reflects your personal style. Selecting the right stain might seem daunting, but with a little thought and planning, you can transform your kitchen into a space you love. What’s your vision for your kitchen?Preparation Steps
Begin by removing the cabinet doors and hardware. Clean surfaces with a mild detergent to eliminate grease. Lightly sand cabinets to create a smooth surface for staining. Wipe away dust with a tack cloth. Apply a wood conditioner to ensure even stain absorption.
The magic of transforming your kitchen cabinets often lies in the preparation steps. A well-prepared surface ensures the stain adheres beautifully, giving your cabinets a fresh and polished look. But how do you effectively prepare your cabinets for staining? Dive into the essential steps that set the stage for a successful staining project.Gathering Necessary Tools
Before you begin, assemble all the tools you’ll need. Preparation is key—having everything at hand saves time and frustration. You’ll need items like sandpaper, a tack cloth, a screwdriver, and a drop cloth. Consider using a power sander for larger surfaces to make the job easier and faster. Do you have safety gear like gloves and goggles? These are essential to protect yourself while working. Keep a checklist handy to ensure nothing is missed, and you can focus on the task at hand.Protecting Surrounding Areas
Staining can be messy, so safeguarding your kitchen is crucial. Cover countertops, floors, and any appliances with drop cloths or plastic sheets. This prevents unwanted stain marks on surfaces. Secure the coverings with painter’s tape to avoid shifting. Have you thought about ventilation? Ensure windows are open or fans are running to keep air flowing and reduce fumes. Remember, a little time spent protecting can save hours of cleaning later.Cleaning And Sanding Cabinets
Start by thoroughly cleaning your cabinets. Remove all grease and grime—a simple soap and water solution often works wonders. Once cleaned, let them dry completely. Next comes sanding. Sanding is vital as it creates a smooth surface for the stain to adhere. Use a fine-grit sandpaper to gently remove old finishes. Are you noticing uneven spots? Focus on those areas to ensure a uniform surface. After sanding, use a tack cloth to wipe away dust and debris. With these steps complete, your cabinets are ready for their transformation. Are you ready to see the magic happen with the stain application?Applying The Stain
Applying stain to kitchen cabinets can refresh their look. The right technique ensures a smooth, even finish. Here’s how to apply stain effectively.
Brushing Technique
Use a brush with natural bristles for staining. This helps the stain spread evenly on wood. Dip the brush lightly into the stain. Apply in long, smooth strokes. Go with the grain of the wood for a uniform look. Avoid overloading the brush, which can cause drips.
Using A Cloth Or Sponge
A cloth or sponge can offer more control. Choose a lint-free cloth for best results. Dip the cloth or sponge into the stain. Wipe it onto the cabinet surface. Apply with light pressure. This method prevents excess stain buildup. It also allows for easy blending.
Ensuring Even Coverage
Work in small sections for even coverage. This prevents the stain from drying unevenly. Overlapping strokes create a seamless finish. Check for missed spots as you work. Adjust the application if needed. Let the stain dry completely before applying a second coat.
Drying And Finishing
Ensure cabinets are completely dry after staining to avoid uneven color. Apply a clear finish for protection and shine.
After staining your kitchen cabinets, the next step is drying and finishing. This phase is crucial for ensuring durability and a polished look. Follow these steps for a professional finish.Allowing Proper Drying Time
Ensure the stain dries completely. This usually takes 24 hours. Humidity and temperature can affect drying time. Choose a well-ventilated area for faster drying. Avoid touching the surface during this period.Applying A Protective Top Coat
A top coat protects the stain and adds shine. Use a polyurethane or varnish suitable for wood. Apply it evenly with a brush or roller. Allow the first coat to dry fully. Lightly sand the surface with fine-grit sandpaper. Remove any dust with a tack cloth. Apply a second coat for extra protection. Let it dry completely.Polishing For Shine
Polishing adds a final touch of elegance. Use a soft cloth and wood polish. Apply polish in circular motions. This enhances the shine and smoothness. Buff the surface gently for a glossy finish. Your cabinets will now look stunning and well-protected.Troubleshooting Common Issues
Staining kitchen cabinets can transform your space, but not without its fair share of challenges. You’ve embarked on this DIY journey with the hope of achieving a flawless finish, yet common issues like uneven stain, streaks, and color variations can be daunting. So, how do you tackle these hiccups without losing your cool or compromising on quality?
Dealing With Uneven Stain
Uneven staining often results from inadequate preparation or inconsistent application. Imagine spending hours on your cabinets only to find blotchy patches staring back at you. Start by ensuring the surface is properly sanded and cleaned, removing all dust and residue. Consider using a wood conditioner to help the stain absorb evenly, especially on softer woods.
Test the stain on a hidden area first. This gives you insight into how it will behave on the entire surface. If you notice unevenness, don’t panic. Apply a second coat of stain to even out the color, or lightly sand trouble spots and re-stain. Patience and precision are your allies here.
Fixing Streaks
Streaks can be a major frustration, turning your cabinet project into a visual nightmare. They often occur due to poor brush technique or uneven pressure. Are you using the right tools? A good quality brush or foam applicator can make all the difference.
Apply the stain in long, even strokes following the grain of the wood. If streaks appear, use a clean cloth to gently rub them out while the stain is still wet. Sometimes, adding a bit more stain can blend the streaks into the surrounding area, leaving a smooth finish.
Addressing Color Variations
Color variations can be tricky, often stemming from different wood types or previous treatments on the cabinets. Think about how different each piece of wood can be; some absorb stain more than others. This can lead to a mismatched look that you weren’t expecting.
To mitigate this, ensure all cabinet surfaces are treated uniformly before staining. If variations persist, try mixing stains to achieve a harmonious color across all cabinets. Remember, slight variations can add character and depth, so embrace them rather than stress over perfection.

Credit: www.angi.com
Maintenance Tips
Staining kitchen cabinets transforms their look and feel. Start by cleaning them thoroughly. Sand the surfaces for smoothness, then apply a stain evenly. Let it dry completely to ensure a lasting finish. Regular maintenance keeps cabinets looking fresh and beautiful.
Maintaining the beauty of stained kitchen cabinets requires consistent care. Proper maintenance ensures they remain as stunning as the day you stained them. Regular cleaning and prevention of damage can extend their lifespan. Below, discover essential tips to keep your cabinets looking fresh and vibrant.Cleaning Stained Cabinets
Dust cabinets weekly using a soft cloth. This avoids buildup. For a deeper clean, use mild soap and water. Avoid abrasive cleaners; they may scratch surfaces. Dry the cabinets with a clean cloth immediately after washing. Regular cleaning prevents dirt from settling into the stain.Preventing Damage
Protect cabinets from excessive moisture. Use mats under sinks to catch water spills. Handle cabinets gently to prevent scratches or dents. Installing bumpers can reduce impact from closing doors. Sunlight may fade cabinets; consider using curtains or blinds to limit exposure.Touch-up Techniques
Inspect cabinets regularly for small chips or scratches. Use a matching stain pen for minor touch-ups. Apply carefully to blend with the existing stain. For larger areas, sand lightly before applying new stain. Finish with a clear protective layer to seal the repair.
Credit: www.instagram.com
Frequently Asked Questions
What Is The Best Way To Stain Kitchen Cabinets?
Clean and sand the cabinets thoroughly. Apply a wood conditioner for even stain absorption. Use a high-quality brush or cloth to apply the stain. Wipe off excess stain with a clean cloth. Allow the stain to dry completely, then apply a protective topcoat for durability and a polished finish.
Do You Need To Sand Cabinets Before Staining?
Yes, sanding cabinets before staining is essential. Sanding smooths surfaces, ensuring even stain absorption and better finish quality. Use fine-grit sandpaper for best results. Thoroughly clean and dry cabinets afterward to remove dust. Proper preparation enhances the stain’s effectiveness and longevity.
Can I Stain My Cabinets Without Sanding Them?
Yes, you can stain cabinets without sanding. Clean them thoroughly, use a deglosser, and apply a bonding primer for better adhesion. Choose a gel stain for better coverage. Ensure proper ventilation and follow product instructions for best results.
How Many Coats Of Stain Do You Put On Cabinets?
Typically, two coats of stain are recommended for cabinets. Apply the first coat evenly and let it dry completely. Assess the color and finish before adding a second coat for enhanced depth and richness. Always follow the manufacturer’s instructions for best results.
Conclusion
Staining kitchen cabinets can refresh your cooking space. It’s a task with rewarding results. First, gather necessary supplies. Sanding is crucial for smooth surfaces. Choose the right stain for your wood type. Apply evenly, and let it dry. Consider a protective finish for durability.
Regular maintenance keeps cabinets looking new. With patience, your kitchen will shine. Remember, practice makes perfect. Enjoy the process and the transformation it brings. You’ll love the new look of your kitchen. It’s a simple way to upgrade your home.
Happy staining!