How Do You Install Kitchen Base Cabinets: Step-by-Step Guide
Transforming your kitchen can feel like a daunting task, especially when it comes to installing base cabinets. However, with a clear guide and the right approach, you can tackle this project confidently.
Imagine the satisfaction of seeing your dream kitchen come to life, knowing you had a hand in its creation. Whether you’re a seasoned DIY enthusiast or a beginner eager to learn, this guide will walk you through every step with ease.
By the end, not only will you have perfectly installed kitchen base cabinets, but you’ll also gain a sense of accomplishment that only comes from building something yourself. Ready to roll up your sleeves and make it happen? Let’s dive in and turn your kitchen vision into reality!
Gather Necessary Tools
Gather essential tools like a level, drill, measuring tape, and screws. Ensure all materials are ready for seamless installation.
Installing kitchen base cabinets requires careful planning and the right tools. Gathering necessary tools is crucial for a smooth installation process. Having everything ready saves time and prevents frustration. Here is a guide on what tools you need for this task.Checklist Of Basic Tools
- Measuring tape: Ensure accurate measurements.
- Level: Keep cabinets straight and balanced.
- Pencil: Mark positions and measurements.
Essential Power Tools
- Drill: Make holes for screws.
- Screwdriver: Tighten screws securely.
- Jigsaw: Cut materials if needed.
Safety Equipment
- Gloves: Protect hands from sharp edges.
- Safety goggles: Shield eyes from debris.
Additional Supplies
- Shims: Adjust cabinet height and alignment.
- Wood screws: Secure cabinets to walls.
- Caulk: Seal gaps for a clean finish.
Prepare The Space
Create a clear workspace by removing all items and debris. Ensure walls and floors are clean and level.
Preparing the space before installing kitchen base cabinets is crucial. It ensures a smooth installation process. Proper preparation avoids future issues like uneven cabinets or misalignment.Clear The Area
Begin by removing obstacles in the kitchen. Take out old cabinets, appliances, and furniture. Ensure the workspace is clutter-free. This step makes installation easier and safer. A clean area prevents accidents and allows for precise measurements. Use a broom to sweep away dust and debris. A vacuum can help with small particles.Check The Floor Level
Use a level tool to check the floor’s evenness. Uneven floors can cause cabinet misalignment. Spot any high or low areas. Mark them for leveling later. Use a straightedge to identify floor dips or bumps. Correcting these ensures the cabinets sit properly. Shim or sand the floor as needed. This step is vital for a polished finish.Mark Cabinet Layout
Mark cabinet layout by measuring and marking the floor where each cabinet will sit. Ensure alignment using a chalk line or laser level. Proper layout guides accurate placement during installation.
Before you dive into installing your kitchen base cabinets, it’s crucial to prepare by marking the cabinet layout accurately. This step ensures that your cabinets are aligned and leveled, providing a professional finish to your kitchen. A little time spent on this task can save you from future headaches. So, grab your tools, and let’s get started with marking your cabinet layout.Measure And Mark Walls
Start by measuring your kitchen walls where the base cabinets will sit. Use a tape measure to determine the exact length and height of the wall sections. This helps you know precisely where each cabinet will fit. With your measurements in hand, use a pencil to mark the edges of each cabinet on the wall. Ensure these marks are visible and clear. This is your roadmap for installation. It’s helpful to label each mark with the corresponding cabinet size or number. This prevents any mix-up when you start placing the cabinets.Establish A Level Line
Once you’ve marked the cabinet positions, the next step is to establish a level line. This ensures your cabinets sit perfectly even, preventing any tilting or uneven surfaces. Use a laser level or a chalk line to draw a straight horizontal line across the wall. This line should match the top of your base cabinets. Check the level line with a spirit level to confirm accuracy. If it’s not level, adjust accordingly until it’s perfect. Remember, a level foundation is key to a sturdy cabinet installation. Have you ever opened a cabinet door that swings back? That’s what happens when you skip this step. Taking the time now means fewer adjustments later. It also guarantees a sleek, professional appearance for your kitchen.
Credit: www.youtube.com
Install The First Cabinet
Installing kitchen base cabinets starts with the first cabinet. This sets the stage for a smooth installation. It is crucial to align it perfectly, ensuring stability and aesthetics.
Position The Corner Cabinet
Begin with the corner cabinet. This cabinet acts as a reference point for others. Measure carefully to ensure a snug fit against the wall. Align its front edge with the layout line drawn on the floor. This ensures a straight row of cabinets.
Use a level to check its balance. Adjust the height with shims if necessary. A leveled corner cabinet prevents misalignment later.
Secure To Wall Studs
Find the wall studs using a stud finder. Mark these points clearly. These studs provide essential support.
Drill pilot holes into the cabinet back at the stud locations. This prevents wood splitting. Secure the cabinet to the wall using screws. Ensure they are tight for maximum support.
Check the cabinet’s alignment again. Confirm it is stable and level. This ensures a solid foundation for subsequent cabinets.
Align And Secure Additional Cabinets
Align cabinets properly before securing them to ensure stability. Use clamps to hold cabinets together tightly during installation. Secure the cabinets to the wall by drilling screws through the back panel into wall studs.
Installing kitchen base cabinets can transform your space, but the real magic happens when you align and secure additional cabinets. This step ensures everything looks cohesive and functions seamlessly. Imagine your kitchen as a puzzle, where each piece must fit perfectly to create a complete picture. Proper alignment isn’t just about aesthetics; it’s crucial for the utility of your kitchen. Let’s dive into making sure everything fits just right.Join Cabinets Together
To start, place the cabinets side by side and ensure they touch. Use clamps to hold them in place. This prevents shifting while you work. With a drill, create pilot holes near the front and back of the adjoining sides. This step prevents the wood from splitting. Screw the cabinets together using screws that are long enough to hold securely. You’ll notice your cabinets start to act as one solid unit.Ensure Level And Plumb Alignment
Before securing to the wall, check if the cabinets are level. Use a carpenter’s level to do this. Adjust using shims beneath the cabinets if needed. Check for plumb alignment by holding the level vertically against the cabinet fronts. Adjust as necessary to ensure the cabinets don’t tilt forward or backward. Once aligned, secure the cabinets to the wall studs using screws. This final step guarantees that your cabinets stay put, even under the weight of all your kitchenware. Have you ever noticed how a crooked cabinet door can drive you mad every time you open it? Ensuring level and plumb alignment prevents such annoyances and makes your kitchen a joy to use. By taking the time to join cabinets properly and ensure they are level and plumb, you lay the foundation for a functional and beautiful kitchen. How will your kitchen transform when every cabinet is perfectly aligned?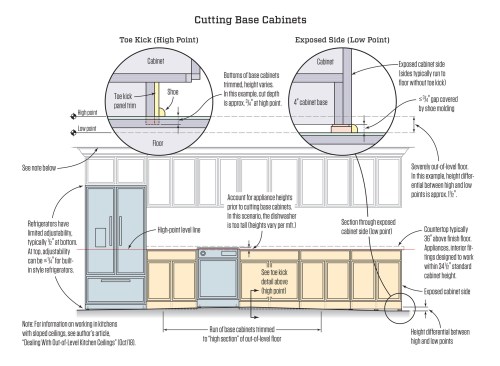
Credit: www.jlconline.com
Add Filler Strips
Filler strips help bridge gaps between cabinets and walls, ensuring a seamless fit. Measure and cut the strips to size, aligning them carefully before securing.
Adding filler strips is crucial for a seamless kitchen cabinet installation. Filler strips are narrow pieces of wood that fill gaps between cabinets and walls or appliances. They ensure a smooth and professional appearance, providing both function and aesthetics. Without them, cabinets may look unfinished, leaving unsightly gaps. Understanding how to measure and attach these strips is key to achieving a polished look.Measure And Cut Filler Pieces
Before cutting, measure the gap between the cabinet and the wall. Use a tape measure for accurate dimensions. Mark the measurements on the filler strip. Ensure the strip is slightly longer than the gap to allow for adjustments. Use a saw to cut the filler strip to the marked size. Double-check the length to ensure it fits snugly. Sand the edges for a smooth finish.Attach Filler Strips
Position the filler strip in the gap to check the fit. Adjust if necessary to ensure a tight fit. Use screws to secure the strip to the cabinet. Drill pilot holes to prevent the wood from splitting. Attach the strip using a screwdriver, ensuring it’s flush with the cabinet surface. For a perfect finish, apply wood glue along the edges. Hold in place until the glue dries completely.Install Cabinet Doors And Drawers
Installing cabinet doors and drawers is an essential step in kitchen renovation. This process enhances both functionality and aesthetics. Proper installation ensures smooth operation and longevity of your cabinets.
Attach Hinges And Doors
Start by preparing the hinges. Align them with the pre-drilled holes on the cabinet frame. Use a screwdriver to secure them tightly. Ensure the hinges are level for smooth door movement.
Next, position the door on the hinges. Hold the door steady while fastening the screws through the hinge plates. Check that the door swings freely and closes snugly.
Insert Drawers
Begin by installing the drawer slides inside the cabinet. Align them parallel to the sides. Attach the slides with screws, ensuring they are firmly fixed.
Now, slide the drawer box onto the tracks. Push it gently to ensure a smooth glide. Adjust the slides if needed for proper alignment.
Test the drawer’s movement. It should pull out and retract without resistance.

Credit: www.familyhandyman.com
Finish And Inspect Installation
Ensure cabinets are level and secure by checking alignment with adjacent units. Adjust for gaps and tighten screws firmly. Inspect for smooth drawer and door operation, confirming proper functionality.
Installing kitchen base cabinets requires precision and attention. After securing them, it’s essential to complete the process with a thorough inspection. This ensures everything aligns perfectly and functions smoothly. The final steps can make a big difference in the overall look and utility of your kitchen. Attention to detail at this stage guarantees your cabinets remain sturdy and attractive.Check For Gaps And Adjust
Inspect the spaces between the cabinets and walls. Gaps can disrupt the aesthetic and cause issues later. Use shims or adjust screws to close these gaps. Ensure doors and drawers open without obstruction. Test the alignment by opening and closing each one. They should glide smoothly without sticking. If they don’t, minor adjustments might be necessary. Use a level to confirm the cabinets are even. Uneven cabinets can lead to problems with countertops and appliances.Clean Up Workspace
Once satisfied with the installation, clean the area. Remove all tools and leftover materials. Wipe down the cabinets to remove dust and fingerprints. This helps in maintaining a clean kitchen environment. Double-check the floor for nails or screws. They can be hazardous if left behind. Dispose of packaging and waste properly. This final clean-up leaves your kitchen ready for use.Frequently Asked Questions
How Should Base Cabinets Be Properly Installed?
Install base cabinets on a level surface. Secure them to wall studs. Ensure alignment using a level. Attach securely with screws. Double-check stability and spacing.
How To Install A Cabinet For Beginners?
Start by measuring and marking the wall for accurate placement. Use a stud finder to locate wall studs. Secure the cabinet brackets to the wall studs. Lift and hang the cabinet onto the brackets. Ensure it’s level, then fasten screws to secure it tightly.
Always follow safety precautions.
Are Base Cabinets Attached To The Floor?
Base cabinets are typically attached to the floor for stability. This prevents them from tipping over. Installers secure them using screws or brackets. This ensures that the cabinets remain sturdy and safe for use. Proper attachment also helps maintain the alignment of countertops and other kitchen fixtures.
Do You Put The Floor Under First Before Installing Kitchen Cabinets?
Install flooring before kitchen cabinets for a clean look and easy future repairs. This allows cabinets to sit evenly. It also ensures no gaps between flooring and cabinets. Consider flooring type, as some may expand or contract, affecting installation. Proper planning ensures a professional finish.
Conclusion
Installing kitchen base cabinets is a straightforward task with the right steps. Start by measuring and marking your space accurately. Secure the cabinets in place using screws and a level. Ensure everything aligns perfectly. Adjust doors and drawers for smooth operation.
Take your time to tighten screws and check stability. Enjoy your new cabinets, enhancing your kitchen’s look and function. Remember, patience and precision make the process easier. Dive into this project with confidence, knowing you can transform your kitchen space.
Happy installing!