How to Install Kitchen Base Cabinets: Step-by-Step Guide
Are you ready to transform your kitchen into a stylish and functional space? Installing kitchen base cabinets is a fantastic way to give your kitchen a fresh look and enhance its usability.
You might think this task is challenging, but with the right guidance, you can do it yourself and save money in the process. Imagine the satisfaction of stepping back and admiring a job well done, knowing you made it happen with your own hands.
This guide will walk you through each step, ensuring you gain the confidence and skills needed to complete the installation like a pro. So grab your tools and let’s dive into the world of kitchen cabinet installation! Your dream kitchen is just a few steps away.
Credit: www.jlconline.com
Preparation And Tools
Preparing to install kitchen base cabinets is crucial for ensuring a smooth and successful installation. The right tools and careful planning can make the process efficient and less stressful. Before you dive into the installation, spend time getting organized and familiarizing yourself with the components and layout. This approach will save you time and prevent headaches down the line.
Gather Necessary Tools
Start by assembling all the tools you’ll need. Having everything on hand will streamline the process and keep you focused. Essential tools include a power drill, screwdriver, level, tape measure, and clamps. A carpenter’s square and a pencil are also handy for accurate measurements and marking. If you’re missing a tool, consider borrowing from a friend or renting from a local hardware store. This ensures you’re not interrupted mid-project.
Check Cabinet Components
Before installation, inspect the cabinet components thoroughly. Confirm you have all the necessary pieces, including screws, hinges, and any additional hardware. It’s not uncommon to find missing or damaged parts, so checking early prevents delays. Lay out each piece and compare them to the assembly instructions. This step is also an opportunity to familiarize yourself with how each component fits together, making the installation smoother.
Plan Cabinet Layout
Planning your cabinet layout is like setting the foundation for your project. Measure your kitchen space and decide the placement of each cabinet. Consider factors like plumbing and electrical outlets, which may affect your layout. Use painter’s tape to mark the floor and walls where the cabinets will go. This visual guide helps you see the flow of your kitchen and adjust your plan if necessary. Ask yourself: does this layout maximize space and functionality? Your answers will guide your final decisions.

Credit: www.youtube.com
Measuring And Marking
Accurate measuring and marking are crucial for kitchen base cabinet installation. Use a tape measure to ensure precise dimensions. Mark the wall with a pencil where the cabinets will be placed, focusing on alignment and levelness for optimal results.
Measuring and marking are crucial steps in cabinet installation. Accurate measurements ensure a perfect fit. Proper marking guides you during installation. Follow these steps to prepare your kitchen for base cabinets.Measure Wall And Floor
Start by measuring the wall where cabinets will go. Use a tape measure for accuracy. Measure the width and height of the space. Check the floor level with a spirit level. Uneven floors may need adjustments. Write down all measurements clearly.Mark Cabinet Placement
Mark the wall with a pencil at cabinet edges. Use a straight edge for straight lines. Ensure markings are visible. Mark the height where the cabinet top will be. Double-check measurements before moving on. This step helps in aligning the cabinets correctly.Locate Studs
Find wall studs to secure cabinets firmly. Use a stud finder for precision. Mark each stud location with a pencil. Studs provide strong support for cabinets. Ensure marks are easy to see. This ensures the cabinets are securely mounted.Installing The Base Cabinets
Installing kitchen base cabinets can seem daunting, but with the right approach, it’s a manageable task for any DIY enthusiast. These cabinets are not just storage units; they form the backbone of your kitchen layout. By ensuring a proper installation, you contribute to the overall functionality and aesthetic of your kitchen space. Here’s a simple breakdown to help you achieve a flawless installation.
Level The Cabinets
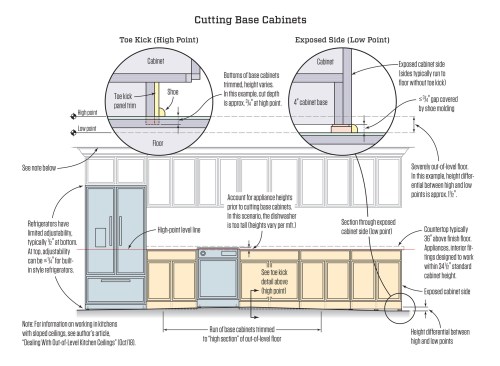
Start by ensuring that your cabinets are perfectly level. Uneven cabinets can lead to problems down the line, like misaligned countertops or doors that won’t close properly. Use a level to check the floor where your cabinets will sit. If you find any irregularities, consider using shims to create a flat surface. This small adjustment can make a big difference in the final outcome.
Attach Cabinets To Wall
Once your cabinets are level, it’s time to secure them to the wall. Start by identifying the studs using a stud finder. This step is crucial as it ensures your cabinets have a strong anchor point. Drill screws through the cabinet backs into the studs for a firm hold. Imagine the satisfaction of knowing your cabinets are securely fastened, ready to withstand the daily rigors of kitchen life.
Secure Cabinets Together
With your cabinets attached to the wall, the next step is to secure them to each other. Align the front edges of adjoining cabinets and use clamps to hold them in place. Drill screws through the sides to connect them securely. This step not only stabilizes the cabinets but also gives a seamless look, enhancing the overall aesthetic of your kitchen.
By following these steps, you’ll ensure your kitchen base cabinets are installed with precision. What challenges have you faced while installing cabinets, and how did you overcome them?
Adjusting And Aligning
Adjusting and aligning your kitchen base cabinets is a critical step in ensuring they function smoothly and look aesthetically pleasing. Proper alignment guarantees that doors close seamlessly and drawers slide effortlessly. Ever struggled with a cabinet door that won’t stay shut or a drawer that feels stuck? These issues often stem from poor alignment, but with a few simple adjustments, you can achieve a polished and professional finish.
Align Doors And Drawers
Start by checking the alignment of the doors and drawers. Use a level to ensure that everything is perfectly straight. A crooked door can be irritating and detract from the beauty of your kitchen.
- Check for gaps between doors and ensure they are evenly spaced.
- Adjust the screws on the hinge plates to fine-tune the alignment.
- Inspect drawer slides to confirm they are parallel and not causing any obstruction.
Imagine the satisfaction of seeing perfectly aligned cabinets every time you enter your kitchen. A small tweak can make a big difference!
Adjust Hinges
Hinges are the backbone of cabinet doors, allowing smooth opening and closing. Misaligned hinges can lead to doors hanging unevenly or not closing properly.
- Loosen screws slightly to reposition the hinge until the door is level.
- Tighten screws securely once the door is aligned to your satisfaction.
- Repeat the process for every door to ensure uniformity across the kitchen.
Have you ever noticed a gap at the top of a cabinet door? Adjusting hinges can easily fix this, creating a flawless appearance.
Install Trim And Molding
Trims and moldings add a finishing touch that can transform the look of your cabinets. They hide gaps and provide a cohesive look that blends seamlessly with your kitchen design.
- Measure carefully before cutting to ensure a perfect fit.
- Use a nail gun to secure trim pieces, making sure they are flush with the cabinet edges.
- Consider painting or staining the trim to match the cabinets for an integrated look.
Why not add a touch of elegance with crown molding? It’s a simple upgrade that can elevate the overall appeal of your kitchen.
Finishing Touches
Align cabinets using a level to ensure they are straight. Secure them to the wall with screws for stability. Add cabinet doors and handles for the finishing touch.
Finishing your kitchen base cabinet installation is all about the details. It’s these subtle touches that transform your kitchen from a mere workspace to a welcoming hub for family and friends. Let’s dive into the final steps that will bring your cabinetry project to life.Install Cabinet Hardware
The right hardware can elevate your cabinet’s look instantly. Choose handles and knobs that complement your kitchen style. Whether you prefer sleek modern lines or vintage charm, hardware is your chance to express personality. Use a template to ensure uniform placement. This small tool can save you from crooked handles and the frustration of uneven spacing. Remember to double-check the screws are secure, but not too tight. Over-tightening can damage your beautiful new cabinets.Clean And Inspect
After all the hard work, a thorough cleaning is essential. Wipe down your cabinets with a soft cloth to remove dust and fingerprints. This step not only makes your kitchen shine but also helps you spot any imperfections. Look for any scratches or marks that might need touch-up. It’s the perfect time to ensure every corner is as flawless as you envisioned. Make a checklist of any minor fixes. Sometimes, small issues can go unnoticed until everything is in place.Final Adjustments
Once cleaned, check the alignment of doors and drawers. Are they opening smoothly? Adjust the hinges and slides to ensure everything is operating perfectly. Consider the alignment of the cabinet doors with the countertops. A small tweak here and there can make a big difference in the overall aesthetic. Ask yourself: Is everything functioning as it should? Taking the time for these adjustments means fewer headaches down the line. Investing time in these finishing touches ensures your kitchen is both functional and beautiful. How do you feel now that your kitchen is almost complete? Your effort has crafted a space that’s truly your own.
Credit: www.instagram.com
Frequently Asked Questions
How To Install Base Cabinets Step By Step?
Start by measuring the space accurately. Mark the layout on the floor. Secure cabinets to the wall studs. Ensure all cabinets are level and aligned. Attach the cabinets together using screws. Install doors and hardware. Finish by adding countertops and sealing edges.
Are Base Cabinets Attached To The Floor?
Base cabinets are typically attached to the floor for stability. This prevents movement and ensures proper alignment. Proper installation involves securing the cabinets with screws or brackets. This ensures they remain firmly in place during use, providing a secure foundation for countertops and other fixtures.
How To Secure Base Kitchen Cabinets To Wall?
Secure base kitchen cabinets by locating studs, drilling pilot holes, and using screws to attach the cabinets. Use shims for leveling.
Should Base Cabinets Be Screwed To The Wall?
Yes, base cabinets should be screwed to the wall for stability. This prevents tipping and ensures safety. Proper installation also enhances the cabinet’s longevity. Use appropriate screws and anchors for secure attachment. Ensure cabinets are level before fastening to achieve optimal results.
Conclusion
Installing kitchen base cabinets can seem tricky at first. But with patience and the right tools, it’s doable. Step-by-step guides simplify the process. Measure carefully. Ensure the cabinets are level. Secure them firmly to the wall. Check for any gaps or misalignments.
Tighten screws and brackets. Remember, a solid foundation enhances the kitchen’s beauty. Take your time. Double-check your work. Enjoy the satisfaction of a job well done. Now, your kitchen is ready for the next cooking adventure. Happy installing!