How to Paint Kitchen Cabinets With Sprayer: Expert Tips
Are your kitchen cabinets looking a bit outdated or worn? Imagine transforming your kitchen without the hassle of a full renovation.
Painting your kitchen cabinets with a sprayer is a game-changer. It’s faster, gives a smoother finish, and can make your old cabinets look brand new. You may be wondering if you have the skills or the time to take on such a project.
The good news is, with the right guide, you absolutely can. This article will walk you through the process step-by-step, ensuring you achieve a professional-looking finish that you’ll be proud to show off. Ready to give your kitchen the makeover it deserves? Let’s dive in and discover how you can effortlessly revamp your space with a sprayer!

Credit: www.youtube.com
Choosing The Right Sprayer
Choosing the right sprayer is crucial for painting kitchen cabinets efficiently. A quality sprayer ensures smooth, even coverage and saves time. Consider factors like adjustable settings, ease of use, and the type of paint when selecting a sprayer.
Choosing the right sprayer can greatly impact the outcome of your kitchen cabinet painting project. The right tool ensures even coverage and a smooth finish, making your cabinets look professionally done. Understanding various sprayer types and their features is essential for selecting the perfect one for your needs.Types Of Sprayers
Sprayers come in different types, each suited for specific tasks. Here are some common options:- Airless Sprayers:Ideal for large surfaces. They use high pressure to spray paint, providing a quick and smooth application.
- HVLP (High Volume Low Pressure) Sprayers:Great for detailed work. They offer more control and produce less overspray, saving paint.
- Compressed Air Sprayers:These offer precision but may require an air compressor. They are perfect for smaller jobs.
Features To Consider
Choosing a sprayer involves considering features that match your project needs. Here are important aspects:- Adjustable Pressure:Allows control over the paint flow. Essential for achieving a smooth finish.
- Tip Sizes:Different tips suit various paint types and finishes. Select the right one for your paint.
- Ease of Cleaning:Quick cleaning saves time. Look for sprayers with easy disassembly.
Budget Options
Finding a sprayer within your budget is crucial. You don’t need to spend a fortune for quality. Here are some options:- Entry-Level Airless Sprayers:Affordable and efficient for large areas. Perfect for beginners.
- DIY HVLP Sprayers:Cost-effective for small projects. Offers decent control without breaking the bank.
- Used Equipment:Consider second-hand sprayers. Often, they perform well at a lower price.

Credit: www.youtube.com
Preparing Cabinets For Painting
Preparing kitchen cabinets for painting involves cleaning and sanding surfaces to ensure smooth paint application. Using a sprayer provides even coverage, transforming cabinets with a fresh, professional finish.
Preparing your kitchen cabinets for painting is crucial to achieving a smooth, professional finish. Whether you’re transforming your space for a fresh look or preparing to sell, taking the time to properly prep the surfaces will make all the difference. Before you grab your sprayer, let’s dive into the essential steps that ensure your cabinets are ready for a flawless paint job.Cleaning And Sanding
Begin by thoroughly cleaning your cabinets to remove grease, dirt, and any residue. A simple mix of dish soap and water works wonders for this task. Scrub all surfaces, including the inside corners and edges, to avoid any particles interfering with the paint adherence. Once cleaned, it’s time to sand. Sanding is essential as it helps the primer stick better. Use medium-grit sandpaper to gently rough up the surface. Are you wondering if you need to sand every inch? Focus on areas that show wear or gloss; they need more attention.Removing Hardware
Next, remove all cabinet hardware, including handles, hinges, and knobs. This not only prevents paint from sticking to these items but also ensures a cleaner finish. You might be tempted to paint around these, but trust me, it’s worth the extra effort to remove them. Keep all hardware in a labeled bag or box to avoid losing any pieces. This organization will save you time and headaches when it’s time to reassemble your cabinets.Priming Surfaces
Priming is your secret weapon for a lasting finish. Apply a high-quality primer to all surfaces you’ve cleaned and sanded. Use a paintbrush for edges and a roller for flat surfaces for even coverage. Did you know that skipping primer can lead to peeling paint? That’s right! Primer creates a binding layer that helps the paint adhere better and keeps it from chipping. Choose a primer that suits your cabinet material, whether it’s wood, laminate, or metal. By focusing on these preparation steps, you set the stage for a successful painting project. Are you ready to see your kitchen cabinets transform before your eyes?Setting Up Your Workspace
Organize your workspace by covering floors and countertops. Ensure good ventilation and proper lighting for painting. Arrange tools and materials within easy reach to streamline the process.
Setting up your workspace before painting kitchen cabinets with a sprayer is crucial for a smooth and successful project. A well-organized space not only enhances efficiency but also ensures safety and minimizes mess. By taking a few preparatory steps, you can transform your kitchen cabinets with ease and precision.Ventilation And Safety
Ensuring proper ventilation is key when using a sprayer. Paint fumes can be hazardous, so open windows and doors or use fans to promote airflow. Consider wearing a mask and goggles to protect yourself from inhaling fumes and paint particles. Safety should never be an afterthought. Keep a fire extinguisher nearby, especially if you’re working with oil-based paints. Ensure your workspace is well-lit to avoid any mishaps.Protecting Surrounding Areas
Prevent unwanted paint splatter by covering nearby surfaces. Use plastic sheeting or drop cloths to cover floors, countertops, and appliances. Secure the coverings with painter’s tape to ensure they stay in place. If you’ve ever faced the frustration of removing paint from unexpected places, you know the value of taking these precautions. Consider labeling the areas you’ve covered to avoid any confusion during the painting process.Organizing Tools And Materials
A clutter-free workspace enhances efficiency. Gather all necessary tools, such as the sprayer, paint, brushes, and cleaning supplies, and organize them within arm’s reach. Use a small table or cart to keep everything tidy and accessible. Have you ever wasted time searching for a tool mid-project? Avoid this by placing your items in a logical order of use. This simple step can save you time and keep the project flowing smoothly. By setting up your workspace effectively, you’re paving the way for a successful cabinet transformation. How do you usually prepare your workspace for painting projects?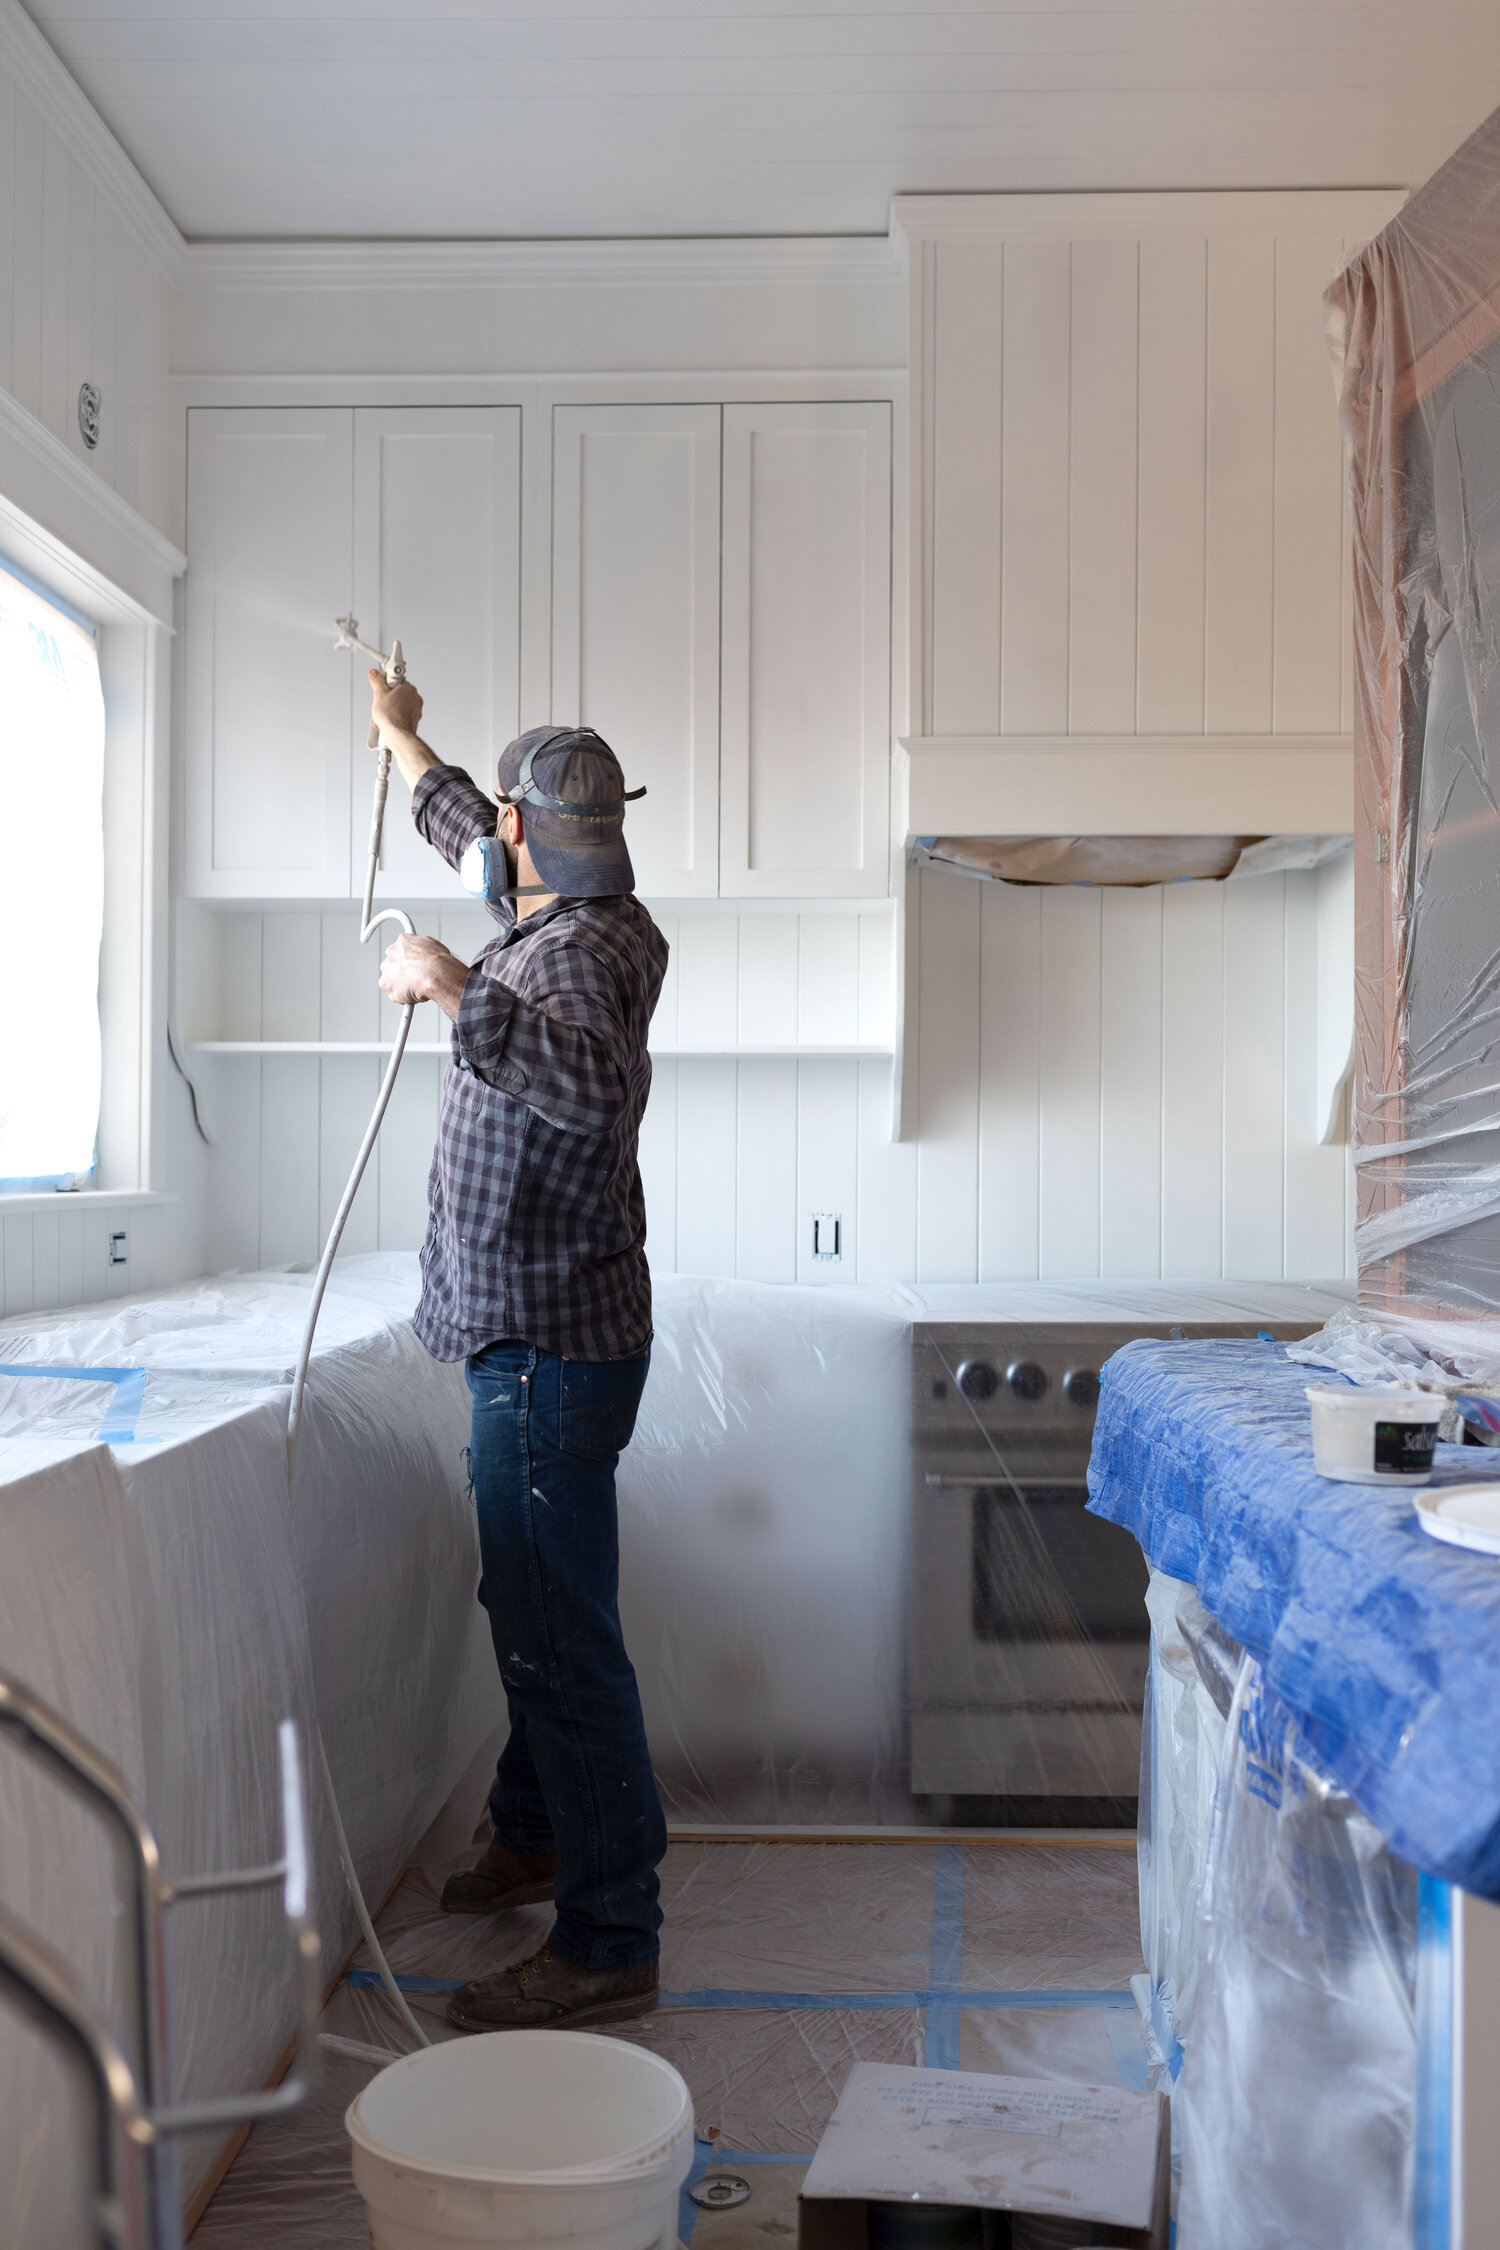
Credit: www.thegritandpolish.com
Mixing And Testing Paint
Mixing and testing paint ensures the perfect shade for kitchen cabinets. Use a sprayer for smooth, even coverage. This method speeds up the process and delivers a professional finish.
Mixing and testing paint is a crucial step in achieving a professional finish when painting kitchen cabinets with a sprayer. A sprayer can deliver a smooth, even coat that transforms your kitchen, but the magic lies in the preparation. Think of this phase as setting the stage for your DIY masterpiece. Without the right mix, the sprayer might clog or the finish could turn out uneven. Let’s get into the nitty-gritty of how you can ensure your paint is perfectly prepared for spraying.Choosing The Right Paint
Selecting the appropriate paint is your first task. Opt for paint specifically designed for cabinets or furniture. These paints are typically more durable and resistant to the wear and tear of kitchen life. You might find yourself torn between oil-based and latex options. Latex is easier to clean and has lower VOCs, making it a safer choice for home use. If you’ve ever felt overwhelmed by choices at the paint store, narrowing it down to cabinet-specific options can save you time and ensure better results.Thinning Paint For Sprayers
Thinning your paint is essential for sprayer use. A sprayer requires a thinner consistency to work effectively and to prevent clogging. You might wonder, “How thin is thin enough?” A good rule of thumb is to aim for the consistency of milk. Add water or a paint thinner gradually, stirring consistently until you reach the desired viscosity. Be cautious; too much thinning can lead to poor coverage, requiring multiple coats.Conducting A Test Spray
Before diving into your cabinets, conduct a test spray. This step is your safety net—it helps you verify that the paint flows smoothly and evenly from the sprayer. Use a scrap piece of wood or cardboard to check the spray pattern. Is it even? Are there any splatters? Adjust the sprayer settings as needed. This practice ensures that your cabinets will get the flawless finish they deserve, saving you from unexpected surprises once you start painting the actual cabinets.Spraying Techniques
Transform kitchen cabinets with a sprayer for a smooth, even finish. Prep the surface, apply primer, then spray paint in thin coats. Ensure proper ventilation for best results.
Spraying kitchen cabinets gives them a smooth, professional finish. Mastering spraying techniques is essential for achieving stunning results. Use the right techniques to avoid drips and uneven coats. Let’s explore the key aspects of spraying techniques for painting kitchen cabinets.Holding The Sprayer Correctly
Hold the sprayer like a pro for an even finish. Keep it steady and at a consistent distance from the surface. About 10-12 inches is ideal. This ensures even coverage and avoids paint buildup. Keep your wrist straight while moving the sprayer. This helps maintain a consistent angle.Maintaining Consistent Movement
Move the sprayer in smooth, sweeping motions. Start moving before pulling the trigger and release it before stopping. This prevents paint from pooling at the start and end. Overlap each pass by about 50% for even coverage. Practice on a scrap piece to perfect your movement.Avoiding Common Mistakes
Avoid some common pitfalls for better results. Don’t rush; take your time with each coat. Ensure the surface is clean and dry before starting. Watch for drips and address them quickly. Use a light touch; heavy coats can lead to runs. Keep the sprayer clean for optimal performance.Applying Multiple Coats
Applying multiple coats ensures a smooth finish for kitchen cabinets. Allow each coat to dry before spraying the next. This approach helps achieve a durable and even appearance.
Applying multiple coats of paint to your kitchen cabinets with a sprayer can transform your space with a professional finish. The process requires patience and precision. Each coat builds upon the last, enhancing durability and achieving that seamless look.Drying Times Between Coats
Allowing adequate drying time between coats is essential. Rushing can lead to smudges or uneven texture. Typically, 4-6 hours is a good window, but always check the paint’s label for specific recommendations. Consider the environment too. Humidity and temperature can affect drying times. A small fan can help speed up drying, but ensure it doesn’t blow dust onto the wet paint.Inspecting For Even Coverage
After each coat dries, inspect the surface for even coverage. Look for areas that might have been missed or appear thinner. A strong light can help highlight inconsistencies. You want a consistent color and texture across all cabinets. If you notice variations, address them before applying the next coat.Addressing Imperfections
Imperfections can happen, even with the best preparation. Small drips or bubbles might appear. Use fine-grit sandpaper to gently smooth these out before the next coat. Are you noticing persistent flaws? It might be worth adjusting your technique or checking your sprayer settings. Sometimes, a small tweak can make a significant difference. Have you ever had a DIY project that didn’t go as planned? Learning from these experiences can make you more adept. Embrace the imperfections as part of the journey to mastering the art of painting.Reassembling Cabinets
Painting kitchen cabinets with a sprayer ensures an even finish. First, disassemble the cabinets carefully. This allows for thorough coverage and a professional look.
Reassembling kitchen cabinets after painting them with a sprayer is crucial. This step ensures a polished look and functionality. Careful attention to detail during reassembly avoids alignment issues. It also helps maintain the aesthetic appeal of your freshly painted cabinets.Reattaching Hardware
Reattach the cabinet hardware with precision. This includes handles, knobs, and hinges. Use a screwdriver to secure each piece firmly. Avoid over-tightening to prevent damage. Ensure each screw fits properly. A snug fit keeps the hardware stable.Ensuring Proper Alignment
Align the cabinet doors carefully. Proper alignment ensures smooth opening and closing. Check each door for even spacing. This helps maintain a balanced appearance. Adjust hinges if needed. Test the doors to verify their functionality.Final Touches And Clean-up
Inspect your cabinets for any touch-ups needed. Use a small brush for minor corrections. Clean up the work area thoroughly. Remove any paint spills or dust. A tidy space enhances the overall satisfaction with your project. Dispose of used materials responsibly.Frequently Asked Questions
Can I Use A Sprayer To Paint My Kitchen Cabinets?
Yes, you can use a sprayer to paint kitchen cabinets. It provides a smooth, professional finish. Ensure proper ventilation and cover surrounding areas to avoid overspray. Clean and sand the cabinets beforehand for best results.
Is It Better To Roll Or Spray Paint Kitchen Cabinets?
Spray painting kitchen cabinets offers a smoother, more professional finish. It covers surfaces evenly and quickly. Rolling is cost-effective and easier for DIY projects but may leave brush marks. Choose spraying for a flawless look and rolling for budget-friendly updates.
How Do You Get The Smoothest Finish When Painting Cabinets?
To achieve a smooth finish, sand cabinets thoroughly and clean them before painting. Use a high-quality primer for better adhesion. Apply paint with a quality brush or sprayer in thin, even coats. Allow each layer to dry completely before adding the next.
Finish with a protective topcoat for durability.
Do I Need To Thin Cabinet Paint For Sprayer?
Yes, thin cabinet paint for a sprayer to ensure smooth application. Follow the manufacturer’s guidelines for thinning ratios.
Conclusion
Painting kitchen cabinets with a sprayer transforms your space quickly. The process is straightforward and efficient. You achieve a smooth, professional finish without much hassle. First, prepare the area and cabinets carefully. This ensures the paint adheres well. Then, use the sprayer for even coverage.
It saves time and effort compared to brushes. Clean the sprayer thoroughly after use. This maintains its effectiveness for future projects. With practice, you gain confidence in spraying techniques. Your kitchen looks fresh and new. Enjoy your revitalized space and admire your handiwork.