How to Install Crown Molding for Kitchen Cabinets: Expert Tips
Transforming your kitchen doesn’t always require a complete overhaul. Sometimes, the smallest details can make the biggest impact.
Have you ever considered adding crown molding to your kitchen cabinets? This simple touch can elevate your kitchen’s style, making it look elegant and finished. You might think installing crown molding is a complex task best left to the professionals, but with the right guidance, you can do it yourself.
Imagine the satisfaction of stepping back and admiring a project you completed with your own hands. In this guide, you’ll discover step-by-step instructions that will help you install crown molding like a pro. With just a little effort, you can give your kitchen a sophisticated new look that you’ll love every time you walk in. Ready to get started? Let’s dive in and transform those cabinets!
Choosing The Right Crown Molding
Selecting the right crown molding enhances kitchen cabinets. Measure accurately and choose a style that complements your design. Install carefully to ensure a seamless fit and professional look.
Choosing the right crown molding for your kitchen cabinets can enhance their appearance and add a touch of elegance. The process involves selecting suitable materials, styles, and ensuring precise measurements. Each decision impacts the final look, so it’s crucial to understand the options available. This guide will help you explore key aspects to consider.Material Options
Crown molding materials vary in durability and aesthetics. Wood is a popular choice; it offers a classic look and can be stained or painted. MDF, or medium-density fiberboard, is an affordable alternative. It’s easy to paint and install. PVC is moisture-resistant, making it ideal for kitchens. Consider your budget and the kitchen’s style when selecting a material.Style Considerations
Style influences the overall vibe of your kitchen. Traditional crown molding features intricate patterns and elaborate designs. This suits classic kitchen themes. Contemporary styles are sleek with minimal detailing. They complement modern kitchen aesthetics. Transitional styles blend traditional and contemporary elements. Choose based on your kitchen’s existing design.Measurement Essentials
Accurate measurements ensure a seamless fit. Measure the length of the cabinet where the molding will be installed. Calculate the angles of corners; this is crucial for cutting the molding correctly. Use a protractor for precise angle measurement. Double-check all dimensions before purchasing materials. Proper measurements prevent gaps and ensure a professional appearance.Tools And Materials Needed
Embarking on the journey of installing crown molding for your kitchen cabinets is a rewarding endeavor that not only enhances the aesthetic appeal of your space but also adds a touch of sophistication. To ensure a successful installation, gathering the right tools and materials is crucial. Equipped with the essentials, you’ll be ready to transform your kitchen into a chic and polished environment.
Essential Tools
- Miter Saw:A precision tool for making accurate angled cuts on your molding pieces.
- Measuring Tape:Essential for ensuring your molding fits perfectly around your cabinets.
- Nail Gun:Speeds up the installation process by securing the molding in place efficiently.
- Level:Guarantees that each piece of crown molding is installed evenly for a professional finish.
Additional Accessories
- Wood Glue:Provides extra adhesion for those stubborn pieces that need a little extra hold.
- Sandpaper:Smoothens out any rough edges or imperfections on the molding.
- Caulk:Fills in gaps and ensures a seamless appearance once the molding is installed.
Safety Equipment
- Safety Glasses:Protects your eyes from debris while cutting and installing molding.
- Ear Protection:Shields your ears from the loud noises generated by power tools like the miter saw.
- Dust Mask:Keeps you safe from inhaling wood dust during sanding and cutting.
Have you ever started a DIY project only to realize halfway that you’re missing a crucial tool? It’s frustrating, right? Ensuring you have all the necessary equipment not only makes the process smoother but also boosts your confidence as you tackle the installation. So, what’s stopping you? Gather your tools, and let’s get that crown molding installed like a pro!
Preparing The Kitchen Cabinets
Enhance your kitchen’s style by installing crown molding on cabinets. Measure accurately, cut pieces precisely, and secure them with nails. This addition brings elegance and a finished look to your kitchen space.
Preparing the kitchen cabinets is crucial for a successful crown molding installation. Proper preparation ensures a seamless and professional look. It involves cleaning, leveling, and marking guidelines. Each step plays a vital role in achieving the desired finish. Let’s dive into the details.Cleaning Surfaces
Start with clean cabinet surfaces. Remove dust and grease using a mild cleaner. Wipe thoroughly with a soft cloth. Ensure no residue remains. This helps the molding adhere well. A clean surface prevents future problems.Ensuring Level Cabinets
Check if the cabinets are level. Use a carpenter’s level for accuracy. Identify any uneven areas. Adjust cabinet heights if necessary. This prevents gaps between molding and cabinets. Level cabinets ensure a uniform look.Marking Guidelines
Mark guidelines for precise molding placement. Use a pencil and measuring tape. Draw lines on the cabinets’ top edges. These marks guide the molding installation. Ensure the lines are straight and even. Accurate markings lead to a flawless finish.Cutting Crown Molding
Enhance your kitchen by installing crown molding on cabinets. Begin with precise measurements for accurate cuts. Use a miter saw to achieve clean edges and ensure each piece fits snugly. Secure the molding with nails, filling gaps with caulk for a polished look.
Cutting crown molding for kitchen cabinets can transform your space, adding elegance and a touch of sophistication. However, this task requires precision and the right tools. One wrong cut can lead to wasted material and frustration. Let’s explore the best way to cut crown molding so you can achieve a professional look.Using A Miter Saw
A miter saw is your best friend for cutting crown molding. It provides the accuracy and control needed for these intricate cuts. Make sure your miter saw is equipped with a fine-toothed blade to ensure smooth edges. Position the molding on the saw with the ceiling edge against the fence. This simulates how it will sit above your cabinets. Always double-check your measurements before cutting to avoid errors.Angle Measurements
Understanding angle measurements is crucial. Crown molding typically requires cutting at a 45-degree angle. However, kitchen cabinets might demand slight adjustments based on their unique design. Use an angle finder to determine the exact angle needed if your cabinets are not a standard 90 degrees. This tool can save you from unnecessary trial and error.Avoiding Common Mistakes
Common mistakes can easily derail your project. One frequent error is cutting the molding upside down. Always remember, the bottom of the molding on the saw is the top when installed. Another mistake is not accounting for the spring angle of the molding. This angle affects how the molding sits against the cabinets and walls. Check the manufacturer’s specifications to know your molding’s spring angle. Have you ever cut too much off and had to start over? Always cut a little longer than needed. It’s easier to trim down than to add material. These small tips can save you from headaches and keep your project on track.Installing The Crown Molding
Installing crown molding enhances kitchen cabinets with elegance. Measure and cut the molding accurately for a perfect fit. Secure it with nails and adhesive for a polished look.
Installing crown molding for kitchen cabinets can dramatically enhance the overall aesthetics of your kitchen. It adds a touch of elegance and sophistication, making your cabinets look more polished and complete. Whether you’re a seasoned DIY enthusiast or just starting out, this process can be simplified into a few manageable steps.Attaching To Cabinets
Begin by measuring the length of the cabinet edges where you plan to attach the crown molding. It’s crucial to get these measurements right to avoid any material wastage. Cut the molding pieces accordingly, ensuring the edges are mitered at a 45-degree angle for a snug fit. Use a strong adhesive to attach the molding to the top of the cabinets. This step helps in holding the molding in place temporarily. Remember, the adhesive is not the primary method of securing the molding, but it provides some initial support.Securing With Nails
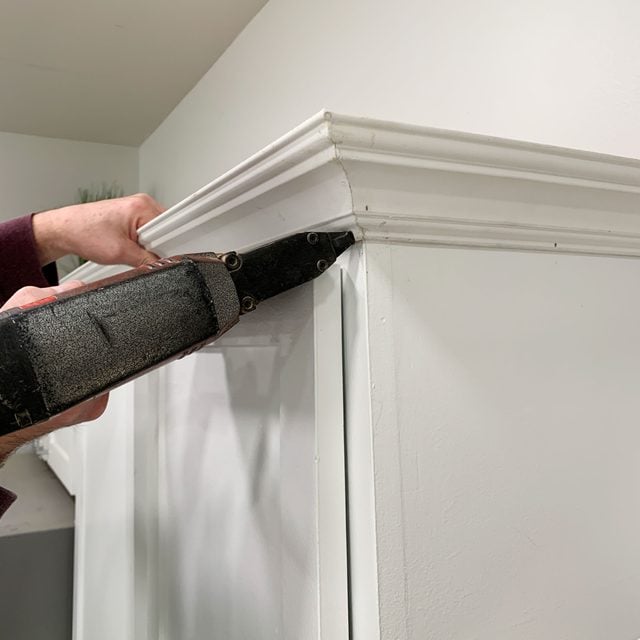
Once the adhesive has set, use finishing nails to secure the molding permanently. A nail gun can make this task easier and faster, providing a secure hold with minimal effort. Ensure you place the nails at even intervals along the molding to prevent any loose sections. If you’re working alone, a helpful tip is to use clamps to hold the molding in place while you nail. This reduces the need for extra hands and gives you more control over the installation. Be cautious about nail placement to avoid splitting the molding.Checking Alignment
After securing the molding, step back and check the alignment. Look for any gaps or uneven sections that might have occurred during installation. Use a level to ensure that the molding is perfectly straight across all sections. If you notice any discrepancies, gently adjust the molding and re-secure it with nails if necessary. A little extra attention to detail here can make a big difference in the final appearance. Ask yourself if the molding looks seamless with the cabinet design—this can be the difference between a good job and a great one. Taking the time to install crown molding correctly can transform your kitchen space. It’s not just about the physical attachment, but about creating a cohesive and stylish look that enhances your home. Are you ready to give your kitchen cabinets the makeover they deserve?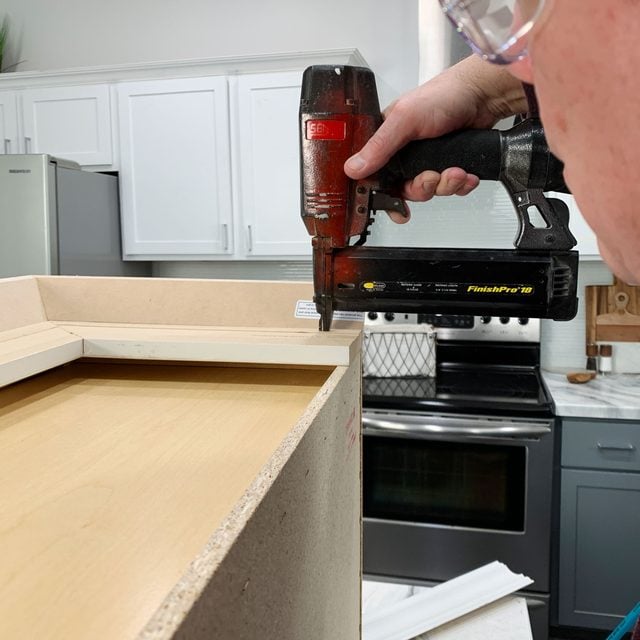
Credit: www.familyhandyman.com
Finishing Touches
The final steps of installing crown molding bring elegance to your kitchen cabinets. These finishing touches ensure a polished and professional look. They include filling gaps, sanding, and choosing the right paint or stain. Each step is crucial for a seamless finish that enhances your kitchen’s beauty.
Filling Gaps
After installation, inspect for any gaps between the molding and cabinets. Use wood filler to fill these spaces. It ensures a snug fit and smooth appearance. Apply the filler with a putty knife. Wipe away excess before it dries. Let it set as per the product instructions.
Sanding And Smoothing
Once the filler is dry, it’s time to sand. Sand the filled areas gently. Use fine-grit sandpaper for best results. This removes any unevenness. Smooth surfaces are essential for a flawless finish. Remember to clean off any dust after sanding.
Painting Or Staining
Decide whether to paint or stain your crown molding. Paint offers a modern, clean look. Stain highlights the wood’s natural beauty. Choose colors that complement your kitchen decor. Apply primer first if painting. Use a high-quality brush for even coverage. Allow sufficient drying time between coats. For staining, apply with a cloth for a rich, warm finish.
Troubleshooting Common Issues
Solving common crown molding issues for kitchen cabinets involves checking for uneven surfaces and ensuring precise measurements. Secure molding with nails or adhesive to prevent gaps or misalignment. Always prepare surfaces and materials carefully to achieve a professional finish.
Installing crown molding for kitchen cabinets can enhance their look. But sometimes, challenges arise during installation. Understanding these common issues can help achieve a flawless finish.Dealing With Uneven Ceilings
Uneven ceilings can cause gaps in crown molding. Use a level to measure the ceiling’s slope. Trim the molding to match the ceiling’s angle. Sand down any rough edges for a snug fit. Consider using flexible molding if the ceiling is extremely uneven.Fixing Misaligned Corners
Misaligned corners can disrupt the molding’s smooth flow. Check the angle of each corner with a protractor. Cut the molding precisely to fit the angle. Use corner blocks to cover minor misalignments. Glue the blocks securely for stability.Addressing Gaps
Gaps between molding and cabinets can be unsightly. Measure gaps carefully before cutting the molding. Use filler strips to cover larger gaps. Caulk smaller gaps for a seamless appearance. Paint over the caulk to match the molding color.
Credit: www.thisoldhouse.com
Credit: www.familyhandyman.com
Frequently Asked Questions
How Do You Attach Crown Molding To A Cabinet?
To attach crown molding to a cabinet, first measure and cut the molding accurately. Use a miter saw for angled cuts. Secure the molding with wood glue and finish nails. Fill any gaps with wood filler and sand smooth. Finally, paint or stain for a seamless look.
Should I Nail Or Glue Crown Molding?
Nailing crown molding provides secure attachment, especially for ceilings. Glue offers a cleaner look for wall installations. Use both for optimal results. Ensure proper alignment and finish for durability and aesthetics. Choose based on project requirements and surfaces.
Should You Put Crown Molding On Kitchen Cabinets?
Crown molding on kitchen cabinets enhances style and elegance. It adds height, conceals gaps, and creates a polished look. Choose molding that complements your kitchen’s design. Consider your ceiling height and cabinet style for best results. Proper installation ensures durability and a seamless finish.
Should Cabinet Crown Molding Touch The Ceiling?
Cabinet crown molding doesn’t need to touch the ceiling. It’s a design choice based on style preference. Some prefer it flush with the ceiling, while others like a gap for a more dramatic look. Consider ceiling height and room aesthetics before deciding.
Conclusion
Installing crown molding enhances your kitchen’s look. It adds elegance and value. The process is simple with the right tools. Measure carefully to ensure a perfect fit. Cut precisely for clean edges. Secure the molding with nails or adhesive. Paint or stain to match your cabinets.
This project can boost your kitchen’s appeal. A small effort with a big impact. Enjoy your refreshed kitchen space. Share your experience with friends and family. They might get inspired too. Happy decorating!