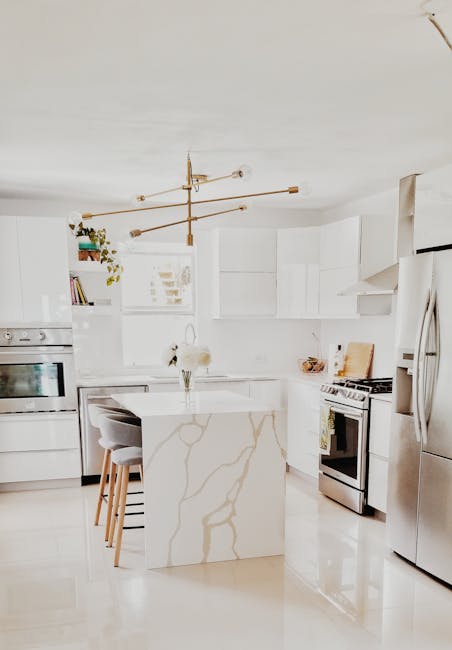
How to Make a Kitchen Island from Cabinets: DIY Guide
Imagine transforming your kitchen into a space that not only meets your practical needs but also elevates your home’s style. Picture this: a sleek, functional kitchen island, crafted by your own hands, becoming the centerpiece of your culinary haven.
You might think that creating such a masterpiece is complex or expensive, but here’s the secret—it’s neither. With just a few cabinets and a bit of creativity, you can build a stunning kitchen island that suits your taste and lifestyle.
Curious about how you can achieve this without breaking the bank or losing your weekend to a complicated DIY project? This guide will walk you through each step, ensuring you have all the knowledge and tools to succeed. You’ll discover insider tips and tricks that make the process not only easy but also enjoyable. Let’s dive in and explore how you can make this impressive transformation happen in your kitchen!
Planning Your Kitchen Island
Planning your kitchen island can transform your cooking space into a functional and stylish centerpiece. It’s not just about adding a counter; it’s about enhancing your kitchen’s efficiency and appeal. Whether you’re looking to boost storage, seating, or workspace, careful planning is the key to success.
Assessing Space And Layout
Begin by measuring your kitchen to determine the available space for your island. This ensures you don’t end up with a cramped or oversized addition. Think about the flow of movement in the kitchen. Will your island allow easy access to the stove, fridge, and sink? Consider how the island will interact with existing features and whether it facilitates a natural cooking and entertaining space.
Visualize the layout by sketching it out or using design software. You can even use tape to outline the island’s footprint on the floor. This helps you see how it fits into the space and whether adjustments are needed. Remember, functionality should drive the design. Ask yourself: will it be used for food prep, dining, or storage?
Choosing The Right Cabinets
Cabinets are the backbone of your kitchen island. Select cabinets that match your kitchen’s existing style and dimensions. Consider using ready-to-assemble cabinets for a cost-effective option. Custom cabinets provide flexibility in design but come at a higher price.
Ensure the cabinets provide adequate storage for your needs. If you love cooking, opt for deep drawers for pots and pans. If you entertain often, include open shelving for wine glasses or a built-in wine rack. Think about how you use your kitchen and tailor the cabinets to suit those needs.
Selecting Materials And Finishes
Material choice is crucial for durability and aesthetics. Choose a countertop that fits your lifestyle; quartz, granite, or butcher block are popular options. Each has its pros and cons—quartz is low-maintenance, granite offers a luxury feel, and butcher block provides warmth.
Consider the finish of the cabinets. Will you go for a sleek modern look with high-gloss finishes, or a rustic appeal with distressed wood? The finish should complement your kitchen’s overall design. Don’t overlook hardware; knobs and pulls can drastically alter the island’s appearance.
Planning a kitchen island is more than assembling pieces—it’s about creating a space that enhances your daily life. So, which features are you most excited about adding to your island?

Credit: www.instagram.com
Gathering Tools And Materials
Begin by gathering essential tools like a screwdriver, drill, and measuring tape. Select quality cabinets and a sturdy countertop. Ensure you have nails, screws, and brackets for assembly.
Gathering tools and materials is the first step to creating a kitchen island from cabinets. You need the right tools and materials to ensure a smooth project. This preparation will make the assembly easier and more efficient. Let’s explore what you need to get started.Essential Tools List
Having the right tools is crucial for a successful project. Here’s a list of essential tools you will need:- Measuring tape
- Level
- Drill
- Screwdriver
- Hammer
- Saw
- Clamp
- Safety glasses
- Work gloves
Materials Checklist
Selecting the right materials will make your kitchen island sturdy and stylish. Here’s a checklist of materials needed:- Cabinets
- Countertop
- Screws and nails
- Wood glue
- Sandpaper
- Paint or varnish
- Brackets
- Wood planks
Preparing The Cabinets
Preparing the Cabinets Begin by removing doors and hardware from existing cabinets. Sand the surfaces for a smooth finish. Ensure all pieces are clean and dry before assembly.
Preparing the cabinets is a crucial step in transforming them into a functional kitchen island. This is where you lay the groundwork for a successful DIY project. By ensuring your cabinets are ready, you can avoid hiccups during the assembly and installation phases.Removing Doors And Hardware
Begin by carefully taking off the cabinet doors and any attached hardware. Use a screwdriver to remove the hinges and handles, keeping them in a labeled bag for future projects or recycling. Removing these components not only makes the cabinets easier to handle but also prevents any damage during the sanding and prepping stages. Have you ever tried working around a cabinet door that kept swinging back? It’s frustrating, right? Taking the time to remove all doors and hardware now will save you from potential headaches later.Sanding And Prepping Surfaces
Once the cabinets are stripped of their doors and hardware, it’s time to sand the surfaces. This step is vital for ensuring a smooth finish when you paint or stain your kitchen island. Use medium-grit sandpaper to gently sand the surfaces, focusing on any rough or uneven areas. After sanding, wipe down the cabinets with a damp cloth to remove any dust. This step ensures that your paint or stain adheres properly. Have you chosen your paint or finish yet? It’s a good idea to decide now, as some finishes may require additional prep work. Taking these extra steps will make all the difference in the final look of your new kitchen island.
Credit: abell.co.uk
Assembling The Island Base
Transform ordinary kitchen cabinets into a functional island. Arrange cabinets in desired layout, securing them together. Add a countertop for extra workspace and storage.
Assembling the Island Base Creating a kitchen island from cabinets can be a rewarding DIY project that adds functionality and style to your kitchen. The base of your island is crucial for stability and support, so let’s dive into the practical steps to assemble it effectively.Positioning The Cabinets
When positioning the cabinets, consider the flow of your kitchen space. Would you like your island to be a central gathering point or a workstation? Ensure the cabinets are aligned in a way that complements your kitchen layout. Measure twice, position once. Use a tape measure to verify the placement of each cabinet to avoid any awkward spaces or misalignments. You want to ensure easy access to all sides of the island.Securing Cabinets Together
Once your cabinets are in place, securing them together is the next step. Use clamps to hold the cabinets in position while you fasten them. This will help keep everything stable and aligned. Grab some screws and a drill. Fasten the cabinets together at their sides. You might need longer screws if your cabinets are thicker. This step is essential to ensure your island stands firm and doesn’t wobble. Consider using brackets or L-braces for additional stability. They can be attached to the inside corners of the cabinets for extra support. Wouldn’t you feel more confident knowing your island can withstand the hustle and bustle of daily kitchen activities?Installing The Countertop
Installing the countertop on your new kitchen island is a crucial step that brings your project to life. This stage is where functionality meets aesthetics, transforming simple cabinets into a cohesive, stylish workspace. Whether you’re aiming for a sleek modern look or a cozy rustic vibe, the right countertop can elevate your kitchen’s entire design.
Measuring And Cutting
Accurate measurements are your best friend. Start by measuring the length and width of your island base. Ensure you include a little extra for overhang, which provides space for seating or just a cleaner look.
Once you have your measurements, it’s time to cut your countertop material. Use a circular saw for precision and smooth edges. Remember, measure twice, cut once – this simple rule can save you from costly mistakes.
Think about the material you’ll use. Granite, butcher block, or laminate? Each has its pros and cons. Choose one that fits your lifestyle and kitchen design.
Attaching The Countertop
With your countertop cut to size, it’s time to attach it. Position the countertop on the cabinets to ensure everything lines up perfectly. Make adjustments as needed before securing it.
Use strong adhesive and screws to attach the countertop firmly. This step is vital for stability, especially if your island will be used for cooking or dining.
Consider adding brackets for extra support, particularly if your countertop is heavy. This can prevent sagging over time.
Is your countertop perfectly aligned? Before finalizing, double-check everything. A small misalignment can become a big issue later.
Attaching the countertop is not just about securing it; it’s about ensuring it complements the whole kitchen island design. Your handiwork will be the foundation of countless meals and gatherings. What kind of memories will your new kitchen island help you create?

Credit: www.tiktok.com
Adding Finishing Touches
Adding finishing touches to a kitchen island made from cabinets enhances its charm. Paint the cabinets a fresh color for a vibrant look. Install sleek hardware and a countertop to complete the transformation.
Adding finishing touches to your kitchen island is like putting the cherry on top of a sundae. It’s the moment when your hard work truly shines and your vision comes to life. Whether you’re going for a rustic charm or a sleek modern vibe, these finishing steps will help you achieve the perfect look. As you wrap up the construction phase, attention to detail is key to transforming your cabinets into a stunning centerpiece in your kitchen.Reinstalling Doors And Hardware
Reinstalling the doors and hardware is a crucial step in achieving the desired functionality and aesthetics for your kitchen island. Ensure that each door aligns perfectly with the cabinet frame. Adjust hinges and check for smooth operation. This might seem tedious, but it ensures that your island not only looks good but works well too. Choose hardware that complements the overall design. Are you opting for vintage knobs or sleek handles? Consider how these elements enhance your island’s style and how they feel when you use them daily.Applying Paint Or Stain
Applying paint or stain is your chance to customize the island and make it your own. Decide whether paint or stain will best suit your style and the material of your cabinets. Paint offers a clean, bold look, while stain provides a warm, natural finish. When applying, use even strokes for a smooth finish. Consider using a primer for paint to improve adhesion and durability. Remember, the color you choose will set the tone for your kitchen’s atmosphere. What mood do you want to create? A bright, airy feel or a cozy, rustic vibe? Your choice of color or stain will play a significant role in defining this. Adding these final touches is more than just completing a project; it’s about creating a space where you’ll enjoy spending time and making memories.Incorporating Functional Features
Transform cabinets into a functional kitchen island by adding storage, seating, and workspace. Customize it with drawers, shelves, or a wine rack to suit your needs. Enhance your kitchen’s efficiency and style effortlessly.
Incorporating functional features into your kitchen island can transform it from a simple workspace into a powerhouse of convenience and efficiency. Imagine having every essential right at your fingertips while maintaining a sleek, organized look. The trick is to seamlessly blend utility with style, ensuring that your kitchen island serves as both a practical tool and a stunning centerpiece.Adding Shelves Or Drawers
Adding shelves or drawers to your kitchen island is a game-changer. They provide ample storage for pots, pans, and utensils, keeping your countertops clutter-free. Consider adjustable shelves; they let you customize the space according to your needs. Drawers can be a lifesaver for organizing smaller items like cutlery and cooking gadgets. Soft-close mechanisms add a touch of luxury and prevent the annoying slamming sound. Think about what you use most in your kitchen and plan your storage accordingly.Integrating Electrical Outlets
Electrical outlets in your kitchen island are a must-have for today’s tech-savvy home cooks. They allow you to use appliances like mixers and blenders without the hassle of trailing cords across your kitchen. Position the outlets strategically to keep them accessible yet discreet. Consider USB ports for charging devices while you cook or entertain. This feature keeps your kitchen island not only functional but also modern and tech-friendly. Ask yourself: how often do you find yourself needing a charge or power source in the midst of a culinary adventure? By thoughtfully adding shelves, drawers, and electrical outlets, your kitchen island can become the heart of your cooking space, offering both functionality and style.Safety And Maintenance Tips
Creating a kitchen island from cabinets can be a rewarding and cost-effective project. However, ensuring safety and maintaining your island’s pristine condition is crucial for its long-term functionality. Below are some essential tips to ensure your DIY kitchen island remains a stable and beautiful centerpiece in your cooking space.
Ensuring Stability
Stability is paramount in any kitchen island project. Make sure your cabinets are securely fastened together and anchored to the floor. Use brackets or screws to reinforce joints and prevent wobbling.
Consider the weight distribution of the items you plan to store. Heavier items should be placed at the bottom to maintain balance. If your kitchen island includes a countertop overhang, support it adequately with brackets to prevent tipping.
Regular Cleaning And Care
Regular cleaning is essential to keep your kitchen island looking new. Use a mild detergent and a soft cloth to wipe down surfaces. Avoid harsh chemicals that can damage the finish.
Think about the materials you used. Wooden surfaces might require occasional oiling or waxing to maintain their shine. If you chose a stone countertop, sealing it periodically can protect against stains and scratches.
What small maintenance tasks can you incorporate into your routine to prolong your island’s lifespan? Regular inspections can help you identify and fix minor issues before they become major problems.
Frequently Asked Questions
Can You Build A Kitchen Island With Cabinets?
Yes, you can build a kitchen island with cabinets. It enhances storage, adds functionality, and improves kitchen aesthetics. Consider dimensions, materials, and layout for optimal design. Customize it to suit your style and needs. Professional guidance or DIY plans can assist in achieving your perfect kitchen island.
Is It Cheaper To Buy Or Build A Kitchen Island?
Building a kitchen island is usually cheaper if you have DIY skills. Buying one can be more expensive but saves time. Costs depend on materials, size, and features. Custom designs typically increase expenses. Assess your budget, skills, and needs to decide the best option for you.
What Is The Rule Of Thumb For A Kitchen Island?
A kitchen island should have at least 36 inches of clearance on all sides for easy movement. Ensure the island is 4 feet long and 2 feet deep for optimal functionality. Ideal height is 36 inches for standard use and 42 inches for bar-style seating.
How Hard Is It To Build A Kitchen Island?
Building a kitchen island can be challenging for beginners. It requires carpentry skills, tools, and precise measurements. Following a detailed plan and having the right materials can simplify the process. Hiring a professional may be advisable for complex designs or if you lack experience.
Conclusion
Creating a kitchen island from cabinets can be a rewarding project. It adds style and function to your space. Gather your materials and tools before starting. Measure carefully to ensure a perfect fit. Secure the cabinets together tightly. Add a countertop that complements your kitchen.
Finish with paint or stain for a polished look. Enjoy the extra storage and workspace. Invite friends to admire your handiwork. Share your new kitchen island with pride. You’ve transformed your kitchen with a personal touch. Keep exploring DIY projects to enhance your home.