How to Repair Water Damaged Kitchen Cabinets: Expert Tips
Water damage in your kitchen can be a real headache, especially when it affects your cabinets. Those once-sturdy fixtures start showing signs of wear, warping, and discoloration.
It’s a common problem that many homeowners face, yet few know how to effectively tackle it. This guide will walk you through the steps to repair your water-damaged kitchen cabinets, saving you the cost of replacements. Imagine opening your kitchen doors to find cabinets that look and function like new.
With a little effort, you can restore them to their former glory. So, if you’re ready to breathe new life into your kitchen space, keep reading. You’ll find that the solution is simpler than you think, and the rewards are well worth the effort.

Credit: cleaningpro.co.nz
Identifying Water Damage
Identifying water damage in kitchen cabinets is crucial. Cabinets often face moisture from spills, leaks, or humidity. Spotting issues early prevents further damage. A quick check can save costs and hassle. Knowing what signs to look for is vital.
Signs Of Water Damage
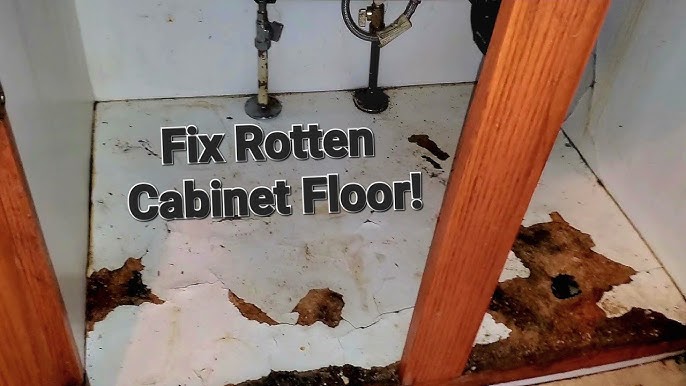
Water damage often shows in visible ways. Cabinets may warp or sag. Discoloration is common. Look for dark spots or stains. Peeling finish or bubbling paint indicates moisture. Swelling wood means water exposure. Musty odors signal damage too.
Common Causes
Leaks are a frequent cause. Pipes under the sink can drip. Appliances nearby may leak. Humidity also affects cabinets. High moisture levels cause swelling. Poor ventilation leads to condensation. Spills left uncleaned cause stains and warping. Regular checks help identify causes.

Credit: www.youtube.com
Preparing For Repairs
Assess the damage to kitchen cabinets caused by water. Gather essential tools for the repair process. Prioritize drying out the affected areas thoroughly.
Preparing for Repairs Before you dive into repairing water-damaged kitchen cabinets, it’s crucial to set the stage for success. A little preparation can save you time and hassle down the line. This phase involves gathering the right tools, ensuring a safe workspace, and mentally gearing up for the task ahead. Let’s break it down step-by-step to make sure you’re fully prepared.Gathering Tools And Materials
First things first, you’ll need to gather all necessary tools and materials. Think of this as your treasure hunt for repair success. Essential items include:- Screwdrivers
- Sandpaper
- Wood filler
- Paint or wood stain
- Paintbrushes
- Protective gloves
Ensuring A Safe Workspace
Safety should always be your top priority. Ensure the area is well-ventilated, especially if you’re using strong-smelling materials like paint or stain. Clear the workspace of unnecessary items to prevent accidents. Use protective gear such as gloves and safety goggles to protect yourself from splinters and chemical exposure. Have you ever faced a situation where you wished you had taken that extra step for safety? Preparing your workspace is that extra step. It allows you to focus entirely on the task without distractions or risks.Drying Out Cabinets
Drying out cabinets is crucial to repair water damage effectively. Start by removing all items and wiping surfaces thoroughly. Use fans and dehumidifiers to ensure complete dryness before proceeding with repairs.
Drying Out Cabinets Water damage in kitchen cabinets requires immediate attention. Drying them out is the first step. This prevents mold and further damage. Quick action is essential. Begin with removing all items from the cabinets. This helps airflow and speeds up drying.Removing Moisture
Start by mopping up standing water. Use absorbent towels for excess moisture. Open cabinet doors to increase air circulation. This helps in faster drying. Fans can also assist in moving air around the cabinets. Position them strategically for better results. Check for hidden water in corners.Using Dehumidifiers
Dehumidifiers are effective in moisture removal. Place one near the damaged cabinets. This reduces humidity and speeds drying. Choose a dehumidifier suitable for room size. Monitor the water tank regularly. Empty it to ensure continuous operation. A dry environment prevents mold growth. Keep the area well-ventilated for best results.Assessing Damage Severity
Assessing damage severity is crucial for effective repairs. Check for swelling, discoloration, and mold in affected areas. Identifying the extent helps in deciding whether to repair or replace kitchen cabinets.
Assessing the severity of water damage in your kitchen cabinets is a crucial first step toward effective repair. Not all water damage is created equal, and understanding the extent of the problem can save you time, money, and effort. By learning how to properly assess the damage, you can make informed decisions about the best course of action for your cabinets.Minor Vs. Major Damage
Distinguishing between minor and major damage can guide your repair strategy. Minor damage might include surface discoloration or slight swelling, which can often be fixed with simple DIY methods. Major damage, on the other hand, could involve structural issues or extensive mold growth, often requiring professional help. Consider the source and duration of water exposure. Was it a one-time spill, or has a leak been seeping into the wood over time? Understanding this can help gauge whether you’re facing minor touch-ups or major overhauls.Inspecting Structural Integrity
Before diving into repairs, inspect the structural integrity of your cabinets. Check for signs like warping, bending, or sagging shelves, which can indicate severe water damage. Gently push and pull on the cabinet frames to see if they feel loose or unstable. Look inside for signs of mold or mildew, which often accompany prolonged water exposure. Use a flashlight to inspect hidden corners and joints, ensuring no detail is overlooked. Are the hinges and screws still securely fastened? Loose fittings can be a telltale sign of weakened wood. Addressing these issues early can prevent further damage and ensure a successful repair.Repairing Minor Damage
Repairing minor damage in kitchen cabinets can save time and money. Addressing these small issues early prevents further deterioration. Many common problems are easy to fix with basic tools.
Surface imperfections and loose parts are typical concerns. Fixing them requires some patience and attention to detail. With the right approach, your cabinets can look as good as new.
Fixing Surface Imperfections
Surface imperfections include scratches, stains, and small dents. Start by cleaning the affected area with a damp cloth. Use mild soap if needed. Let it dry completely before proceeding.
For scratches, use a wood filler that matches the cabinet color. Apply it with a putty knife, filling the scratch completely. Allow it to dry, then sand it smooth with fine-grit sandpaper.
Stains can be tricky. Try using a mixture of baking soda and water. Gently scrub the stain with a soft cloth. Rinse with clean water and dry thoroughly.
Small dents may need a different approach. Try using a damp cloth and a hot iron. Place the cloth over the dent and press the iron on top. The steam can help the wood swell back to its original shape.
Reattaching Loose Parts
Loose parts include hinges, handles, and drawer fronts. Check the screws to see if they need tightening. Use a screwdriver to secure them back in place.
If a screw hole is stripped, use a toothpick to fill it. Insert the toothpick with some wood glue. Break it off flush with the surface, then reattach the screw.
For loose cabinet doors, inspect the hinges. Tighten the screws or replace them if necessary. Ensure the door aligns properly with the cabinet frame.
Drawer fronts can come loose over time. Remove the drawer and tighten any loose screws. If the drawer slides poorly, check the tracks for obstructions. Clean them and apply a bit of lubricant for smoother operation.
Handling Major Repairs
Handling major repairs in water-damaged kitchen cabinets requires careful attention. These repairs ensure the cabinets regain their functionality and aesthetic appeal. Addressing significant damage involves replacing compromised parts and reinforcing the cabinet structure. Let’s explore these crucial steps.
Replacing Damaged Panels
Damaged panels can affect the cabinet’s appearance and function. Start by removing the cabinet doors. Use a screwdriver to detach hinges from the cabinet frame. Examine the panels for swelling or discoloration. Replace any panels that show extensive damage. Cut new panels to fit, using the old ones as templates. Ensure the new panels match the existing design. Secure them using screws or adhesive.
Reinforcing Cabinet Structure
A weakened cabinet structure can lead to further issues. Inspect the frame for signs of warping or cracking. Use brackets to reinforce the corners. Install them inside the cabinet for added support. Consider using metal braces for extra durability. Tighten any loose screws that hold the cabinet together. This ensures stability and prolongs the cabinet’s life. Regular checks help maintain the cabinet’s integrity.
Restoring Cabinet Finish
Repairing water-damaged kitchen cabinets involves drying, sanding, and refinishing. Start by removing excess moisture with a cloth. Sand the damaged areas lightly to smooth out uneven surfaces. Apply a suitable wood finish to restore the cabinet’s original look and protect it from future damage.
Restoring Cabinet Finish Water damage can leave your kitchen cabinets looking dull and lifeless. Reviving them involves more than just cleaning; it requires restoring the finish to bring back their original charm. Whether you choose to paint or stain, this process will breathe new life into your cabinets, making your kitchen feel fresh and vibrant again.Sanding And Smoothing
Begin by sanding the damaged areas to remove the old finish and any watermarks. Use medium-grit sandpaper for the initial pass, and then switch to a finer grit for a smooth surface. This step is crucial because a smooth surface ensures that the new finish adheres properly and looks professional. Don’t rush this process. Take your time to achieve an even texture across all affected areas. Have you ever tried painting over a rough surface? It never looks good, and the same applies here.Applying New Paint Or Stain
Once the surface is smooth, it’s time to decide between paint or stain. Paint offers a wide range of colors, allowing you to match or reinvent your kitchen’s look. On the other hand, stain enhances the natural beauty of wood, highlighting its grain and texture. Before you start, ensure the cabinets are dust-free. Use a tack cloth to wipe away any remaining particles. For painting, apply a primer first to ensure better adhesion and a smoother finish. When staining, apply a wood conditioner to help the wood absorb the stain evenly. Apply the paint or stain in thin, even coats. Multiple thin coats are preferable to one thick coat as they prevent drips and provide a more even finish. Allow each coat to dry completely before applying the next. Are you ready to transform your kitchen with a fresh, vibrant look? Restoring your cabinets’ finish can make a world of difference.
Credit: www.facebook.com
Preventing Future Damage
Seal gaps and leaks to prevent future water damage in kitchen cabinets. Use waterproof paint or varnish for extra protection. Regular inspections help catch early signs of damage.
Preventing future damage to kitchen cabinets is crucial. Water can cause long-term problems. Once repaired, take steps to avoid recurrence. Several strategies can help keep your cabinets safe.Improving Ventilation
Proper ventilation reduces moisture build-up. Install exhaust fans near cooking areas. Ensure vents are clear and functioning. Open windows while cooking to let steam escape. Consider using dehumidifiers for added protection. Regularly check for blockages in vents. Good airflow keeps cabinets dry and damage-free.Installing Protective Barriers
Protective barriers shield cabinets from water. Use waterproof sealants on cabinet surfaces. Apply water-resistant paint to cabinet exteriors. Install splash guards near sinks and stoves. Use rugs or mats to absorb spills. Barriers create a defense against water exposure. Regular maintenance of barriers ensures long-lasting protection.Frequently Asked Questions
How To Identify Water Damage In Cabinets?
Water damage in cabinets can be identified by discoloration, swelling, or warping of the wood. Check for musty odors or mold growth inside the cabinets. Inspect hinges and handles for rust or corrosion. Peeling or bubbling paint is also a sign of moisture infiltration.
Can I Repair Cabinets Without Replacing Them?
Yes, you can repair water-damaged cabinets without replacing them. First, dry them thoroughly using fans or dehumidifiers. Sand down any swollen areas and apply wood filler to cracks. Repaint or refinish for a fresh look. Ensure proper sealing to prevent future damage.
What Materials Are Best For Cabinet Repair?
For cabinet repair, use waterproof wood filler and high-quality sandpaper. Choose a water-resistant primer and paint for refinishing. Silicone sealant is ideal for sealing gaps and joints. Consider using moisture-resistant MDF or plywood for replacements if necessary.
How To Prevent Future Water Damage?
Prevent future water damage by ensuring proper ventilation in your kitchen. Regularly inspect plumbing for leaks and fix them promptly. Use water-resistant finishes on cabinets. Install drip trays under sinks and appliances. Avoid placing wet items directly on cabinet surfaces.
Conclusion
Repairing water-damaged kitchen cabinets can seem challenging. But it’s doable with patience. Start by assessing the damage. Remove any wet items. Dry the area thoroughly. Sand and refinish affected surfaces. Use quality sealants to prevent future damage. Regular maintenance is key.
Check for leaks regularly. Keep cabinets dry and clean. With these steps, cabinets can look good again. Save money and extend their life. Remember, a little effort now avoids big problems later. Your kitchen deserves care and attention. Enjoy a refreshed, functional space.