How Do You Resurface Kitchen Cabinets: Expert Tips
Are you tired of looking at your outdated kitchen cabinets but worried about the cost of a full remodel? You’re not alone.
Many homeowners face the same dilemma, wanting to breathe new life into their kitchens without breaking the bank. The good news is, there’s a budget-friendly solution that can transform your kitchen space: resurfacing your cabinets. Imagine walking into your kitchen and being greeted by cabinets that look brand new, without the hefty price tag or the hassle of a complete renovation.
In this guide, we’ll reveal the secrets to resurfacing your kitchen cabinets, showing you step-by-step how you can achieve a stunning transformation. Get ready to discover how simple changes can make a big impact, turning your kitchen into a space you’ll love to show off. Stay with us to learn how you can do it yourself and enjoy a fresh, modern look in your kitchen.
Preparing Your Workspace
Clear the workspace to avoid clutter. Remove items from cabinets and cover surfaces with protective sheets. Organize necessary tools for easy access during the resurfacing process.
Resurfacing kitchen cabinets can transform your kitchen’s appearance. Preparing your workspace is crucial for a smooth process. Proper organization ensures efficiency and safety.Gathering Necessary Tools
Begin by collecting all essential tools. You’ll need sandpaper, a screwdriver, and a paintbrush. Choose high-quality materials for better results. Having everything ready saves time and reduces stress.Setting Up A Safe Environment
Ensure your workspace is secure. Lay down drop cloths to protect floors. Ventilate the area to avoid inhaling fumes. Keep sharp tools stored safely. Adequate lighting helps you work accurately.Choosing The Right Materials
Choosing the right materials is essential for resurfacing kitchen cabinets. Opt for durable veneers or laminates to ensure a smooth finish. Sand and prime the surface before applying the new material for a professional look.
Choosing the right materials is key in resurfacing kitchen cabinets. The materials you select will affect the look and durability. It is essential to match the finish with your kitchen’s style. This decision will influence both aesthetics and longevity.Types Of Finishes
There are several finishes to consider for kitchen cabinets. Each type offers unique benefits and looks.- Lacquer:Provides a glossy and smooth finish. It dries quickly and is durable.
- Varnish:Offers a hard and protective layer. It enhances the wood’s natural color.
- Shellac:Gives a warm tone. It is easy to apply and repair.
- Polyurethane:Known for its strong protection. It is ideal for high-use areas.
Selecting Paint Or Stain
Choosing between paint and stain is another important decision. Paint offers a variety of color options. It can completely transform the look of cabinets. Stain, on the other hand, highlights the natural wood grain. It provides a warm and inviting appearance.- Paint:Ideal for modern or bold styles. Easy to clean and maintain.
- Stain:Perfect for rustic or traditional looks. It preserves the wood’s natural beauty.
Removing Cabinet Hardware
Removing cabinet hardware is a crucial first step in resurfacing kitchen cabinets. This simple process ensures a smooth and even finish. Unscrew handles and knobs carefully to avoid damaging the cabinet surface.
Removing the cabinet hardware is a crucial step in resurfacing your kitchen cabinets. It might seem like a simple task, but doing it right can save you a lot of time and frustration later. By methodically removing and organizing each piece, you’ll ensure a smoother process when it’s time to put everything back together.Detaching Handles And Knobs
Start with a trusty screwdriver. Most cabinet handles and knobs are attached with screws from the inside of the cabinet door or drawer. Carefully unscrew each piece, keeping a firm hold on the handle or knob to prevent it from falling and causing damage. As you remove the hardware, place each piece in a designated container or bag. This keeps everything together and avoids the dreaded lost screw scenario. Remember, it’s not just about removing the hardware; it’s about maintaining its condition for reattachment.Labeling For Easy Reassembly
Labeling is your best friend in this process. Once you’ve removed a piece of hardware, label it with a piece of masking tape that identifies its original location. This could be as simple as “top left cabinet” or “bottom drawer.” Consider creating a simple table or list to track where each piece belongs:| Location | Hardware Type |
|---|---|
| Top Left Cabinet | Handle |
| Bottom Drawer | Knob |

Credit: www.youtube.com
Cleaning And Sanding
Cleaning and sanding are crucial steps to resurface kitchen cabinets. Begin by thoroughly cleaning surfaces to remove grease and dirt. Then, sand the cabinets to create a smooth base for paint or finish, ensuring even coverage and a fresh look.
Resurfacing kitchen cabinets can transform your cooking space without the hefty cost of a complete remodel. The process begins with the critical stages of cleaning and sanding. These steps are foundational, ensuring a smooth and durable finish. Proper cleaning removes grime and grease, while sanding helps the new paint or stain adhere better. Ready to roll up your sleeves? Let’s dive into the details.Degreasing Surfaces
Before you start, examine your cabinets. They have likely accumulated a fair share of grease and dust over time. To tackle this, you need a good degreaser. A homemade mix of vinegar and water can work wonders. Simply spray it on and wipe with a cloth. For tougher stains, consider a store-bought degreaser or a mixture of baking soda and water. Always ensure the surfaces are completely dry before moving on.Sanding Techniques
Once clean, it’s time to sand. Sanding is the secret sauce that makes your cabinets look professionally done. Start with a medium-grit sandpaper, like 120-grit, to remove the old finish. Move in the direction of the wood grain to prevent scratches. Feeling adventurous? You can use a power sander for large surfaces, but hand sanding gives you more control, especially in corners and edges. Follow up with a finer grit, like 220, for a smooth finish. Are you wondering if skipping this step will save time? It might, but it could also lead to a less durable finish. Take the extra effort now to enjoy long-lasting results. This is your chance to make those cabinets truly shine!Repairing Surface Imperfections
Resurfacing kitchen cabinets involves sanding to smooth imperfections. Apply primer for better paint adhesion. Finish with a fresh coat of paint for a renewed look.
Repairing surface imperfections in kitchen cabinets is crucial for a flawless finish. Before painting or staining, address any blemishes on the cabinet surface. Small cracks, holes, and uneven areas can ruin the final look. Properly repairing these imperfections ensures a smooth, professional appearance.Filling Cracks And Holes
Inspect the cabinets for any visible cracks or holes. Use a wood filler to patch these imperfections. Choose a filler that matches the cabinet material. Apply it with a putty knife, pressing firmly into the gaps. Allow the filler to dry completely. Once dry, check if additional layers are needed. Repeat the filling process until the surface is even.Smoothing Surfaces
After filling, sand the repaired areas. Use fine-grit sandpaper for a smooth finish. Sand in a circular motion to blend the filler with the wood. Wipe away dust with a damp cloth. Ensure the surface is clean and smooth before proceeding. Smooth surfaces help paint or stain adhere better. This step is essential for a polished look.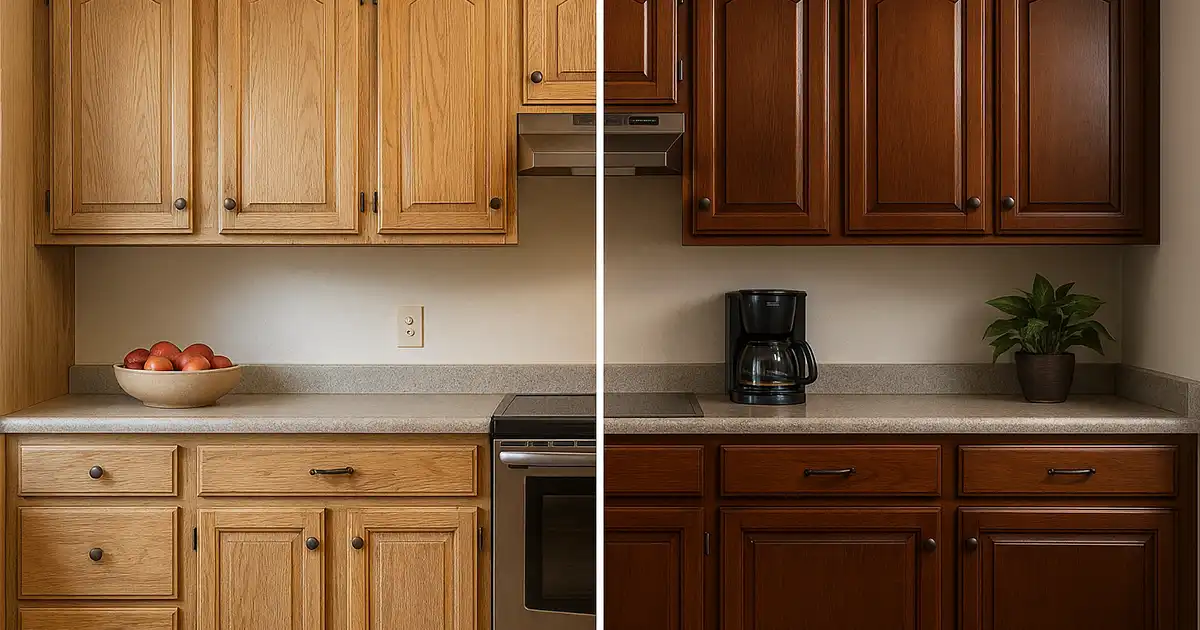
Credit: bruckschandsons.com
Applying Primer
Applying Primer Priming kitchen cabinets is a crucial step to ensure a smooth finish. It helps the paint adhere better and last longer. Use a high-quality primer for best results.
Applying primer is a crucial step in resurfacing kitchen cabinets. It prepares the surface for paint, ensuring durability. A well-applied primer can make a big difference. It helps the paint adhere better, providing a smooth finish. Let’s explore how to choose and apply primer effectively.Choosing The Right Primer
Selecting the right primer is essential. Consider your cabinet material. Wood, laminate, and metal each require different primers. For wood, use an oil-based primer. It seals the wood and blocks stains. For laminate, choose a bonding primer. It helps paint stick to slick surfaces. Metal cabinets need rust-inhibiting primer. It prevents rust and ensures longevity. Check the primer label for compatibility. Ensure it matches your paint type.Techniques For Even Application
Even application of primer is key. Start by cleaning the cabinet surfaces. Remove dust and grease for better adhesion. Use a high-quality brush or roller. They provide a smooth finish with fewer streaks. Apply thin, even coats of primer. Thick coats can cause drips and uneven texture. Allow the primer to dry completely. Check the manufacturer’s instructions for drying time. Sand lightly between coats if needed. This creates a smooth base for the paint.Painting Or Staining
Resurfacing your kitchen cabinets can breathe new life into your cooking space without the hefty price tag of a full renovation. Deciding between painting or staining is a crucial step in this transformation. Each option offers its own unique benefits and aesthetic appeal. Painting provides a solid color that can brighten up your kitchen and hide imperfections, while staining enhances the natural beauty of the wood grain. Your choice depends on the look you want and the condition of your cabinets.
Brush Vs. Spray Application
Choosing between a brush and spray application can significantly impact your cabinet’s final appearance. Brushes are ideal for achieving a classic, textured finish and are perfect for smaller spaces or intricate details. Spray application, on the other hand, delivers a smooth, even coat that can make your cabinets look professionally done. If you opt for spraying, make sure you have enough space and proper ventilation. I once used a spray method in my garage, and the results were stunning, but it required careful preparation.
Applying Multiple Coats
Multiple coats are often necessary to achieve the desired depth and durability. Applying several layers can enhance the richness of the color or stain, ensuring your cabinets look vibrant and last longer. Allow each coat to dry thoroughly before applying the next. This patience pays off with a flawless finish. Have you ever rushed a project only to regret it later? Taking your time with each coat can prevent that disappointment and ensure your cabinets look their best.

Credit: www.tiktok.com
Reattaching Hardware
Reattach hardware carefully to ensure a secure fit. Align screws with their original holes for stability. Tighten each screw properly to maintain cabinet functionality.
Reattaching hardware is crucial in resurfacing kitchen cabinets. It enhances both appearance and functionality. Following a few key steps ensures everything aligns perfectly.Ensuring Proper Alignment
Aligning hardware correctly is essential for smooth operation. Start by examining the original holes. Use a level to ensure doors and drawers are straight. Mark any adjustments needed with a pencil. Next, use a screwdriver to attach hinges or handles. Make sure screws are tight but not over-tightened. This prevents damage to the cabinet surface. If holes are worn out, consider using larger screws or filler. This provides a secure fit and better alignment.Testing For Functionality
Once attached, test each piece for functionality. Open and close doors gently. They should move smoothly without sticking. Check drawer slides for ease of movement. Adjust if necessary to avoid friction. Ensure handles and knobs are firmly in place. They shouldn’t wobble or feel loose. A final inspection ensures everything functions as intended. These steps help maintain the look and utility of your resurfaced kitchen cabinets.Final Touches And Maintenance
Final touches include applying a protective coat to seal the cabinets. Regular cleaning ensures long-lasting shine and durability.
Resurfacing kitchen cabinets can breathe new life into your kitchen, but it’s the final touches and maintenance that ensure your hard work lasts. Imagine the joy of seeing your kitchen shine day after day, knowing you’ve done it yourself. It’s satisfying, but the journey doesn’t end with just a fresh coat of paint or veneer. Ensuring durability and regular upkeep will maintain that new look for years to come. Let’s explore how to add those finishing touches and keep your cabinets looking pristine.Sealing For Durability
A good sealant is your best friend for extending the life of your resurfaced cabinets. After the paint or stain has dried, applying a topcoat creates a protective barrier against moisture, scratches, and stains. Consider using a polyurethane sealant for a glossy finish, or a polycrylic for a less shiny look. When I resurfaced my cabinets, the difference a sealant made was unbelievable. It added a professional touch and made cleaning easier. Apply the sealant in thin, even layers, letting each coat dry fully before adding the next. How many coats will you need? Usually, two to three should suffice, but check the manufacturer’s instructions for the best results.Regular Maintenance Tips
Keeping your cabinets looking new doesn’t have to be a chore. Regular maintenance is key, and it’s simpler than you might think. Start with weekly dusting using a soft cloth to prevent buildup. Spills should be wiped immediately to avoid stains or water damage. For tougher grime, a gentle cleaner works wonders. Avoid abrasive pads or harsh chemicals, as they can damage the finish. Instead, a mixture of mild dish soap and warm water often does the trick. Every few months, inspect for any chips or scratches and touch them up promptly. This will prevent further damage and keep your cabinets looking flawless. Think about setting a reminder on your phone to check your cabinets’ condition periodically. This small step can save you a lot of time and effort in the long run. What do you think? Are these tips something you could easily incorporate into your routine? Keeping your kitchen beautiful and functional is just a few steps away.Frequently Asked Questions
Is It Worth It To Reface Kitchen Cabinets?
Refacing kitchen cabinets is cost-effective and refreshes your kitchen’s look. It saves time and reduces waste. You can achieve a modern design without a full renovation. It’s worth considering for budget-friendly updates.
Can I Resurface My Kitchen Cabinets Myself?
Yes, you can resurface kitchen cabinets yourself. Gather necessary tools, materials, and follow step-by-step instructions. Ensure proper preparation and patience for best results.
What Is The Difference Between Resurfacing And Refinishing Kitchen Cabinets?
Resurfacing involves replacing cabinet doors and veneers for a new look. Refinishing updates the existing surfaces with paint or stain.
What Is The Average Cost To Resurface Cabinets?
Resurfacing cabinets typically costs between $1,000 and $3,000, depending on materials and labor. Factors affecting price include cabinet size, design complexity, and location. Get quotes from local professionals to ensure accurate pricing tailored to your specific needs. Resurfacing is a cost-effective way to update your kitchen or bathroom aesthetics.
Conclusion
Resurfacing kitchen cabinets is a simple way to refresh your space. It saves money compared to buying new cabinets. You can choose paint or laminate to update the look. Both options offer plenty of colors and styles. Remember to clean and sand the surfaces well.
This helps the new finish last longer. Take your time and follow steps carefully. A fresh look boosts the kitchen’s appeal and adds value. Enjoy your renewed space with pride. Your kitchen will feel like new without the high cost.