How to Clean Kitchen Sink Faucet: Expert Tips
A sparkling kitchen is the heart of a welcoming home, and your sink faucet plays a pivotal role in keeping that space functional and inviting. Yet, it’s easy to overlook this essential fixture, allowing grime, water spots, and mineral deposits to dull its shine.
You might not even realize how a clean faucet can transform the entire look of your kitchen and enhance your daily routine. Imagine the satisfaction of seeing your faucet gleam every time you turn it on. In this guide, you’ll discover simple, effective steps to restore the sparkle to your kitchen sink faucet, making it not only a pleasure to use but also a highlight of your kitchen’s aesthetic.
Stick around to learn how to achieve a spotless shine with minimal effort. Your kitchen deserves it, and so do you.
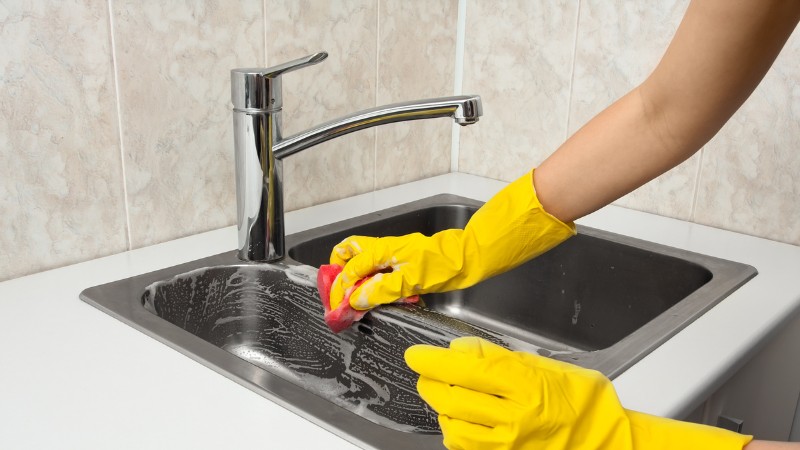
Credit: modern-maids.com
Choosing The Right Cleaning Tools
Choosing the right cleaning tools ensures your kitchen sink faucet shines. Use a soft cloth for gentle wiping. For stubborn spots, a toothbrush with mild soap works wonders.
Cleaning your kitchen sink faucet can be a breeze if you have the right tools on hand. By picking the right tools, you’ll not only make the task easier but also ensure your faucet stays in top condition. Let’s dive into the essential tools that will help you tackle this job effectively.Choosing The Right Cleaning Brush
Select a brush with soft bristles to avoid scratching the faucet’s surface. A toothbrush can be a great choice for reaching tight corners and crevices around the faucet. Make sure it’s flexible enough to maneuver around intricate designs, yet firm enough to remove stubborn grime.Opting For Effective Cleaning Solutions
Consider using a mild dish soap mixed with warm water as your primary cleaning solution. This blend is gentle on most finishes and effective against dirt and grease. If you’re facing mineral deposits, a vinegar solution can work wonders; just remember to rinse thoroughly afterward.Utilizing Microfiber Cloths
Microfiber cloths are excellent for polishing and drying your faucet without leaving streaks. They are soft and absorbent, making them ideal for a shiny finish. Use them to buff the faucet after cleaning to achieve a sparkling result.Choosing A Suitable Scrubbing Pad
Pick a non-abrasive scrubbing pad if you need a bit more scrubbing power. It’s crucial to ensure the pad won’t damage the faucet’s finish. Test it on a small, inconspicuous area first to see how it reacts with the surface.Considering Specialized Tools For Hard Water Stains
If hard water stains are a regular issue, invest in a specialized cleaning tool designed to tackle these spots. Products specifically made for dealing with calcium buildup can save you time and effort. They often work more efficiently than generic tools, giving your faucet a refreshed look. Are you using the right tools for your faucet cleaning? A little investment in the right tools can save you a lot of time and keep your faucet looking new.Preparing The Faucet For Cleaning
Begin by gathering cleaning supplies like vinegar, baking soda, and a soft cloth. Turn off the water supply to avoid splashes.
Cleaning your kitchen sink faucet may seem like a mundane task, but it’s essential for maintaining both hygiene and aesthetics. Before diving into scrubbing and polishing, it’s crucial to prepare the faucet properly. This step ensures that your cleaning efforts are effective and your faucet remains in top condition.Gather Your Cleaning Supplies
Start by collecting all necessary supplies. You’ll need a soft cloth, mild detergent, a toothbrush, and vinegar. Having everything within arm’s reach prevents interruptions and keeps the process smooth.Turn Off The Water Supply
Locate the shut-off valves under the sink. Turning off the water supply ensures you can clean without accidental water flow, which could dilute cleaning solutions or cause a mess.Clear The Surrounding Area
Remove any items around the sink, like soap dispensers or dish racks. A clear area gives you space to maneuver and ensures that you don’t accidentally drop cleaning tools into the sink.Inspect The Faucet For Damage
Check for any visible signs of damage or leaks. Are there scratches or dents? Addressing these issues beforehand can help you decide if professional repairs are needed alongside cleaning.Remove Hard Water Buildup
If you notice white, crusty deposits, it’s likely hard water buildup. You can loosen these deposits by soaking a cloth in vinegar and wrapping it around the faucet. Let it sit for about 15 minutes.Detach Faucet Parts If Possible
If your faucet has removable parts, gently detach them. This allows you to clean those tricky areas thoroughly, ensuring no grime is left behind in hidden crevices. Preparing your faucet for cleaning might seem like extra effort, but it pays off in the end. Are you ready to see your faucet sparkle again? With everything in place, the cleaning process becomes more efficient and rewarding.Removing Mineral Deposits
Mineral deposits on your kitchen sink faucet can be stubborn and unsightly. They often accumulate due to hard water, leaving behind chalky residues that can dull the shine of your faucet. Fortunately, there are effective ways to tackle these deposits using simple ingredients from your pantry. Ready to restore that gleaming finish? Let’s dive into two powerful methods to remove those pesky mineral deposits.
Using Vinegar Solution
Vinegar is a powerhouse when it comes to dissolving mineral buildup. Its acidic nature helps break down calcium deposits effortlessly. Start by mixing equal parts of white vinegar and water in a bowl.
- Soak a cloth in the solution and wrap it around the affected areas of the faucet.
- Leave it for about 30 minutes to allow the vinegar to work its magic.
- Afterward, scrub gently with a toothbrush or scrub pad to lift any remaining residue.
Have you ever noticed how vinegar seems to do wonders on everything from cleaning to cooking? It’s a real kitchen MVP! Plus, it’s all-natural, so you don’t have to worry about harsh chemicals. Isn’t it satisfying to use something so simple yet effective?
Applying Baking Soda Paste
Baking soda is another versatile kitchen staple, perfect for tackling mineral deposits. It acts as a mild abrasive, making it ideal for scrubbing without scratching surfaces. Mix baking soda with a bit of water to create a paste.
- Apply the paste directly onto the mineral deposits on the faucet.
- Let it sit for 15 minutes to break down the buildup.
- Use a soft brush or cloth to gently scrub the area, then rinse with water.
Did you know that baking soda is not just for baking? It’s like a secret weapon in your cleaning arsenal. How many other uses can you think of for baking soda? It’s surprising how versatile it is!
Both vinegar and baking soda are readily available and affordable, making them perfect choices for regular maintenance. With these methods, you can keep your faucet shining bright and free from mineral deposits. Why not give them a try and see the difference for yourself?
Cleaning The Faucet Aerator
Cleaning the faucet aerator ensures smooth water flow and removes debris. First, gently unscrew the aerator from the faucet. Rinse it under running water to clear out any clogs.
Cleaning the faucet aerator is a simple yet crucial task to ensure your kitchen sink faucet functions optimally. Often overlooked, the aerator can accumulate mineral deposits and debris over time, affecting water flow and pressure. Taking a few minutes to clean the aerator can greatly improve your faucet’s efficiency and extend its life. Let’s dive into the process of cleaning your faucet aerator with ease.Disassembling The Aerator
To start, you’ll need to disassemble the aerator from the faucet. Begin by carefully unscrewing the aerator using your hand. If it’s tightly secured, use a pair of pliers with a soft cloth to avoid scratching the finish. Remember to note the order of the parts as you take them apart; a simple photo on your phone can be a helpful reference for reassembly.Removing Debris And Buildup
Once disassembled, inspect the aerator for any visible debris or mineral buildup. Use a small brush, like an old toothbrush, to gently scrub away the grime. Soaking the parts in vinegar for about 30 minutes can help dissolve stubborn deposits. Rinse thoroughly with water before reassembling. Have you ever noticed how a clean aerator can transform the water flow from a trickle to a powerful stream? Give it a try and see the difference it makes in your daily kitchen routine! By dedicating just a few moments to maintain your faucet aerator, you’re ensuring a more efficient and pleasant kitchen experience.Polishing The Faucet Surface
Polishing the faucet surface can enhance its shine and appearance. Use a soft cloth to gently rub the faucet with a mixture of water and mild soap. Regular polishing not only maintains the faucet’s look but also helps prevent mineral buildup.
Cleaning your kitchen sink faucet can make a world of difference in the overall look of your kitchen. But if you really want to elevate the shine, polishing the faucet surface is key. This task not only enhances the faucet’s appearance but also helps protect it from future tarnish. Let’s dive into how you can transform your dull faucet into a gleaming centerpiece.Selecting The Right Polish
Choosing the right polish is crucial for achieving that perfect shine. Not all polishes are created equal, and using the wrong one can damage your faucet. Look for a polish specifically designed for the material of your faucet, whether it’s chrome, stainless steel, or another finish. – Chrome Faucets: Use a non-abrasive chrome polish to prevent scratches. – Stainless Steel Faucets: Opt for a stainless steel polish to maintain the sleek look. – Brass Faucets: Use a gentle brass polish to avoid tarnishing. Have you ever wondered why your faucet looks streaky even after cleaning? It could be the polish you’re using. Ensuring you have the right product can save you time and effort.Buffing For A Shine
Buffing is where the magic happens. After applying the polish, take a soft, clean cloth and begin buffing the faucet. This step helps to remove any residue and enhance the shine. – Use a microfiber cloth for the best results. – Apply gentle pressure in circular motions. – Focus on hard-to-reach areas to ensure an even shine. Imagine the satisfaction of seeing your reflection in your faucet. Buffing not only improves aesthetics but also gives you that rewarding feeling of accomplishment. Do you ever find yourself admiring a beautifully polished faucet at a friend’s house? It’s likely because they spent a little extra time buffing. Make sure you don’t skip this essential step to achieve a professional finish.
Credit: www.tiktok.com
Preventing Future Build-up
Regularly wipe down the faucet with a soft cloth to remove water spots and soap residue. Use vinegar solution monthly to prevent mineral deposits and keep fixtures shiny.
Preventing future build-up on your kitchen sink faucet not only enhances its lifespan but also keeps it gleaming and functional. A little foresight can save you from the hassle of dealing with stubborn stains and grime. By adopting simple habits, you can keep your faucet pristine and avoid the dread of deep cleaning sessions.Regular Maintenance Tips
Regular cleaning is your first line of defense against build-up. After each use, wipe the faucet with a dry cloth to prevent water spots. Consider using a mild detergent solution weekly to clean the faucet, followed by a rinse with warm water. Pay attention to the joints and curves, as these are the spots where grime tends to accumulate the most.Using Water Softeners
Hard water is often a culprit behind mineral deposits on faucets. Installing a water softener can significantly reduce this issue. Softened water minimizes calcium and magnesium deposits, which are notorious for causing unsightly build-up. If installing a water softener isn’t feasible, consider using a vinegar solution monthly to clean the faucet, as vinegar naturally breaks down mineral deposits. Are you familiar with the challenges of hard water in your area? Addressing this could be a game-changer for your faucet’s upkeep.Handling Stubborn Stains
Kitchen sink faucets often face stubborn stains. These stains can be tough. Regular cleaning sometimes fails. They need special handling for a sparkling look. The faucet’s beauty can shine again with the right approach.
Commercial Cleaners Options
Commercial cleaners are strong. They tackle stubborn stains effectively. Many brands offer products for faucets. They contain chemicals that break down stains. Some cleaners are sprays. Others come in paste form. Both types work well. Always follow instructions carefully.
Choose a cleaner suitable for your faucet material. This prevents damage. Test a small area first. Ensure it doesn’t harm the faucet. Protective gloves are a good idea. They keep your skin safe. Ventilate the kitchen well. This avoids inhaling fumes.
Diy Remedies
Natural solutions can be effective. Vinegar is a popular choice. Mix it with water for a cleaning solution. Apply with a soft cloth. Let it sit for a few minutes. Scrub gently to remove stains.
Baking soda is another option. Combine it with water to form a paste. Spread it over the stain. Scrub with a toothbrush. It’s gentle but effective. Lemon juice works too. It’s a natural bleach. Rub it on the stain. Rinse thoroughly afterward.
DIY remedies are safe. They are eco-friendly. They avoid harsh chemicals. Always rinse well after use. This prevents residue buildup. Regular use keeps the faucet shining.
Credit: www.rd.com
Maintaining Faucet Longevity
Regular cleaning keeps your kitchen sink faucet shining. Use mild soap and water to remove dirt and grime. Ensure to dry it thoroughly to prevent water spots and mineral buildup.
Keeping your kitchen sink faucet in prime condition is not just about aesthetics; it’s crucial for maintaining its longevity and functionality. An often overlooked aspect of home maintenance, regular faucet care can prevent costly repairs and replacements. By investing a little time in routine check-ups and understanding when to replace worn-out parts, you can ensure your faucet serves your kitchen efficiently for years.Routine Check-ups
Start by making routine check-ups a habit. Regularly wipe down the faucet with a soft cloth to remove water spots and mineral build-up. You might be surprised to find how a gentle vinegar solution can work wonders on stubborn stains. Don’t forget to check the water pressure and the flow. A noticeable change might indicate a blockage or leak.- Inspect the aerator – this small piece can accumulate debris over time.
- Listen for unusual sounds – a squeak might mean it’s time for lubrication.
- Check under the sink for any signs of leaks or moisture.
Replacing Worn-out Parts
No matter how diligent you are, parts of your faucet will wear out over time. Identifying and replacing these parts promptly can prevent bigger issues down the line. Consider a time I noticed a persistent drip. I realized it was time to replace the washer, a simple fix that saved me from a hefty water bill. Keep an eye on seals and washers, which often deteriorate faster than other components. When replacing parts, always ensure they are compatible with your faucet model. This might sound trivial, but incorrect parts can lead to more damage. So, when was the last time you gave your kitchen faucet a thorough check-up? Investing in these small maintenance tasks can save you time and money. After all, a well-maintained faucet is the unsung hero of a clean and efficient kitchen.Frequently Asked Questions
How To Clean Kitchen Sink Faucet Buildup?
To clean faucet buildup, mix equal parts vinegar and water. Soak a cloth in the solution and wrap it around the faucet. Leave for 30 minutes, then scrub with a toothbrush. Rinse with water and dry thoroughly. Regular cleaning prevents buildup and maintains shine.
How Long To Soak A Kitchen Faucet In Vinegar?
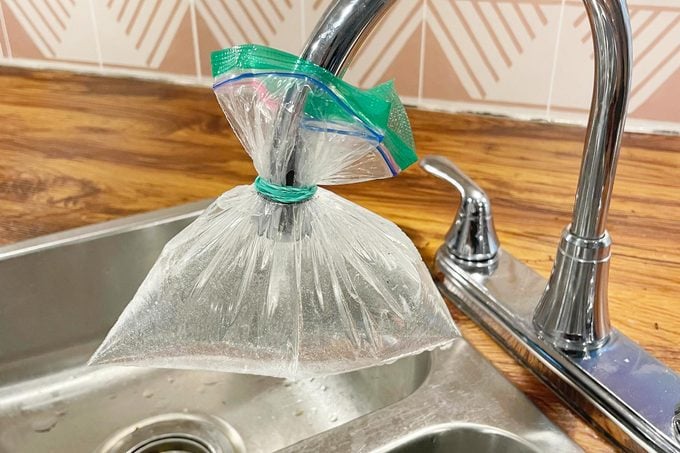
Soak the kitchen faucet in vinegar for 30 to 60 minutes. This helps remove mineral deposits. Make sure to use a plastic bag filled with vinegar, secured with a rubber band around the faucet. After soaking, scrub with a brush and rinse thoroughly with water for a clean finish.
How To Clean Sediment Out Of A Sink Faucet?
Turn off the water supply and remove the faucet aerator. Soak it in vinegar for an hour. Use a brush to scrub off any remaining sediment. Rinse thoroughly and reattach the aerator. Restore the water supply and check for improved flow.
How To Remove Limescale From A Sink Faucet?
To remove limescale from a sink faucet, mix equal parts vinegar and water. Apply the solution with a cloth, scrub gently, and rinse with water. For stubborn stains, wrap a vinegar-soaked cloth around the faucet and leave it for an hour before scrubbing.
Dry thoroughly to prevent future buildup.
Conclusion
Cleaning your kitchen sink faucet doesn’t have to be hard. Regular care keeps it shining bright. Use gentle cleaners to avoid damage. Wipe with a soft cloth for best results. A clean faucet makes your kitchen look fresh. Try to clean it weekly for lasting beauty.
It’s important for hygiene too. Family health matters. Keep germs away by cleaning often. Follow these steps for a cleaner home. Enjoy your sparkling kitchen space. A little effort goes a long way. Happy cleaning!