How to Do a Tile Backsplash in Kitchen: Expert Guide
Are you dreaming of a kitchen that looks straight out of a designer magazine? Adding a tile backsplash is one of the simplest ways to transform your cooking space from drab to fab.
It’s not just about aesthetics; a well-chosen and expertly installed backsplash can protect your walls from stains and spills, making your kitchen both beautiful and practical. Imagine walking into your kitchen and being greeted by a sleek, stylish wall of tiles that reflects your unique taste.
You might think that such a project is complicated or expensive, but the truth is, you can do it yourself without breaking the bank. In this guide, we’ll show you how to achieve a stunning tile backsplash in your kitchen, step by step. From choosing the perfect tiles to the final polish, you’ll gain the confidence and know-how to tackle this rewarding DIY project. Let’s dive in and turn your kitchen dreams into reality.
Choosing Materials
Choosing materials for a kitchen tile backsplash involves considering durability and style. Opt for ceramic or glass tiles for easy maintenance and a modern look.
Choosing the right materials for your kitchen tile backsplash can make a big difference. It affects the look and durability of your kitchen space. Understanding the variety of tiles, grout options, and necessary tools helps create a perfect backsplash.Tile Types
Ceramic tiles are popular for backsplashes. They are affordable and easy to clean. Glass tiles add a modern touch and come in various colors. Natural stone tiles offer a rustic look but need more maintenance. Porcelain tiles are durable and resistant to moisture.Grout Options
Grout fills the spaces between tiles. Choose between sanded and unsanded grout. Sanded grout is best for wider spaces. Unsanded grout works well for narrow gaps. Epoxy grout is waterproof and stain-resistant. It is ideal for kitchen backsplashes.Tools Required
Gather essential tools before starting the project. You need a tile cutter to fit tiles perfectly. A trowel helps spread adhesive evenly. A grout float is necessary for applying grout. A sponge and bucket are needed for cleaning. Safety goggles and gloves protect you during installation.
Credit: food52.com
Preparing The Surface
Cleaning and smoothing the kitchen wall is crucial before installing a tile backsplash. Remove old paint, dirt, and grease to ensure tiles stick well. Sand rough areas to create an even surface for better adhesion.
Preparing the surface for a tile backsplash in your kitchen is a crucial step that sets the foundation for a successful project. It may not be the most glamorous part of the process, but it ensures your tiles adhere properly and last for years. Taking the time to prepare the wall can save you from headaches down the road.Cleaning The Wall
Start by giving your wall a thorough cleaning. Remove any grease, dirt, or grime that might prevent the tiles from sticking. A simple mix of warm water and dish soap can work wonders. Use a sponge or cloth to scrub the area, and don’t forget to rinse well with clean water. Once cleaned, let the wall dry completely before moving on.Repairing Imperfections
Identify any cracks, holes, or uneven areas on your wall. Patch them up with spackle or a wall repair compound. Smooth out the surface with sandpaper once the repairs have dried. A smooth surface is essential for a sleek and professional tile finish. Remember, a little patience here can make all the difference in your end result.Measuring The Area
Measure the area where you plan to install the backsplash. Use a tape measure to get the length and height, then multiply these to calculate the total square footage. This will help you determine how much tile you need. It’s wise to purchase a bit extra to cover any breakage or cutting mistakes. Being precise in your measurements saves time and money.Design And Layout
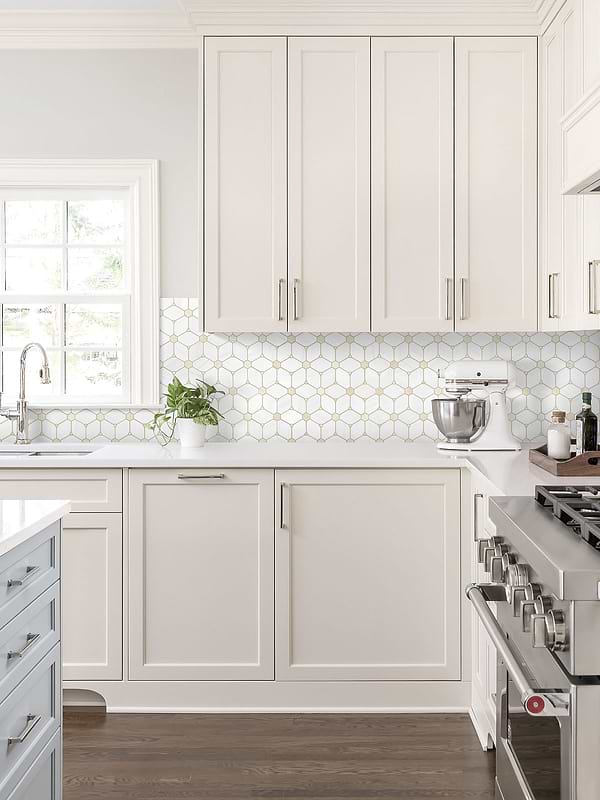
Choose tiles that match your kitchen style. Arrange them to create a balanced look. Use spacers for even gaps between tiles.
Designing and laying out a tile backsplash can transform your kitchen space. It adds style and personality, enhancing the overall aesthetics. Before starting, consider the design and layout carefully. A well-thought-out plan ensures a seamless installation and beautiful finish.Planning The Pattern
Choose a pattern that complements your kitchen style. Common options include subway, herringbone, and diagonal. Test different layouts by arranging tiles on the countertop. This gives a visual idea of the final look. Use a pencil to mark lines on the wall, ensuring straight and even rows. This step helps in maintaining uniformity throughout the process.Estimating Tile Quantity
Measure the backsplash area accurately. Multiply the height by the width to get the total area. Purchase 10% more tiles than needed. This extra covers breakage and mistakes. Consider special tiles for edges and corners if required. It ensures a consistent and complete design.Cutting Tiles
Use a tile cutter for straight cuts. For curves, use a tile nipper. Always wear safety goggles and gloves. Measure the space where the tile will fit. Mark the tile with a pencil before cutting. Cut slowly and carefully to avoid breakage. Test fit each piece before applying adhesive. By following these steps, you create a stunning kitchen backsplash. It adds both function and beauty to your space.Installing The Tiles
Installing tiles in your kitchen can transform the space. The process involves a few key steps. Once you have your tiles ready, it’s time to install them. This section will guide you through applying adhesive, setting the tiles, and maintaining proper spacing.
Applying Adhesive
Start by preparing the wall surface. Ensure it’s clean and dry. Use a notched trowel to spread adhesive evenly. Hold the trowel at a 45-degree angle. This helps create ridges in the adhesive. These ridges ensure tiles adhere properly. Work in small sections to prevent drying out.
Setting The Tiles
Place the first tile at the corner. Press it firmly into the adhesive. Use a slight twisting motion for better grip. Continue placing tiles next to each other. Use a level to ensure tiles are straight. Adjust as needed before adhesive sets.
Maintaining Spacing
Maintain even spacing between tiles. Use spacers to keep gaps uniform. This ensures grout fills evenly later. Check spacing frequently as you work. Adjust tiles if gaps are inconsistent. Proper spacing enhances the backsplash’s appearance.
Grouting Process
Apply grout evenly between the tiles using a rubber float. Press firmly to ensure all gaps are filled. After about 15 minutes, wipe away excess grout with a damp sponge. This step will help in achieving a smooth and clean finish for your kitchen backsplash.
The grouting process is the final touch that brings your tile backsplash to life. It’s where your hard work pays off, as the grout fills the spaces between tiles, creating a seamless, polished look. But how do you ensure your grouting is both effective and efficient?Mixing Grout
Begin by carefully following the instructions on your grout package. Typically, you’ll add water to the grout powder, stirring until you achieve a smooth, peanut butter-like consistency. Use a mixing paddle or a margin trowel to prevent clumps. Remember, too much water can weaken the grout, while too little can make it difficult to apply.Applying Grout
Using a rubber float, apply the grout at a 45-degree angle to the tile surface. This ensures the grout penetrates the joints fully. Move diagonally across the tiles, pressing firmly to fill all gaps. Work in small sections to prevent the grout from drying out before you can clean it up.Cleaning Excess Grout
Once the grout begins to harden, typically after 15-30 minutes, it’s time to clean. Use a damp sponge to wipe the tile surface, removing excess grout. Be gentle to avoid pulling grout out of the joints. Rinse your sponge frequently and change the water often to maintain cleanliness. Does your backsplash look the way you envisioned? The satisfaction of a well-grouted backsplash is worth every careful step.Finishing Touches
Ensure neat edges by aligning tiles carefully and applying grout smoothly. Clean excess grout with a damp sponge for a polished look.
Adding the finishing touches to your kitchen tile backsplash is like adding the last brush strokes to a masterpiece. This is where your hard work comes together, creating a polished and professional look. Each step in the finishing process ensures that your backsplash is not only beautiful but also durable and easy to maintain.Sealing The Tiles
Sealing is crucial for protecting your tiles from stains and moisture. Choose a sealant that’s suitable for your tile material, whether it’s ceramic, glass, or natural stone. Apply the sealant evenly using a sponge or brush, ensuring it penetrates all grout lines. Let it dry thoroughly before wiping off any excess with a clean cloth. Consider sealing your tiles annually to maintain their luster and durability. Have you checked if your sealant is both water and stain-resistant?Caulking Edges
Caulking the edges prevents water from seeping behind the tiles, which could lead to mold or mildew growth. Use a caulk that matches your grout color for a seamless finish. Apply a thin bead along the countertop, cabinets, and any other edges where water might penetrate. Smooth it with a damp finger or a caulking tool for a neat finish. Remember to check the caulking every few months. Is it still intact and providing a good seal?Polishing The Surface
Polishing your backsplash enhances its shine and makes it easier to clean. Choose a polish appropriate for your tile type; a glass cleaner works well for glass tiles, while stone polish suits natural stone. Spray or apply the polish with a soft cloth, buffing in circular motions until the tiles gleam. This step not only adds beauty but also creates a protective layer against dirt. Think about how often you admire that fresh, clean sparkle. Wouldn’t it be satisfying to keep it that way with regular polishing?Common Mistakes
Installing a tile backsplash can transform your kitchen. It adds style and functionality. Yet, many make common mistakes during installation. Knowing these pitfalls helps achieve a flawless finish.
Avoiding Uneven Tiles
Uneven tiles disrupt the kitchen’s look. Ensure the wall surface is flat before starting. Use a level tool to check tile placement regularly. Consistency in spacing is key. Tile spacers help maintain equal gaps between tiles. Measure twice, fix once. This saves time and effort.
Preventing Grout Cracks
Grout cracks can ruin the backsplash. Mix grout to the right consistency. Too much water weakens it. Spread grout evenly using a rubber float. Press it firmly between tiles. Allow proper drying time. Avoid walking or leaning on the area. This prevents shifting and cracking.
Ensuring Adhesion
Adhesion is crucial for tile durability. Clean the wall thoroughly. Remove dust and grease before applying adhesive. Choose the right adhesive for your tile type. Follow the manufacturer’s instructions carefully. Apply adhesive evenly using a notched trowel. Press tiles firmly into place. This ensures a secure bond.

Credit: apollotile.com
Maintenance Tips
Ensure the surface is clean and dry before starting. Apply thin-set mortar evenly with a notched trowel. Carefully place tiles, using spacers for consistent gaps. After tiles set, apply grout with a rubber float. Clean excess grout before it dries.
Seal grout lines to prevent moisture damage. Regularly clean tiles to maintain appearance.
Maintaining your kitchen tile backsplash isn’t just about keeping it clean, but ensuring it remains a stunning feature for years to come. It’s easy to overlook this seemingly minor detail, yet it plays a vital role in preserving the beauty and functionality of your kitchen. Here, you’ll find practical and straightforward tips that will help you keep your backsplash looking as good as new.Cleaning Routine
Developing a regular cleaning routine is crucial. Use a mild detergent mixed with warm water and a soft cloth or sponge to wipe down the tiles. This prevents grime and grease buildup, keeping your backsplash sparkling. For stubborn stains, a mixture of baking soda and water can do wonders. Apply it to the stain, let it sit for a few minutes, then scrub gently. Do you struggle with hard water stains? A solution of vinegar and water can be your best friend.Repairing Damages
Even with careful maintenance, tiles can sometimes chip or crack. When this happens, don’t panic. Assess the damage to determine if you need professional help or if it’s a DIY fix. For minor chips, repair kits are available that can seamlessly match the existing tile color. If a tile is severely damaged, replacing it might be necessary. You can do this by carefully removing the damaged tile and setting a new one in its place.Enhancing Longevity
To prolong the life of your backsplash, consider applying a sealant. This extra layer provides protection against moisture and stains, making cleaning easier and more effective. Regularly check for grout deterioration. Fresh grout not only enhances appearance but also strengthens the bond between tiles. Have you ever thought about how humidity affects your kitchen? Using a dehumidifier can help maintain optimal conditions, reducing the risk of mold and mildew. Maintaining your tile backsplash doesn’t have to be a chore. With these simple yet effective tips, you can ensure it continues to be a focal point in your kitchen, while adding value to your home.
Credit: www.youtube.com
Frequently Asked Questions
When Tiling A Backsplash, Where Do You Start?
Start tiling the backsplash from the center of the focal point, like the sink or cooktop. Ensure tiles are level and symmetrical. This approach ensures a balanced design and minimizes visible cuts. Use a tile spacer for even gaps. Adjust as needed for outlets or cabinets.
What Do You Put Behind A Tile Backsplash?
Behind a tile backsplash, install cement board or drywall for support. Use adhesive or mortar to attach tiles. Ensure the wall is clean and dry before installation. A waterproof membrane can prevent moisture damage. Proper preparation enhances durability and maintains the backsplash’s appearance.
Can You Put Tile Backsplash Directly On Drywall?
Yes, you can install tile backsplash directly on drywall. Ensure the drywall is clean, dry, and free of grease. Use a quality adhesive for secure installation. For areas prone to moisture, consider using a waterproofing membrane. Proper preparation ensures a long-lasting and attractive backsplash.
How Difficult Is It To Install A Tile Backsplash In A Kitchen?
Installing a tile backsplash in a kitchen can be moderately challenging. Basic DIY skills and patience help. Proper tools, precise measurements, and careful preparation are crucial. Beginners might take longer, but with tutorials, it’s manageable. Consider professional help for intricate designs or large areas for best results.
Conclusion
Installing a tile backsplash in your kitchen is rewarding. It adds style and value. Follow steps carefully. Measure and plan before starting. Choose tiles that match your kitchen theme. Prepare the wall properly. Use the right tools. Lay tiles with precision.
Grout and clean for a perfect finish. Take your time. Enjoy the process. Your new backsplash will impress guests and uplift your space. Transform your kitchen into a lively spot. A great DIY project. Simple yet impactful. Feel proud of your achievement.
Now, your kitchen shines with charm and personality.