How to Install Kitchen Tile: Step-by-Step Guide
Executive Chef & Lead Commercial Kitchen Specialist at Daily Kitchup Test Lab
Transforming your kitchen can be as simple as installing new tiles, and you might be surprised at how much you can do on your own. Imagine walking into your kitchen and being greeted by a fresh, stylish look that you created yourself.
Installing kitchen tile might seem daunting, but with the right guidance, you can achieve a professional finish without hiring a pro. Are you ready to revamp your space and impress your guests? In this guide, you’ll discover straightforward steps to tackle this DIY project, boosting both your confidence and your home’s appeal.
Keep reading to unlock the secrets to a stunning kitchen transformation that’s easier than you think.
Choosing The Right Tile
Choosing the right tile for your kitchen is crucial. It affects the room’s look and feel. With so many options available, making a choice can be overwhelming. This section will guide you through key considerations for selecting kitchen tiles.
Material Options
Different materials offer varied benefits. Ceramic tiles are popular for their durability and affordability. Porcelain tiles resist stains and are suitable for high-traffic areas. Stone tiles, like marble or granite, provide a natural and elegant appearance. Glass tiles add a modern touch and reflect light beautifully.
Color And Design Considerations
Color sets the mood of your kitchen. Light colors make small spaces appear larger. Dark tones add depth and drama. Consider your kitchen’s overall design theme. Tiles with patterns can create a focal point. Solid colors offer a clean and simple look. Mix and match for a unique style.
Tile Size And Shape
Tile size influences the visual space in your kitchen. Large tiles cover more area with fewer grout lines, creating a seamless look. Smaller tiles can highlight specific areas. Shapes vary from square to rectangular. Hexagonal tiles add a trendy touch. Consider the space you have and the effect you want to create.
Credit: petiteglimmers.com
Gathering Necessary Tools
Gather essential tools like a tile cutter, trowel, and level to ensure a smooth kitchen tile installation. Keep spacers, adhesive, and grout nearby for seamless workflow. Proper preparation ensures efficiency and quality in your tiling project.
Gathering the necessary tools for your kitchen tile installation is a crucial first step. Having the right equipment not only makes the job easier but also ensures that your work is precise and professional-looking. Before diving into the project, let’s ensure your toolbox is well-stocked and ready for action.Essential Tools And Equipment
You’ll need a few essential tools to get the job done right. Start with a tile cutter or wet saw, which is vital for cutting tiles to fit around edges and corners. A trowel is needed to spread adhesive evenly on the floor. Keep a notched trowel handy as well, as it helps in creating grooves for better tile adhesion. A level ensures your tiles lay flat and even, preventing future cracking or uneven surfaces. A rubber mallet helps gently tap tiles into place without damaging them. Finally, a tile spacer ensures even spacing between tiles for a uniform look.Safety Gear
Safety should never be an afterthought. Protect your eyes from tile shards with a pair of safety goggles. Your hands are your most valuable tools, so invest in some sturdy gloves to prevent cuts and injuries. A dust mask is also crucial, especially if you’re using a tile saw that creates dust. This small step can prevent you from inhaling harmful particles. Consider wearing knee pads. They provide comfort and support when you’re working on your knees for extended periods. As you gather these tools and gear, visualize the smooth rhythm of cutting, placing, and securing each tile. Have you ever started a project only to realize halfway through that you’re missing a tool? Preparing in advance saves time and frustration. With the right tools and safety gear, you’re not just ready to start your kitchen tile installation; you’re set to do it with confidence and precision.Preparing The Surface
Preparing the surface is crucial for a flawless kitchen tile installation. A well-prepared surface ensures tiles adhere properly and last longer. This process involves cleaning, leveling, and applying primer. Let’s dive into each step to make your kitchen tile project a success.
Cleaning And Leveling
Start by thoroughly cleaning the surface. Remove dirt, grease, and old adhesive. Use a mild detergent and warm water for effective cleaning. Scrub the surface gently to avoid damage. Rinse with clean water and let it dry completely.
Next, check for any uneven areas. Use a level to find high spots or dips. High spots need sanding down for a smooth finish. For dips, apply a leveling compound. Spread it evenly with a trowel and let it dry. A smooth surface is essential for tile adherence.
Applying Primer
Applying primer helps tiles stick better. Choose a primer suitable for your surface type. Apply it with a roller or brush. Cover the entire area evenly. This creates a strong bond for the tile adhesive.
Ensure the primer dries completely. Check the drying time on the product label. A dry primer layer is crucial for the next steps. Now, your surface is ready for tile installation.
Planning The Layout
Carefully plan the kitchen tile layout to ensure a balanced and appealing design. Measure the area and mark guidelines for precise tile placement. Consider tile size and pattern for a cohesive look.
Planning the layout is a crucial step in installing kitchen tiles. A well-thought-out layout saves time and reduces material waste. It ensures the finished look is both functional and visually pleasing. Before you begin, take time to carefully plan.Measuring The Space
Accurate measurements are the foundation of a successful tile installation. Use a measuring tape to determine the width and length of the kitchen floor. Write down these measurements for reference. Multiply the width by the length to find the total area. This helps in calculating the number of tiles needed. Don’t forget to account for extra tiles. About 10% more than the calculated area covers any mistakes or future repairs.Creating A Layout Plan
Sketch the kitchen floor on graph paper. Mark doors, cabinets, and appliances. This visual aid helps in planning tile placement. Decide on a starting point, often the center of the room. This ensures symmetry and balance. Experiment with tile patterns on paper. Options include straight, diagonal, or herringbone layouts. Each pattern gives a different aesthetic feel. Align the tiles with major elements in the kitchen. This alignment creates a harmonious look. Use spacers to maintain consistent gaps between tiles. This makes grout lines even and aesthetically pleasing.Cutting The Tiles
Cutting tiles is a crucial step in your kitchen tile installation journey. Getting a precise cut ensures that tiles fit perfectly, especially around edges and corners. Precision cutting not only enhances the aesthetic appeal but also reduces wastage. Are you ready to learn the secrets to cutting tiles like a pro?
Using A Tile Cutter
A tile cutter is an essential tool in achieving clean, straight cuts. It’s especially useful for ceramic tiles. Place the tile on the cutter, align the cutting wheel with your marked line, and apply steady pressure. A quick snap is usually all it takes to break the tile along the scored line.
Consider investing in a high-quality cutter if you have a big project ahead. It can save you time and frustration. Remember, practice makes perfect, so try a few test cuts before starting on your actual tiles. Have you ever tried using a tile cutter before?
Handling Odd Shapes And Corners
Not all tiles will fit perfectly into your kitchen layout. Odd shapes and corners require a bit more finesse. A wet saw is your best friend here, allowing you to make intricate cuts with ease. It’s perfect for porcelain tiles and awkward angles.
Mark the tile carefully, and always wear safety gear when using a wet saw. For small nooks, consider using tile nippers. They allow you to carefully chip away at the tile, giving you more control. What creative solutions have you come up with for tricky tile cuts?
Applying Adhesive
Applying adhesive evenly is crucial for a lasting kitchen tile installation. Spread the adhesive with a notched trowel to ensure uniform coverage. Press tiles firmly into place for a secure bond.
Applying adhesive is a critical step in installing kitchen tile. It ensures that your tiles stay put for years to come. Think about the adhesive as the glue that holds your masterpiece together. Get it right, and you’re halfway to a stunning kitchen transformation. But how do you choose the right adhesive and apply it effectively?Choosing The Right Adhesive
Selecting the perfect adhesive depends on various factors like tile type, kitchen environment, and budget. Ceramic tiles might require different adhesives than porcelain tiles. If your kitchen frequently deals with moisture, prioritize adhesives designed for damp areas. Consulting experts at your local hardware store can provide valuable insights. They might have personal experience or feedback from other customers that can help you make an informed decision.Techniques For Applying Adhesive
Before you start, ensure the surface is clean and free of debris. This step is crucial for the adhesive to bond properly. Use a notched trowel to spread the adhesive evenly across the surface. Consider how your tiles will align by laying out a few without adhesive first. This will help you visualize the final layout and make necessary adjustments. Using a back-butter method can enhance adhesion for larger tiles. Apply adhesive on both the tile and the wall for extra grip. How you apply the adhesive can make a significant difference in the longevity of your tiles. Are you ready to see your kitchen transform with your own hands?Laying The Tiles
Begin by preparing the surface, ensuring it is clean and dry. Apply adhesive evenly, then press each tile firmly into place. Use spacers for consistent gaps, and check alignment frequently for a neat finish.
Laying the tiles in your kitchen is an exciting step that transforms your space into a stylish and functional area. This part of the installation process is crucial, as it sets the foundation for the rest of your tile work. The goal is to create a smooth, even surface that looks great and lasts for years. You’ll need a careful approach and some helpful tips to ensure success.Starting Point Tips
Begin by choosing a focal point in your kitchen where the tiles will naturally draw attention. It could be the center of the room or along a prominent wall. Consider the layout of your tiles. Do you prefer a straight pattern or a diagonal one? Whichever you choose, plan it out to avoid misalignment. Having a clear starting point helps you maintain direction and consistency. A laser level or chalk line can assist in marking your starting lines.Ensuring Even Spacing
Even spacing is essential for a professional finish. Use tile spacers to keep tiles equidistant, ensuring clean lines and a polished look. Think about the grout width that suits your kitchen’s style. Thin grout lines offer a modern aesthetic, while thicker lines can add a rustic touch. Check your progress frequently. Small adjustments can prevent larger issues down the line, maintaining uniformity throughout the installation. Now, what does your kitchen tile layout look like? Are you envisioning sleek modern lines or a more intricate pattern?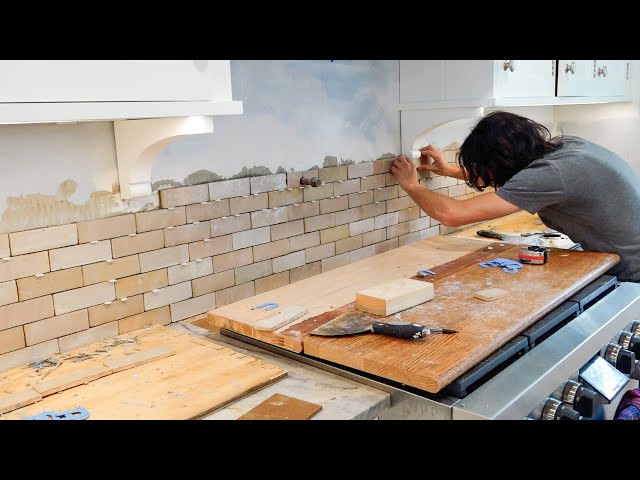
Credit: www.youtube.com
Grouting The Tiles
Grouting the tiles ensures a durable and clean finish for your kitchen. Properly fill gaps between tiles with grout using a rubber float. Wipe away excess grout with a damp sponge for a smooth surface.
Grouting the tiles adds the final touch to your kitchen tile installation. It seals the tiles and fills the gaps, giving a polished look. Proper grouting prevents moisture from seeping beneath the tiles. This ensures durability and a clean finish. Follow these steps to grout your tiles like a pro.Mixing Grout Properly
Start with the right grout type for your tiles. Check the manufacturer’s instructions on the grout package. Pour the grout powder into a clean bucket. Add water slowly, stirring as you pour. Mix until the grout reaches a creamy consistency. Avoid lumps for a smooth application. Let the grout sit for about ten minutes. Stir again before using it.Applying Grout Effectively
Use a rubber float to apply grout over the tiles. Hold the float at a 45-degree angle. Spread the grout diagonally across the tiles. Press firmly to fill the gaps between tiles. Wipe off excess grout with the float. Move the float across the tiles’ surface at an angle. Use a damp sponge to clean grout from tile surfaces. Rinse the sponge often to avoid leaving grout haze. Let the grout dry for about 24 hours. After drying, polish the tiles with a clean cloth.Cleaning And Sealing
Cleaning and sealing kitchen tiles is crucial for longevity. Begin by thoroughly cleaning the tiles to remove dust and debris. Apply a high-quality sealant to protect the tiles from stains and moisture, ensuring a durable and pristine finish.
Cleaning and sealing kitchen tiles are crucial steps in tile installation. They ensure durability and appearance. After laying the tiles, removing excess grout is necessary. This prevents a messy look and ensures a smooth surface. Sealing adds a protective layer, enhancing the tiles’ lifespan.Removing Excess Grout
Start by letting the grout dry slightly. This usually takes around 15-30 minutes. Use a damp sponge to wipe the tiles gently. Move the sponge in a diagonal direction. Rinse the sponge frequently in clean water. Avoid applying too much pressure. This can remove grout from between the tiles. Once the excess grout is gone, let the tiles dry for a few hours. Inspect for any remaining haze on the tiles. Use a dry cloth to polish the surface.Applying Sealant
Choose a sealant suitable for your tile type. Read the instructions on the sealant package. Pour a small amount of sealant onto a clean cloth. Apply it evenly across the tile surface. Ensure the entire tile is covered. Let the sealant sit for the recommended time. Usually, this takes about 5-10 minutes. Use a clean cloth to wipe off any excess sealant. Allow the tiles to cure for at least 24 hours. This ensures the sealant sets properly. Regularly check and reapply the sealant every few years. This keeps your kitchen tiles looking new and protected.Troubleshooting Common Issues
Installing kitchen tiles can transform your space, but sometimes, unexpected issues arise. Whether it’s uneven tiles or cracks, knowing how to troubleshoot these problems can save you time and stress. Let’s dive into some practical solutions to keep your tile project on track.
Fixing Uneven Tiles
Uneven tiles can disrupt the aesthetic of your kitchen. Often, they occur due to an uneven subfloor or incorrect adhesive application.
- Start by checking the subfloor level with a spirit level. Any noticeable dips or rises? Level it out with a self-leveling compound.
- Ensure you’re using the right amount of adhesive. Too much can cause tiles to shift, while too little may lead to gaps.
- Consider using tile spacers to maintain uniform gaps between tiles. They help in achieving a smooth, even finish.
If the tiles are already laid, consider removing the uneven ones and reapplying them with extra care. Double-checking your work can make all the difference.
Dealing With Cracks
Cracks in tiles are frustrating, often caused by heavy impact or subfloor movement. But don’t despair – there are ways to tackle this issue.
- Assess the damage first. Is the crack small or large? A small crack might be hidden using a matching epoxy or filler.
- For larger cracks, replacing the tile might be necessary. Carefully remove the damaged tile using a chisel and hammer.
- Prepare the area for a new tile by cleaning out old adhesive and ensuring the subfloor is stable. This prevents future cracks.
It’s worth considering why the crack occurred. Is there a pattern in your kitchen? Identifying the root cause can prevent repeat issues.
Remember, each tile tells a story. Are yours telling the right one?

Credit: www.youtube.com
Frequently Asked Questions
Can I Install Kitchen Tiles Myself?
Yes, you can install kitchen tiles yourself. Ensure you have the right tools and materials. Watch tutorials for guidance. Prepare the surface properly before starting. Follow each step carefully for a successful DIY project.
Can A Beginner Install A Kitchen Backsplash?
Yes, a beginner can install a kitchen backsplash. Follow tutorials for guidance and use the right tools. Choose easy-to-install materials like peel-and-stick tiles for a hassle-free experience. Preparation and patience are key for a successful DIY backsplash installation. Always ensure accurate measurements for a perfect fit.
Do You Need Cement Board For Kitchen Tile?
Cement board is recommended for kitchen tile installations. It provides stability and moisture resistance, essential for lasting tiles. Ensure a secure base to prevent tile cracks. Properly installed cement board enhances tile durability and minimizes future repairs. Always follow manufacturer guidelines for best results.
What Goes Behind Tile In A Kitchen?
Behind kitchen tiles, you typically find a moisture-resistant backer board. It’s essential for durability and preventing water damage. Use thin-set mortar to adhere tiles securely. Proper installation ensures a long-lasting and attractive backsplash or wall. Ensure walls are clean and smooth before applying any materials.
Conclusion
Installing kitchen tile is a rewarding project. It adds style and function. Use the right tools for the best results. Measure and plan carefully before starting. Always choose quality tiles for durability. Follow steps to ensure a smooth process. Clean and prepare the area thoroughly.
Take your time to lay tiles evenly. Grouting is the final touch for a polished look. A well-installed tile can transform your kitchen space. Feel proud of your work and enjoy the new design. With patience and effort, you can achieve a beautiful kitchen finish.
Happy tiling!

Similar Posts





















