How to Put Tile on Wall in the Kitchen: Expert Guide
Are you looking to give your kitchen a fresh and stylish makeover? Putting tile on your kitchen wall is a game-changer.
Not only does it protect your walls, but it also adds a touch of elegance and personality to your cooking space. Imagine walking into your kitchen and being greeted by a stunning backsplash that reflects your taste. Curious about how to achieve this transformation on your own?
In this guide, you’ll discover simple, step-by-step instructions to tile your kitchen wall like a pro. Whether you’re a DIY enthusiast or a complete beginner, by the end of this article, you’ll have the confidence and know-how to tackle this rewarding project. So, are you ready to elevate your kitchen’s aesthetic without breaking the bank? Let’s dive in and get those walls looking fantastic!

Credit: www.tilemountain.co.uk
Choosing The Right Tile
Selecting tiles for kitchen walls involves considering style, durability, and ease of cleaning. Opt for ceramic or porcelain tiles for a sleek and practical choice. Ensure proper spacing and adhesive for a secure installation.
Choosing the right tile for your kitchen wall is a pivotal step in transforming your space into a stylish and functional area. The tile you select will not only impact the aesthetic appeal but also the durability and maintenance of your kitchen walls. With a plethora of options available, it can be overwhelming to make a choice. Let’s dive into some key aspects to consider.Types Of Tiles
The variety of tiles available can make or break your kitchen design. Ceramic tiles are popular for their affordability and versatility. They come in various colors and patterns, making it easy to find a style that suits your taste. Porcelain tiles, on the other hand, offer enhanced durability and are perfect for areas that experience higher moisture levels. If you’re aiming for a touch of luxury, natural stone tiles like marble or granite can add a sophisticated feel, though they require more maintenance. What type of tile resonates with your lifestyle and kitchen needs?Tile Sizes And Shapes
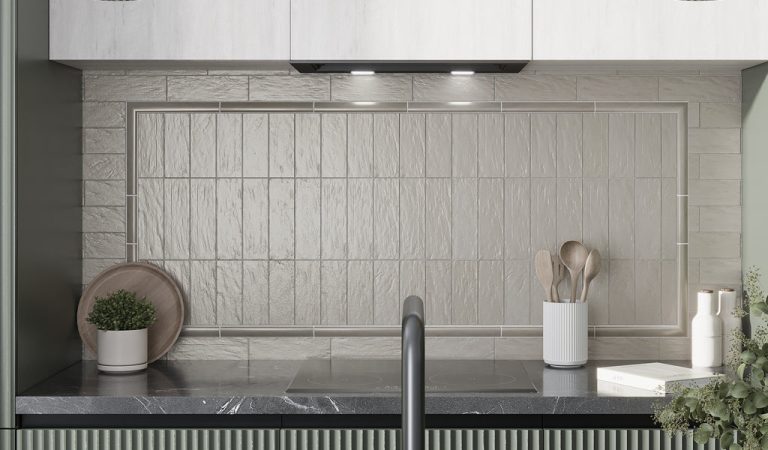
Size matters when choosing your kitchen wall tiles. Large tiles can make a small kitchen appear more spacious by minimizing grout lines. However, smaller tiles can add intricate detail and texture, ideal for creating eye-catching backsplashes. Don’t forget about shapes—hexagonal tiles can add a modern twist, while rectangular subway tiles offer classic charm. Which size and shape will create the desired impact in your kitchen?Color And Finish Options
The color and finish of your tiles can dramatically influence the mood of your kitchen. Light-colored tiles can brighten up the space, making it feel open and airy. Dark tiles can add depth and a sense of elegance but might require more frequent cleaning to avoid showing dirt. Matte finishes provide a subtle look and are less prone to showing fingerprints, while glossy finishes can make your kitchen shine but might be more slippery. Do you prefer a vibrant kitchen or a calm and serene environment? Choosing the right tile involves balancing style, functionality, and maintenance. By considering these aspects, you’ll be well-equipped to select tiles that not only elevate your kitchen’s design but also cater to your practical needs.Preparing The Wall
Clean the wall thoroughly to remove dirt and grease. Ensure the surface is smooth and dry for tile adhesion. Prime the wall if needed to improve grip, creating a solid base for the tiles.
Preparing the Wall Before transforming your kitchen with vibrant tiles, it’s essential to prepare the wall properly. A well-prepared surface ensures your tiles stick perfectly and last for years. Let’s dive into how you can get your wall ready for tiling.Cleaning The Surface
Start with a clean slate. Dust, grease, and grime can prevent tiles from adhering properly. Use a damp cloth and a mild detergent to wipe the wall. Pay extra attention to areas around the stove where grease tends to accumulate. Once cleaned, let the wall dry completely. A dry surface is crucial for effective tiling. Consider using a fan to speed up the drying process if you’re in a rush.Repairing Imperfections
A smooth wall is the foundation of a successful tiling project. Scan your wall for cracks or holes. These imperfections can cause tiles to misalign or pop off over time. Fill in cracks with spackle or joint compound. This might seem tedious, but it’s worth the effort. Once filled, sand down the area until it’s smooth and even with the rest of the wall.Priming The Wall
Priming is your secret weapon for long-lasting tiles. It creates a solid base that helps tiles adhere better and prevents moisture from seeping through. Choose a primer suited for your wall type. Apply it evenly using a roller for a smooth finish. Wait until the primer is completely dry before moving on to the next step. Have you ever skipped a step in wall preparation and faced consequences? Share your experiences below and let’s learn together!Gathering Necessary Tools
Before tiling the kitchen wall, gather essential tools like a notched trowel, tile spacers, and a level. Ensure you have a tile cutter and adhesive suitable for your tiles. Keep a sponge and bucket for easy cleaning.
Gathering the right tools is the first step in tiling your kitchen wall. Without the proper equipment, your task might become challenging and frustrating. Ensuring you have everything at hand will make the job smoother and more enjoyable. Let’s explore the essential tools and safety gear you need for this project.Essential Tools List
To start tiling, gather these crucial tools. They are necessary for a successful kitchen wall tile installation.- Tile Cutter:It helps cut tiles to fit corners.
- Notched Trowel:Useful for spreading adhesive evenly.
- Tile Spacers:They ensure even gaps between tiles.
- Level:Keeps your tiles straight and aligned.
- Rubber Grout Float:Spreads grout into tile joints.
- Sponge:Cleans excess grout and adhesive.
- Measuring Tape:Measures tile and wall dimensions.
- Bucket:For mixing adhesive or grout.
- Pencil:Marks cutting lines on tiles.
Safety Equipment
Safety should never be an afterthought. Protect yourself while tiling with these essential items.- Safety Glasses:Protects your eyes from tile shards.
- Gloves:Shields your hands from cuts and chemicals.
- Dust Mask:Prevents inhalation of dust and debris.
- Knee Pads:Provides comfort when kneeling for long periods.
Measuring And Planning
Measuring and planning are crucial for tiling kitchen walls. Accurate measurements ensure tiles fit perfectly, reducing waste and time. Planning the layout helps avoid awkward cuts and aligns tiles with kitchen features.
Measuring and planning are crucial steps before tiling your kitchen wall. Proper preparation saves time and prevents costly mistakes. Begin by assessing the area and understanding the layout. This guides you in selecting the right quantity and design.Calculating Tile Quantity
Measure the height and width of the wall. Multiply these to find the area. Consider cutting and wastage. Usually, add 10% extra tiles. This ensures you have enough for adjustments or mistakes. Always round up your order to the next box.Design Layout Planning
Choose a design that complements your kitchen decor. Consider patterns like subway, herringbone, or grid. Use graph paper to sketch your layout. This helps visualize tile placement. Plan for focal points like the area behind the stove. It draws the eye and highlights your design.Marking Guidelines
Start by marking a vertical center line on the wall. This ensures symmetry. Use a level to draw a horizontal line at the base. This acts as a guide for your first row. Mark where each tile will sit. This prevents alignment errors during installation.Applying Adhesive
Apply adhesive evenly to the kitchen wall using a notched trowel. Ensure full coverage for proper tile adhesion. Let the adhesive set slightly before positioning tiles to avoid movement.
Applying adhesive correctly is a crucial step when you’re putting tile on a kitchen wall. It ensures that your tiles stay secure and look professional. The right adhesive, applied evenly, makes all the difference in the world. But how do you know which adhesive to choose and how to spread it properly? Let’s dive into these important aspects.Choosing The Right Adhesive
Choosing the correct adhesive isn’t just about sticking tiles to the wall—it’s about ensuring they stay there for years to come. Kitchen environments can be humid and greasy, so selecting an adhesive that’s moisture and heat-resistant is key. Consider using a thin-set mortar for ceramic tiles, which is durable and versatile. If you’re working with glass tiles, a white adhesive is better to avoid any discoloration. Always check the manufacturer’s instructions on the adhesive packaging for compatibility with your chosen tiles. Have you ever tried using the wrong adhesive and faced a sticky situation? It’s a mistake you won’t want to repeat.Spreading Adhesive Evenly
Once you’ve chosen the right adhesive, it’s time to apply it evenly. Use a notched trowel to spread the adhesive over the wall, creating grooves that help the tiles stick better. Keep the trowel at a consistent angle to ensure an even spread. The grooves should be uniform to prevent any tiles from sitting higher or lower than others. Work in small sections to keep the adhesive from drying out before you lay the tiles. Have you noticed how a rushed job leads to uneven surfaces? Taking your time here pays off in the long run. Applying adhesive isn’t just about sticking tiles—it’s about crafting a foundation for your kitchen’s new look. Are you ready to start tiling with confidence?Placing The Tiles
Placing tiles on a kitchen wall requires careful preparation and planning. Start by measuring the area and cutting tiles to fit. Apply adhesive evenly and press each tile firmly into place.
Placing tiles on your kitchen wall can transform the space. It is a rewarding project that adds elegance and functionality. With the right approach, you can achieve a professional finish.Starting From The Center
Begin placing tiles from the center of the wall. This ensures symmetry and balance. Measure the wall’s width and height to find the center point. Mark it using a pencil or chalk. Align the first tile with this center mark. Extend outward from this point, keeping the tiles aligned. This method helps avoid awkward cuts at the wall’s edges.Using Tile Spacers
Tile spacers ensure even gaps between tiles. These small tools are essential for uniform grout lines. Place spacers at the corners of each tile as you lay them. This maintains consistent spacing and aids in achieving a neat finish. Remove the spacers once the adhesive dries. This step is crucial for a polished look.Cutting Tiles For Edges
Cut tiles to fit the edges with precision. Use a tile cutter or wet saw for accurate cuts. Measure the space at the wall’s edge and mark the tile accordingly. Carefully cut the tile to fit. This step is important for corners and edges where full tiles don’t fit. Properly cut tiles complete the layout, giving a clean, finished appearance.Grouting The Tiles
Applying grout to kitchen wall tiles enhances durability and seals gaps. Spread grout evenly, pushing it into joints. Wipe excess with a damp sponge for a smooth finish.
Grouting the tiles in your kitchen is the final step in tiling. It binds the tiles together and fills the gaps. This process gives your kitchen walls a polished, finished look. Proper grouting ensures durability and enhances the beauty of your tiled walls. Below, we explore key steps in the grouting process.Mixing Grout Properly
Mixing grout is a crucial step. Start by reading the grout package instructions. It guides you on the right grout-to-water ratio. Use a clean bucket for mixing. Gradually add water to the grout powder. Stir the mixture with a spatula or paddle. Aim for a creamy, peanut butter-like consistency. Avoid lumps for smooth application.Applying Grout Evenly
Use a rubber float to apply grout. Hold the float at a 45-degree angle. Spread the grout diagonally across the tiles. This ensures the grout fills the gaps completely. Work in small sections to avoid drying. Apply consistent pressure for even distribution. Remove excess grout as you go.Cleaning Excess Grout
Allow the grout to set slightly. Use a damp sponge to clean excess grout. Wipe in circular motions. Rinse the sponge frequently to avoid smearing. Keep the sponge damp, not wet. Excess water can weaken the grout. After cleaning, let the grout cure according to package instructions.
Credit: www.tilemountain.co.uk
Sealing And Finishing
Sealing and finishing tiles in the kitchen ensures durability and a polished look. Apply grout to fill gaps, then seal to protect. Finish by cleaning the surface for a neat appearance.
Sealing and finishing is crucial for wall tiles in the kitchen. It protects tiles from moisture and stains, ensuring a lasting look. Proper sealing helps maintain the kitchen’s cleanliness. It also enhances the overall appearance of the tiled area. Let’s explore how to seal and finish tiles effectively.Choosing A Sealant
Selecting the right sealant is vital. It depends on the tile type and kitchen environment. Ceramic tiles may need a different sealant than natural stone. Consider a sealant that offers water resistance and durability. Look for options that match the kitchen’s humidity level. This ensures long-lasting protection and easy maintenance.Applying Sealant
Application should be careful and precise. Ensure tiles are clean and dry before starting. Use a brush or roller to apply the sealant evenly. Cover all grout lines and tile surfaces. Allow the sealant to dry completely. Follow the manufacturer’s instructions for drying time. This step prevents moisture from seeping into the tiles.Polishing The Tiles
Polishing adds a final touch to the kitchen tiles. It enhances their shine and smoothness. Use a soft cloth or polishing pad for best results. Buff the tiles gently until they gleam. Regular polishing keeps tiles looking new and vibrant. It also helps in maintaining their durability and appeal.Maintenance Tips
Properly clean the wall surface before tiling. Ensure tiles are evenly spaced using spacers for a professional finish. Apply adhesive carefully to secure tiles in place, and use a level for alignment. Grout tiles after adhesive dries to complete the look.
Maintaining your kitchen wall tiles not only enhances the beauty of your space but also ensures their longevity. With the hustle and bustle that often occurs in the kitchen, it’s vital to keep your tiles in top shape. Let’s dive into some practical maintenance tips to keep your tiles looking their best.Regular Cleaning
Regular cleaning is key to preserving the shine and durability of your kitchen wall tiles. A simple wipe-down with a damp cloth after cooking can prevent grease and dirt build-up. Use a mild detergent or tile cleaner weekly to keep them sparkling. Remember, consistent cleaning prevents grime from settling in, making it easier to maintain over time.Dealing With Stains
Stains are inevitable, especially in a busy kitchen. Address them promptly to avoid permanent marks. For instance, coffee or tomato stains can be tackled with a mixture of baking soda and water. Rub gently with a soft cloth and rinse. If a stubborn stain persists, consider using a specialized tile stain remover. What methods have you found effective in dealing with kitchen stains?Inspecting For Damage
Regularly inspecting your tiles for damage can save you from costly repairs. Look for cracks or chips, as these can worsen over time. If you notice any, consider replacing the damaged tile immediately. Also, check the grout lines for wear and tear. Re-grouting might be necessary if gaps appear. A careful inspection can keep your kitchen looking pristine and prevent further issues down the line.
Credit: www.designcafe.com
Frequently Asked Questions
Where To Start Tiling A Kitchen Wall For Beginners?
Begin tiling at the center of the wall for balanced design. Use a level to ensure straight lines. Mark a horizontal line as a guide. Work from the bottom upwards, applying adhesive evenly. Adjust tiles as needed for even spacing.
Trim tiles to fit corners and edges neatly.
How To Put Tiles On A Wall In A Kitchen?
Clean the wall thoroughly. Apply tile adhesive evenly. Press tiles firmly onto the wall. Use spacers for uniform gaps. Let adhesive dry completely. Grout the tiles using a rubber float. Wipe off excess grout with a damp sponge. Seal the grout to prevent stains.
Enjoy your new kitchen tiles!
What Is The Best Way To Attach Tiles To A Wall?
Use thin-set mortar for strong tile adhesion on walls. Ensure surface is clean and level before starting. Apply mortar with a notched trowel and place tiles firmly. Allow proper curing time before grouting. Follow manufacturer’s instructions for best results.
How To Prep A Kitchen Wall For A Tile Backsplash?
Clean the wall thoroughly and remove any old wallpaper or debris. Repair holes or cracks using spackle. Sand the wall for a smooth surface. Apply a suitable primer to ensure better tile adhesion. Measure and plan tile layout before installation to ensure accuracy and symmetry.
Conclusion
Putting tile on a kitchen wall can transform the space. It’s a straightforward process. Start with clean and dry walls. Measure carefully to avoid mistakes. Use the right tools for cutting and placing tiles. Apply adhesive evenly for strong tiles.
Grout fills the gaps and seals the tiles. Check for level and alignment as you work. Patience is key for a flawless finish. A tiled kitchen wall adds style and easy cleaning. Take your time and enjoy the results. Your kitchen deserves a fresh look with new tiles.