How to Install Kitchen Cabinet Doors Evenly: Expert Tips
Are you tired of looking at your uneven kitchen cabinet doors and wishing for a quick fix? Installing cabinet doors evenly might seem like a daunting task, especially if you’ve never done it before.
But guess what? It doesn’t have to be. With a bit of guidance and the right tools, you can transform your kitchen space into a more organized and visually appealing area. Imagine opening your cabinets and seeing perfectly aligned doors every time.
This guide is designed to help you achieve just that, with simple, step-by-step instructions. Ready to give your kitchen the makeover it deserves? Let’s dive in!
Tools And Materials Needed
Proper tools and materials are essential for installing kitchen cabinet doors evenly. Gather a screwdriver, level, hinges, and screws. Ensure all items are of good quality for a smooth installation.
Installing kitchen cabinet doors evenly requires precise tools and materials. Having the right equipment ensures a smooth and accurate installation. This section outlines essential items that will help you achieve professional-looking results.
Tools Required
- Drill: A power drill speeds up the installation process.
- Screwdriver: Essential for tightening screws securely.
- Measuring Tape: Accurate measurements ensure proper alignment.
- Level: Keeps cabinet doors straight and even.
- Pencil: Marks positions for hinges and screws.
Materials Needed
- Cabinet Doors: Choose doors that fit your kitchen style.
- Hinges: Select durable hinges for long-lasting doors.
- Screws: Ensure screws match the hinges and doors.
- Wood Shims: Adjust door height easily with shims.
- Protective Gear: Safety goggles and gloves protect you during installation.
Proper tools and materials set the foundation for a successful project. Keep these items handy to streamline your cabinet installation process.
Preparing The Cabinets
Aligning cabinet doors evenly requires careful preparation. Measure and mark hinge positions accurately for consistent alignment. Use a level to ensure precise door placement.
Preparing the cabinets is a crucial step in installing new cabinet doors evenly. A smooth surface ensures proper alignment and a polished finish. Start by removing the old doors, then clean and repair surfaces for a perfect installation.
Removing Old Doors
Begin by unscrewing the hinges from each cabinet door. Use a screwdriver or power drill for efficiency. Carefully detach the doors, avoiding damage to the cabinet frame. Set aside old doors if you plan to reuse or recycle them. Inspect the hinges and decide if replacements are necessary.
Cleaning And Repairing Surfaces
Once doors are off, clean the cabinet surfaces thoroughly. Use a gentle cleaner to remove grease and grime. Inspect the wood for scratches, dents, or peeling paint. Sand any rough spots for a smooth finish. Fill holes or gaps with wood filler and let it dry. Ensure surfaces are ready for the new doors.
Measuring For New Doors
Measuring for new kitchen cabinet doors is crucial for a perfect fit. Proper measurements ensure that your new doors align and function well. Let’s explore how to measure accurately.
Accurate Measurements
Begin by measuring the height and width of each cabinet opening. Use a tape measure for precision. Write down each measurement. Consistency is key. Double-check your measurements to avoid errors. Measure at least twice to confirm accuracy.
Consider the thickness of the cabinet material. This affects how the doors will fit. Standard thickness is often around ¾ inch. If your cabinets differ, adjust measurements accordingly.
Considering Door Overlaps
Think about the desired door overlap. Overlap is how much one door covers the cabinet frame. Common overlaps range from ½ inch to 1 inch. Decide on your overlap preference before ordering doors.
Measure the space between adjacent doors. Ensure they won’t collide when opened. Leave a small gap, about ⅛ inch, between doors. This prevents binding and ensures smooth operation. Proper spacing helps maintain even alignment.

Credit: www.familyhandyman.com
Choosing The Right Hinges
Selecting quality hinges is crucial for kitchen cabinet door installation. Ensure alignment for smooth opening and closing. Proper hinge choice prevents sagging and maintains door position.
Choosing the right hinges for your kitchen cabinet doors is a crucial step in ensuring they hang evenly and function smoothly. The type of hinge and its placement can dramatically impact the look and usability of your cabinets. Selecting the best hinge involves understanding their types and knowing where to position them for optimal performance.
Types Of Hinges
There are several types of hinges you might consider, each offering unique benefits. Butt hinges are a classic choice, often providing sturdy support for heavier doors. If you’re aiming for a clean look, concealed hinges are the way to go, as they remain hidden when the door is closed. European hinges are popular for their adjustability, allowing you to tweak the door alignment easily. Your choice should align with your cabinet style and personal preference. Think about the weight and material of your cabinet doors. Heavier doors might require more robust hinges.
Hinge Placement
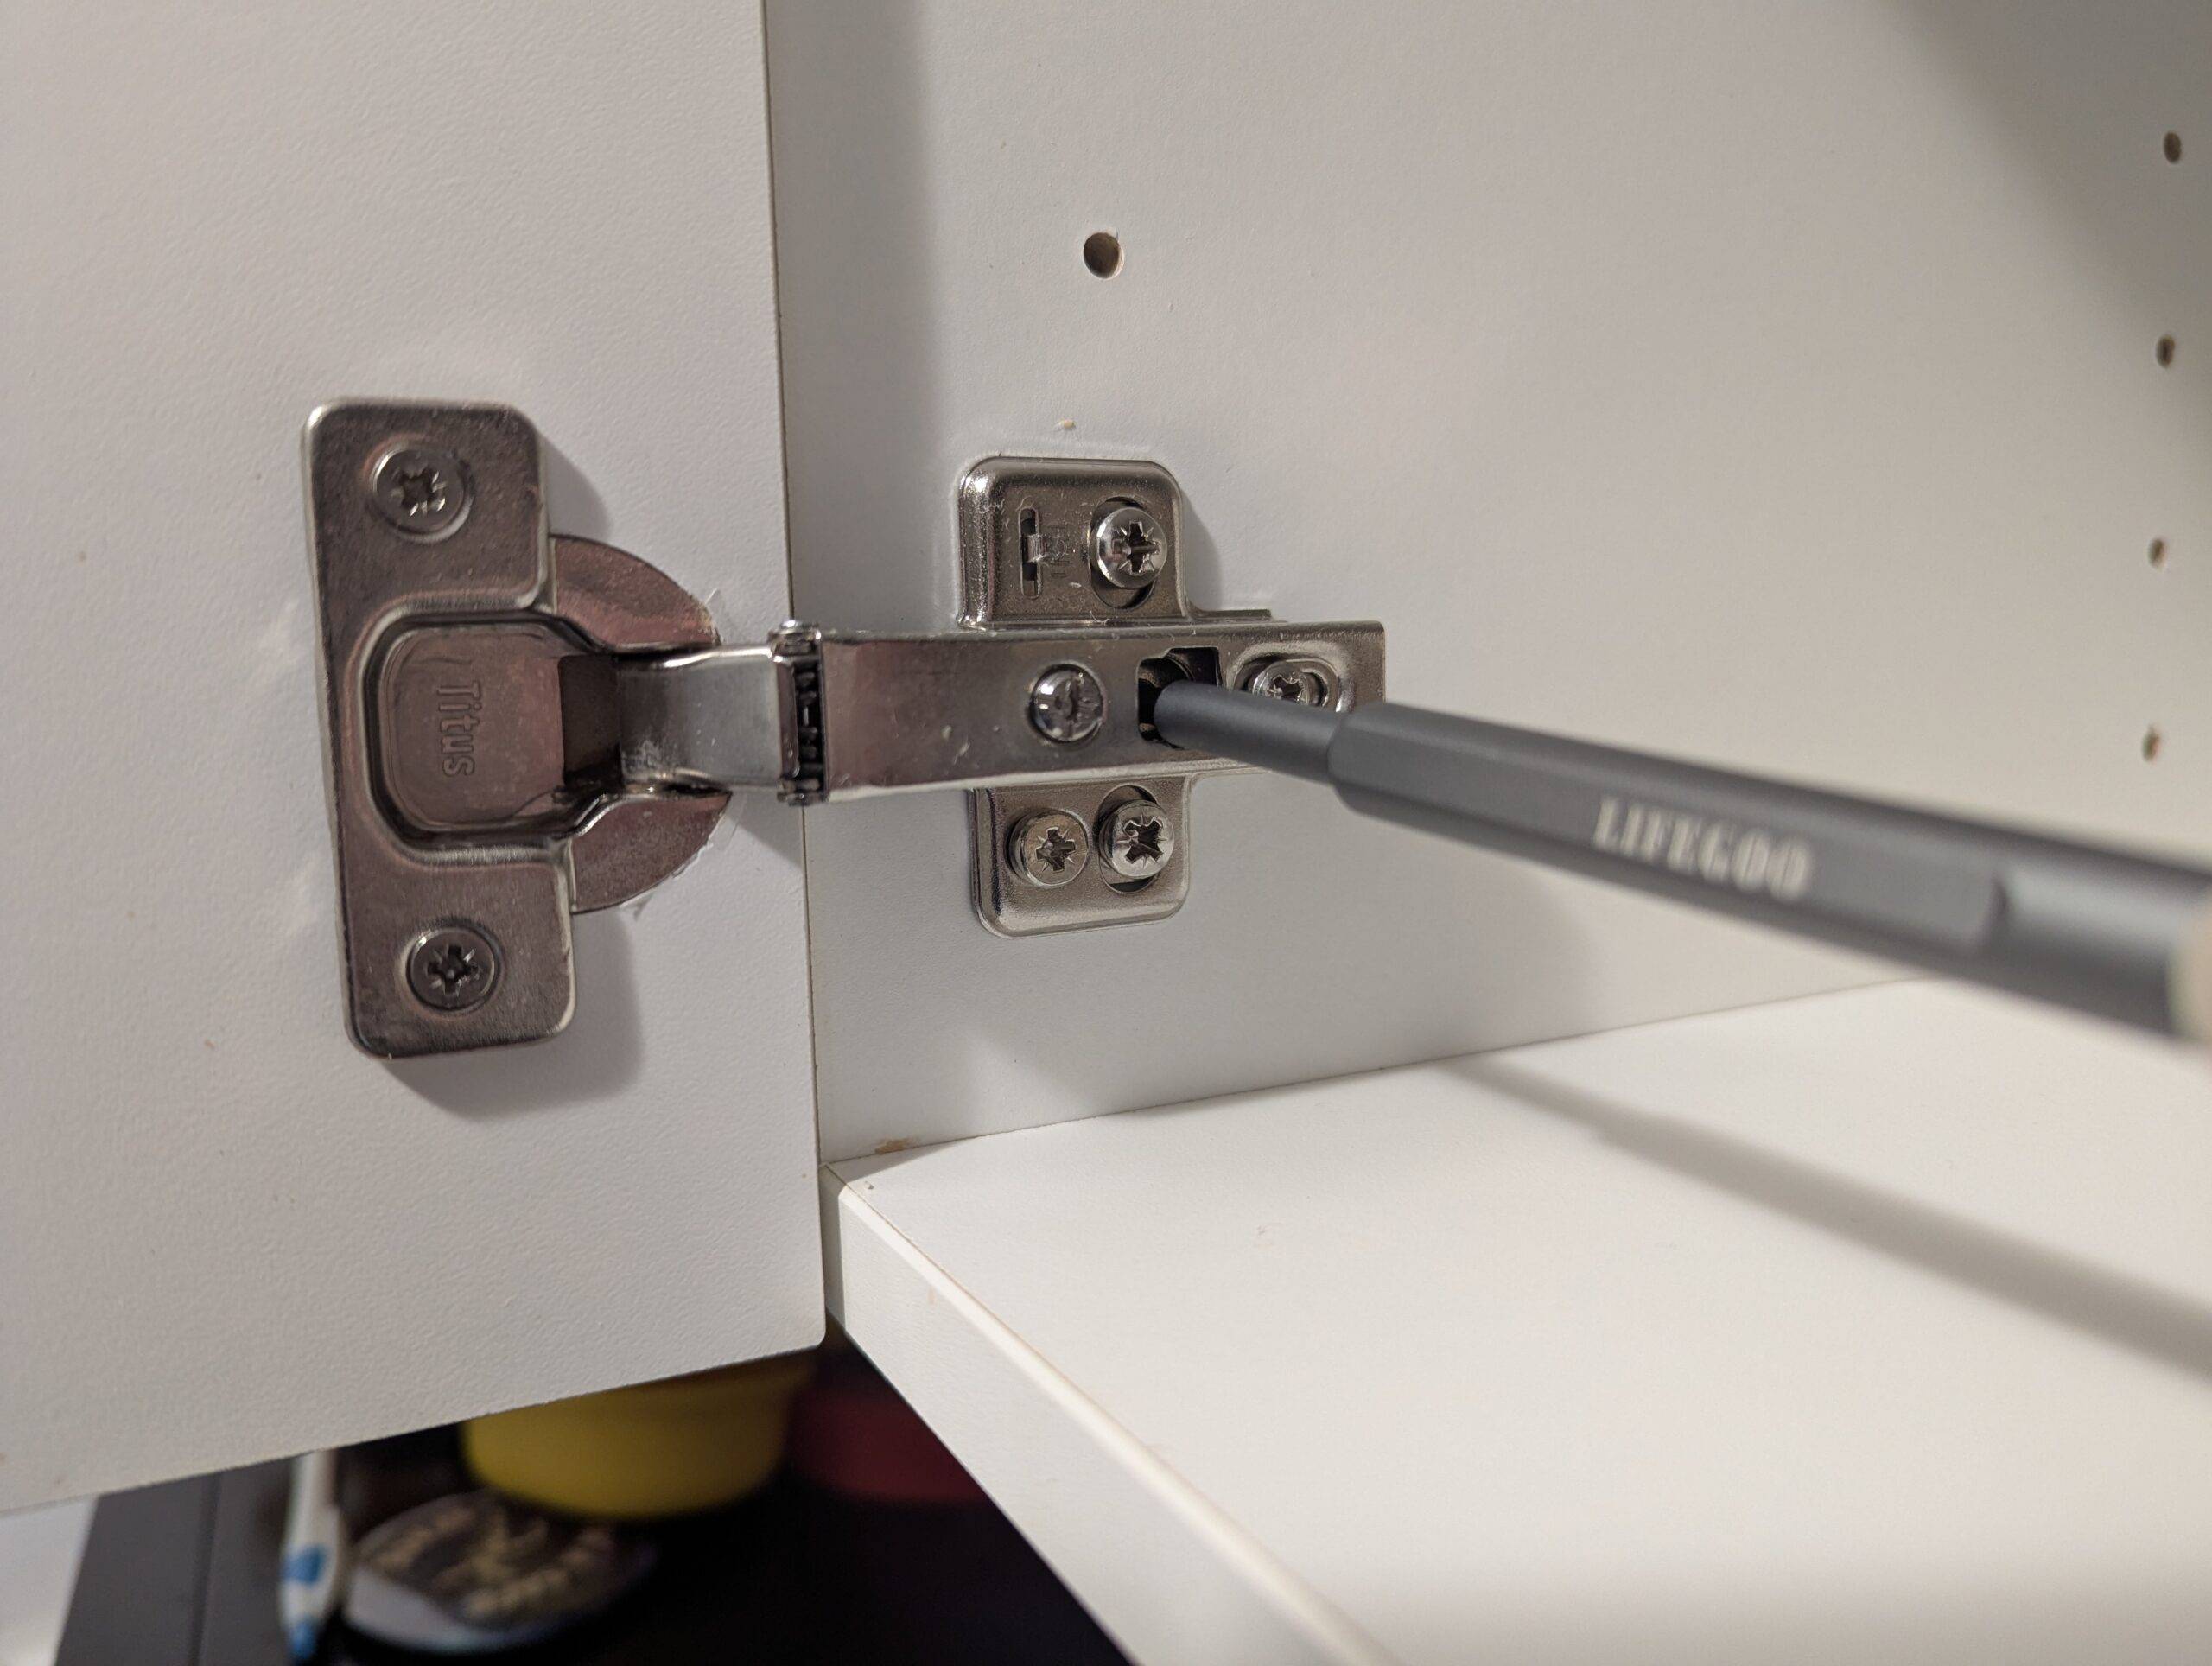
Proper hinge placement is just as important as choosing the right type. Typically, you’ll want to place one hinge about 2 inches from the top of the door and another 2 inches from the bottom. This spacing provides balanced support. For taller doors, consider adding a third hinge in the center for extra stability. Before drilling, mark the spots and double-check your measurements. A slight misalignment can lead to uneven hanging or poor door function. What if your doors don’t align perfectly after installation? Adjustments can usually be made with a screwdriver, especially if you’ve chosen adjustable hinges.
Marking And Drilling Holes
Accurate marking and drilling ensure cabinet doors align perfectly. Use a template to mark drilling spots evenly. Double-check measurements before drilling to avoid errors.
Marking and drilling holes for kitchen cabinet doors might seem daunting, but with the right approach, it can be a breeze. The secret lies in precision and preparation, ensuring your doors hang evenly and operate smoothly. Let’s delve into the essential steps to achieve perfectly installed cabinet doors, starting with using a template and ensuring precise alignment.
Using A Template
Utilizing a template is a game-changer when marking holes for your cabinet doors. It not only speeds up the process but also significantly reduces errors. A simple cardboard or plastic template can help you replicate hole positions accurately across multiple doors. Have you ever found yourself frustrated with uneven holes? A template can save you time and aggravation by offering consistent results. Gather your template and a pencil, and align it with the top edge of the door. Mark the necessary points clearly where you will drill. By using a template, you eliminate guesswork. This tool is your best friend in achieving uniformity.
Ensuring Precise Alignment
Precise alignment is crucial to avoid doors that hang awkwardly or fail to close properly. Pay attention to the cabinet frame and the door’s position. Are they level? Use a spirit level to check alignment, and adjust as needed. Consider investing in a laser level for added accuracy. This can be especially helpful in larger kitchens where multiple doors need to align seamlessly. Double-check your marked points before drilling. Even a small deviation can lead to crooked doors. Taking your time to ensure precision will save you from headaches down the road. Would you rather redo a task or get it right the first time? Once confident in your markings, use a drill to make holes at the marked points. Remember, patience and precision are your allies in achieving a flawless kitchen cabinet installation.
Attaching The Hinges
Attaching the hinges correctly ensures even cabinet doors. Align hinges with the pre-drilled holes and secure tightly. This step keeps doors aligned and functional.
Attaching the hinges to your kitchen cabinet doors is a pivotal step in ensuring smooth functionality and aesthetic appeal. This process requires precision and patience, but once mastered, it can transform your kitchen space dramatically. Ever found yourself struggling with misaligned doors or uneven gaps? Properly attaching hinges is your secret weapon to avoid these common pitfalls. Let’s dive into the details to get those cabinet doors perfectly aligned.
Securing Hinges To Doors
Begin by selecting the right type of hinges for your cabinet doors. European-style hinges are popular for their adjustability and streamlined appearance. Position the hinge on the door, ensuring it’s centered on the designated spot. Mark the screw holes with a pencil for accurate placement. With a drill, carefully attach the hinge to the door using screws. Make sure the hinge is flush and secure, allowing for smooth movement. Remember, the devil is in the details. Double-check the tightness of your screws—loose hinges can lead to sagging doors over time.
Aligning Hinges With Cabinet Frame
Now, let’s focus on aligning these hinges with the cabinet frame. This step is crucial for achieving that seamless look and effortless door operation. Begin by marking the spots on the cabinet frame where the hinges will be attached. Measure twice to avoid any alignment errors. Attach the hinges to the cabinet frame using screws, ensuring they are level and aligned with the door hinges. Test the door movement by gently opening and closing it. Adjust the hinges if necessary to ensure smooth operation. Don’t rush this step. Proper alignment ensures your cabinet doors close snugly without gaps or uneven edges. Have you ever felt the satisfaction of perfectly aligned cabinet doors? It’s a game changer in both functionality and aesthetics. Follow these steps to achieve that flawless finish.
Mounting The Doors
Installing kitchen cabinet doors evenly requires patience and precision. Measure carefully and use a level to align the doors. Secure hinges firmly for a smooth, balanced finish.
Mounting the Doors Mounting kitchen cabinet doors evenly can transform the look and functionality of your kitchen. It’s a task that requires precision but is entirely manageable with a little patience. A properly mounted door enhances the aesthetic appeal of your kitchen and ensures smooth operation over time.
Adjusting Door Position
Start by holding the cabinet door against the frame to check alignment. Use a pencil to mark where the hinges will attach. Drill pilot holes carefully to avoid splitting the wood. Secure the hinges with screws, but don’t tighten them completely just yet. This allows you to make any necessary adjustments. Check the gaps between the door and the cabinet frame, ensuring they are even on all sides.
Checking Door Swing
Test the door swing by opening and closing it a few times. It should move smoothly without any obstruction. If it sticks, you might need to adjust the hinges slightly. Make sure the door remains level and doesn’t sag over time. Tighten the screws once you’re satisfied with the door’s movement. How does your door swing feel? If it’s not quite right, a minor tweak can make a significant difference. Don’t rush this part; taking your time here saves you future headaches.
Ensuring Even Alignment
Installing kitchen cabinet doors evenly creates a polished look. Proper alignment ensures functionality. Misaligned doors can cause issues. Learn how to keep them even with simple steps.
Using A Level
A level is essential for even cabinet doors. Place it on top of the door. Check the bubble to see if it’s centered. Adjust the door slightly until the bubble is in the middle. This confirms the door is level. Repeat for each door to ensure consistency.
Making Final Adjustments
After leveling, check the gaps between doors. They should be uniform. Use a screwdriver to adjust hinges if needed. Tighten or loosen screws to align the doors. Ensure they open and close smoothly. Recheck the level to confirm everything stayed aligned.
Finishing Touches
After successfully mounting your kitchen cabinet doors, the finishing touches are crucial to ensure your cabinets not only look good but function seamlessly. It’s these small details that add personality and ensure everything operates smoothly. Let’s dive into how you can perfect these final steps.
Securing Knobs And Handles
Choosing the right knobs and handles can transform the look of your cabinets. Opt for designs that complement your kitchen style. Whether you love a classic look or a modern aesthetic, your handles should reflect that.
Before drilling, measure twice to ensure they’re perfectly aligned. Uneven handles can ruin the symmetry of your cabinets. A handy tip is to use a template or a jig to maintain consistency across all doors.
Once you’re ready, carefully drill holes and secure your knobs or handles using the screws provided. It’s a simple task, but precision is key. A wobbling handle can be annoying, so make sure they’re tightly fastened.
Inspecting For Smooth Operation
With your doors and handles in place, it’s time to test for smooth operation. Open and close each cabinet door to ensure they glide effortlessly. This step is all about feeling; do the doors swing smoothly, or is there resistance?
If you notice any sticking or misalignment, adjust the hinges. Sometimes, a slight tweak can make a world of difference. Tighten or loosen screws as needed, and if the problem persists, consider repositioning the hinges.
Listen for creaks or unusual noises. These could indicate loose screws or misaligned doors. Addressing them now will prevent bigger issues down the road.
Your kitchen is a hub of activity. Wouldn’t it be great to have it both stylish and functional? By focusing on these finishing touches, you ensure that your kitchen cabinets not only look amazing but work efficiently, too. What small details can you tweak today for a better kitchen experience?
Credit: www.manmadediy.com

Credit: www.familyhandyman.com
Frequently Asked Questions
How To Make Uneven Cabinet Doors Even?
Adjust hinges using a screwdriver for alignment. Tighten screws to secure the doors. Check the cabinet level with a spirit level. Use shims for uneven surfaces. Ensure even spacing between doors for proper closure.
How To Fix Misaligned Kitchen Cabinet Doors?
Tighten or adjust the screws on the hinges using a screwdriver. Align the cabinet doors by loosening hinges slightly and repositioning them. Ensure the doors are level using a spirit level. Adjust the hinges vertically, horizontally, or in-depth as needed.
Check alignment and tighten the screws to secure.
How Do You Align Cabinet Doors?
To align cabinet doors, adjust the hinges using a screwdriver. Tighten or loosen screws for vertical alignment. Use the side screws to adjust horizontally. Check the spacing between doors and adjust accordingly. Test the doors to ensure they open and close smoothly without gaps or misalignment.
Do You Attach Hinges To Cabinet Door Or Frame First?
Attach hinges to the cabinet door first. This ensures precise alignment when mounting onto the frame. Proper installation enhances functionality and appearance. Always check hinge placement for accurate door swing.
Conclusion
Achieving evenly installed kitchen cabinet doors enhances your space. Start by gathering the right tools. Measure carefully to ensure precision. Align each door with patience. Double-check each hinge placement. Adjust as needed for a perfect fit. Take your time with every step.
A well-installed door adds beauty and function. Your kitchen will look neat and organized. Enjoy the satisfaction of a job well done. Don’t rush. Good results come with careful work. With these tips, your cabinet doors will impress. Happy installing and enjoy your refreshed kitchen space!